PC Games
• Orb
• Lasagne Monsters
• Three Guys Apocalypse
• Water Closet
• Blob Wars : Attrition
• The Legend of Edgar
• TBFTSS: The Pandoran War
• Three Guys
• Blob Wars : Blob and Conquer
• Blob Wars : Metal Blob Solid
• Project: Starfighter
• TANX Squadron
Tutorials
• 2D shoot 'em up
• 2D top-down shooter
• 2D platform game
• Sprite atlas tutorial
• Working with TTF fonts
• 2D adventure game
• Widget tutorial
• 2D shoot 'em up sequel
• 2D run and gun
• Roguelike
• Medals (Achievements)
• 2D turn-based strategy game
• 2D isometric game
• 2D map editor
• 2D mission-based shoot 'em up
• 2D Santa game
• 2D split screen game
• 2D quest game
• SDL 1 tutorials (outdated)
Latest Updates
The Legend of Edgar 1.38
Thu, 1st January 2026
SDL2 Quest game tutorial
Wed, 7th May 2025
SDL2 Versus game tutorial
Wed, 20th March 2024
Download keys for SDL2 tutorials on itch.io
Sat, 16th March 2024
The Legend of Edgar 1.37
Mon, 1st January 2024
Tags
• battle-for-the-solar-system (10)
• blob-wars (10)
• brexit (1)
• code (6)
• edgar (10)
• games (45)
• lasagne-monsters (1)
• making-of (5)
• match3 (1)
• numberblocksonline (1)
• orb (2)
• site (1)
• tanx (4)
• three-guys (3)
• three-guys-apocalypse (3)
• tutorials (18)
• water-closet (4)
Books

The Honour of the Knights (First Edition) (The Battle for the Solar System)
When starfighter pilot Simon Dodds is enrolled in a top secret military project, he and his wingmates begin to suspect that there is a lot more to the theft of a legendary battleship and an Imperial nation's civil war than either the Confederation Stellar Navy or the government are willing to let on.
— Simple 2D quest game —
Part 9: Towns, part 4
Note: this tutorial assumes knowledge of C, as well as prior tutorials.


Introduction
In the last part, we added buildings that could be entered via doors. What we're missing now is the town residents, whom the robot can interact with. In this part, we're going to set about populating the town. Each resident will have a name, can be spoken to, and will also have a profession, if they were assigned to a building when they were added to the town. The building itself will also be given a type, to aid this.
Extract the archive, run cmake CMakeLists.txt, followed by make, and then use ./quest09 to run the code. As before, you can move around with the WASD control scheme. To speak to a resident, simply walk into them. A dialog box will be displayed as they speak. Press Space or Enter to dismiss the box. Notice how each resident is displayed in grey before they are interacted with, to help us know whom we have yet to meet. When you're finished, close the window to exit.
Inspecting the code
There is actually quite a bit we need to do to add our residents. We could, of course, have simply added the entities to the town and called it a day, but we want them to talk to them, have different dialogs, have names, and also have professions (although these won't actually impact our game).
Let's start with the changes we've made to structs.h. First, we've updated Building:
struct Building
{
	int         type;
	BoundingBox bounds;
	Building   *next;
};
We've added the `type` field, that will determine the type of building. This will be a BT_ enum value, found in defs.h. Next, we've added the actual Resident struct:
typedef struct
{
	Entity     *town;
	Entity     *entity;
	Building   *building;
} Resident;
This struct will hold the extended data for a Resident entity (as part of its `data` field). `town` is the town entity to which the Resident belongs; `entity` is a reference to their own entity object (forming a two-way relationship), and `building` is the Building to which the Resident belongs (if any).
That should all be quite easy to follow, so let's now look at the changes to townGen.c. There are quite a number of updates here, so we'll start with generateTown:
void generateTown(Entity *e)
{
	Town *t;

	t = malloc(sizeof(Town));
	memset(t, 0, sizeof(Town));

	t->entity = e;

	generateTownName(e->name);
	e->data = t;

	// snipped

	assignBuildingTypes(t);

	addDoors(t);

	addResidents(t);

	// snipped
}
We're calling a few new functions here, generateTownName, assignBuildingTypes, and addResidents. We'll look at generateTownName a bit later on. For now, we'll move on to assignBuildingTypes:
static void assignBuildingTypes(Town *t)
{
	int       i, j, tmp, types[NUM_BUILDING_TYPES];
	Building *b;

	for (i = 0; i < NUM_BUILDING_TYPES; i++)
	{
		if (i < BT_MAX)
		{
			types[i] = i;
		}
		else
		{
			types[i] = BT_HOUSE;
		}
	}

	for (int i = NUM_BUILDING_TYPES - 1; i > 0; i--)
	{
		j = rand() % (i + 1);

		tmp = types[i];
		types[i] = types[j];
		types[j] = tmp;
	}

	i = 0;

	for (b = t->buildingHead.next; b != NULL; b = b->next)
	{
		b->type = types[i++];
	}
}
What this function does is randomly assign a building type to each building in the town. In our game, we'll be limited to one inn, bank, petshop, etc., but as many houses as we wish. We also want to make it so that not all towns will have a blacksmith, a takeaway, and such. To achieve this, what we do is fill an array with all the possible building types, plus a number of houses (NUM_BUILDING_TYPES is BT_MAX * 2). We then shuffle the array, to randomly order the elements. Finally, we loop through all our buildings, setting their `type` at the incrementing index of types as we go. This means that we will have a unique set of buildings, with normal houses being a lot more common.
With our building types randomly determined, we can move on to adding in the Residents themselves.
static void addResidents(Town *t)
{
	Entity      *e;
	int          i, n, x, y, attempts;
	Building    *b;
	BoundingBox *bb;
	Resident    *r;

	SDL_LogMessage(SDL_LOG_CATEGORY_APPLICATION, SDL_LOG_PRIORITY_INFO, "Creating Residents ...");

	for (b = t->buildingHead.next; b != NULL; b = b->next)
	{
		attempts = 100;

		if (b->type != BT_HOUSE || rand() % 2 == 0)
		{
			bb = &b->bounds;

			do
			{
				x = bb->x1 + (rand() % (bb->x2 - bb->x1));
				y = bb->y1 + (rand() % (bb->y2 - bb->y1));

				if (--attempts <= 0)
				{
					break;
				}
			} while (!canAddResidentAt(t, x, y));

			if (attempts > 0)
			{
				e = initEntity("Resident");
				e->x = x;
				e->y = y;

				r = (Resident *)e->data;
				r->town = t->entity;
				r->building = b;
			}
		}
	}

	n = 4 + rand() % 4;

	for (i = 0; i < n; i++)
	{
		attempts = 100;

		do
		{
			x = rand() % t->map.width;
			y = rand() % t->map.height;

			if (--attempts <= 0)
			{
				break;
			}
		} while (!canAddResidentAt(t, x, y));

		if (attempts > 0)
		{
			e = initEntity("Resident");
			e->x = x;
			e->y = y;

			r = (Resident *)e->data;
			r->town = t->entity;
		}
	}
}
There's not as much going on here as it first appears, and this function can be thought of as having to main parts. To start with, we're attempting to add residents to a building. We do so by looping through all the buildings in the town. If the building isn't a house, we definitely want to try to add in a resident, to act as the owner of the establishment. If the building is a house, there will be a 50/50 chance that the homeowner will not be there.
When it comes to adding in the resident to a building, we will make a limited number of attempts to do so (up to 100). We select a random point within the bounds of the building, and then make a call to canAddResidentAt (we'll come to this in a moment). Should the placement be successful, we'll create the Resident themselves, place them at the location (`x` and `y`), and then set their `town` and `building` data.
Next, we'll randomly scatter a number of other Residents throughout the town. As we're picking random locations, some will be out on the streets, while others will be inside buildings. In this part, those who end up inside buildings won't be assigned the building itself, as they are simply visiting. As in the first part, we'll set their `town` field to the current town.
So, in summary, we're simply adding in some Residents to our buildings and town streets.
Now to look at canAddResidentAt:
static int canAddResidentAt(Town *t, int rx, int ry)
{
	int     x, y, mx, my;
	Entity *e;

	for (x = -1; x <= 1; x++)
	{
		for (y = -1; y <= 1; y++)
		{
			mx = rx + x;
			my = ry + y;

			if (mx >= 0 && my >= 0 && mx < t->map.width && my < t->map.height && t->map.data[mx][my] >= TT_WALL)
			{
				return 0;
			}
		}
	}

	for (e = t->map.entityHead.next; e != NULL; e = e->next)
	{
		if (getDistance(x, y, e->x, e->y) <= 3)
		{
			return 0;
		}
	}

	return 1;
}
As expected, this function attempts to add a Resident at the given position (`rx`, `ry`). There are two checks performed - the first is that we want to ensure that there is space between the Resident and a wall; we don't want our residents to be jammed right up next to walls, which could result in areas becoming impassable (such as entrances to buildings). The next check ensures that there is also a distance of 3 units between the input position and any other entities (including doors) on the current map. Once again, we don't want everything to be clustered together, so performing this check ensures that the Residents don't block routes that the player wants to explore.
That's all the changes we've made to townGen.c, so next we can look at resident.c, where we're creating our Resident entity. As well as setting them up, we're also dealing with their various interactions. This compilation unit will eventually do some quest management for us. For now, the interactions are basic.
First off, we have initResident:
void initResident(Entity *e)
{
	Resident *r;

	if (unknownResidentTexture == NULL)
	{
		unknownResidentTexture = getAtlasImage("gfx/entities/unknownResident.png", 1);
	}

	r = malloc(sizeof(Resident));
	memset(r, 0, sizeof(Resident));

	r->entity = e;

	generateResidentName(e->name);

	e->type = ET_RESIDENT;
	e->solid = 1;
	e->texture = unknownResidentTexture;
	e->data = r;

	e->touch = touch;
}
Nothing taxing here, as we're just creating our Resident data. Note how we're initially setting the entity's texture to the greyscale image (unknownResident). This is flipped during the interaction. Also note we're calling generateResidentName, to give the Resident a random name.
We'll come to name generation in a short while. For now, let's look at the `touch` function:
static void touch(Entity *self, Entity *other)
{
	Resident *r;

	if (other == game.map->player)
	{
		r = (Resident *)self->data;

		if (self->texture == unknownResidentTexture)
		{
			self->texture = getAtlasImage(expiringFormattedString("gfx/entities/resident%d.png", 1 + (self->id % 7)), 1);
		}

		chat(r);
	}
}
When the player interacts with a Resident, by walking into them, we'll flip their texture to a colourful one, and then invoke the `chat` function. When flipping the texture, we're making use of the entity's `id`, to ensure consistency; due to the way we set our random seed, the entity will always have the same `id` when created for this world.
All simple enough. So, let's look at the `chat` function:
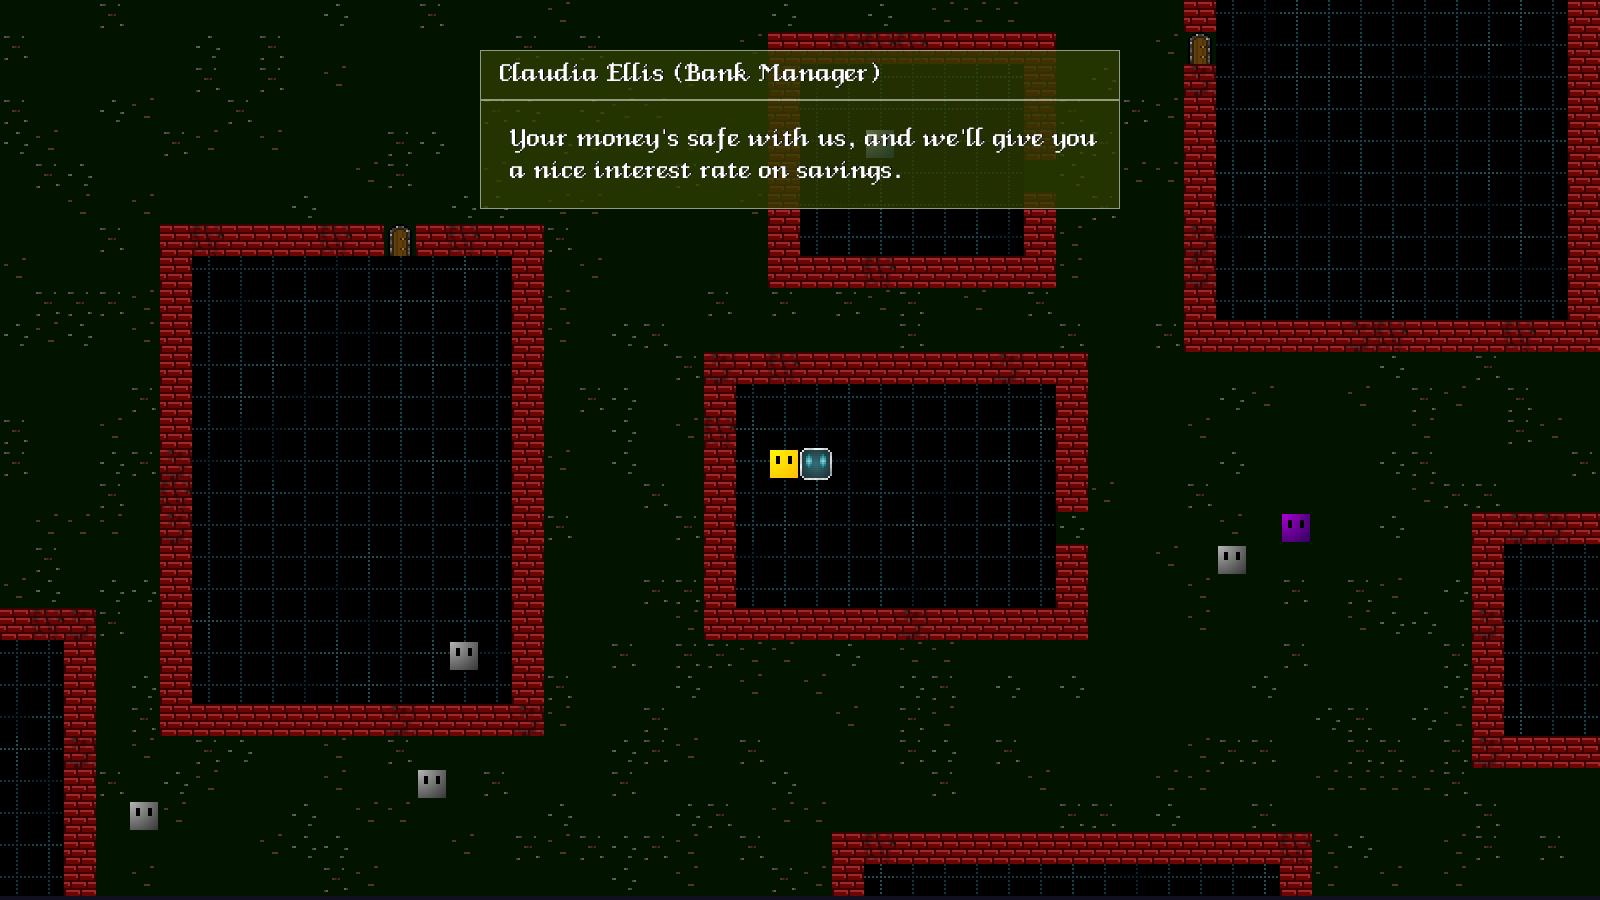
static void chat(Resident *r)
{
	char *text;
	char *speaker;

	if (r->building != NULL)
	{
		switch (r->building->type)
		{
			case BT_INN:
				text = "Need a room for the night?";
				speaker = expiringFormattedString("%s (Landlord)", r->entity->name);
				break;

			case BT_BLACKSMITH:
				text = "I can forge anything, me. Just need the materials.";
				speaker = expiringFormattedString("%s (Blacksmith)", r->entity->name);
				break;

			// snipped

			default:
				text = "I AM ERROR";
				break;
		}
	}
	else
	{
		speaker = r->entity->name;

		switch (strlen(speaker) % 12)
		{
			case 0:
				text = "Wow, a real life robot! How long does your battery last?";
				break;

			case 1:
				text = "I used to know a robot who looked just like you.";
				break;

			// snipped

			default:
				text = expiringFormattedString("Hello, my name is %s. Welcome to %s. I hope you enjoy your stay.", r->entity->name, r->town->name);
				break;
		}
	}

	addMessageBox(speaker, text);
}
The chat function basically displays a message box, with the name of the Resident, and some dialog text. The `text` of the dialog will depend on the Resident. Those who have a building assigned to them will deliver a fixed line, about their establishment. For example, a Resident assigned to an Inn will ask if the robot wants a room for the night. Note also that the `speaker` string includes the profession of the Resident, based on their `building`. So, the owner of the Inn will have the suffix "(Landlord)" added.
If the Resident isn't assigned to a building, they will either make a comment about the adventurer being a robot, or will introduce themselves, and welcome the robot to the town (using the name of the `town` we originally linked them against).
With the `speaker` and `text` strings determined, we call addMessageBox to display the message. The message box (including addMessageBox) uses the same logic as found in SDL2 Adventure, so we won't delve into how that works. Know only that the colour of the dialog box is determined by the value of `speaker`, to once again be consistent; the background will always be the same when speaking to this Resident. Those interested can investigate messageBox.c, to see how it all works.
That's mainly it for this part - we can now add in our Residents, assign them to buildings, and interact with them. Before finishing up, we'll take a look at the other things we've added, for some context.
First, let's look at how the name generation works, in nameGen.c. There are a number of functions here, that mostly do the same job. We'll take generateTownName as an example:
void generateTownName(char *name)
{
	int p, s;

	memset(name, 0, MAX_NAME_LENGTH);

	p = count(townPrefixes);
	s = count(townSuffixes);

	do
	{
		sprintf(name, "%s%s", townPrefixes[rand() % p], townSuffixes[rand() % s]);
	} while (!isUnique(name));
}
To create the name for our town, we'll pass over a char buffer (`name`) to fill (expected to be MAX_NAME_LENGTH in size). We'll then randomly choose a prefix and suffix from our list of townPrefixes and townSuffixes. With the two chosen, we use sprintf to join them together, into the `name` buffer. There's scope for some optimisation here, since we're counting the length of the arrays each time. Thankfully, this isn't a time critical operation, and also happens during our world generation, so we can get away with it.
Note that this function will loop until it creates a name that is not already in use, via isUnique:
static int isUnique(char *name)
{
	int i;

	for (i = 0; i < MAX_GENERATED_NAMES; i++)
	{
		if (strlen(generatedNames[i]) == 0)
		{
			STRCPY(generatedNames[i], name);
			return 1;
		}
		else if (strcmp(generatedNames[i], name) == 0)
		{
			return 0;
		}
	}

	SDL_LogMessage(SDL_LOG_CATEGORY_APPLICATION, SDL_LOG_PRIORITY_CRITICAL, "Out of name cache space.");

	return 0;
}
isUnique basically caches the generated names of our islands, towns, and residents, so that they are only assigned once. We don't want to have multiple towns and residents with the same name in our game. There is an upper limit of MAX_GENERATED_NAMES in our game, meaning we'll never be able to have more than a total of 256 (as defined) islands, towns, and residents. This is plenty of room for us, however. If we need more space, we can simply increase this value (or turn it into a linked list).
As for the name parts themselves, these live in a JSON file called names.json. It can be found in the data directory. Below is a short example of how this appears:
{
  "islandPrefixes": [
    "Time",
    "Man",
    "Day"
  ],
  "islandSuffixes": [
    "run",
    "duck",
    "jump"
  ],
  "townPrefixes": [
    "Lon",
    "West",
    "Man"
  ],
  "townSuffixes": [
    "don",
    "minister",
    "chester",
    "ford",
    "pool"
  ],
  "residentFirstNames": [
    "Arthur",
    "Bart",
    "Charlie",
    "Derek"
  ],
  "residentLastNames": [
    "Smith",
    "Jones",
    "Taylor",
    "Brown"
  ]
}
The actual file is much bigger than this, have many prefixes and suffixes for each type. As you can see, it is simply a list of names and words, forming the left and right parts of a pair. These are joined together as desired, to create a unique name.
Finally, we've made tweaks to various other files, to incorporate our updates. First up, we've updated the `logic` function in town.c:
static void logic(void)
{
	if (game.messageBoxHead.next == NULL)
	{
		doPlayer();

		// snipped
	}
	else
	{
		doMessageBox();
	}

	// snipped
}
When a message box is active, we want to take control away from the player until it is cleared.
Next, we've updated generateWorld (overworldGen.c):
void generateWorld(void)
{
	loading = 0;

	// snipped

	initNameGen();

	// snipped
}
A call to initNameGen prepares our name generation.
Lastly, we've updated generating.c, to setup our message box:
static void logic(void)
{
	loading += (0.4 * app.deltaTime);

	if (done)
	{
		game.map = &game.overworld.map;

		initQuestLog();

		initMessageBox();

		enterOverworld();

		app.transitionTimer = FPS / 2;

		app.expireStrings = 1;
	}
}
Once everything has finished generating, initMessageBox is invoked to ensure messages can be processed.
There we have it, our town is complete. We have buildings, doors, and people to talk to. The only thing missing is the ability to enter and exit Towns. Right now, our game is forcing us into a town, with no means to leave. Our next part will fix this, so we will finally be able to fully explore the world. There are many island to explore, towns to discover, and people to meet, and it's about time we were able to do so.
Purchase
The source code for all parts of this tutorial (including assets) is available for purchase, as part of the SDL2 tutorials bundle:
From itch.io