PC Games
• Orb
• Lasagne Monsters
• Three Guys Apocalypse
• Water Closet
• Blob Wars : Attrition
• The Legend of Edgar
• TBFTSS: The Pandoran War
• Three Guys
• Blob Wars : Blob and Conquer
• Blob Wars : Metal Blob Solid
• Project: Starfighter
• TANX Squadron
Tutorials
• 2D shoot 'em up
• 2D top-down shooter
• 2D platform game
• Sprite atlas tutorial
• Working with TTF fonts
• 2D adventure game
• Widget tutorial
• 2D shoot 'em up sequel
• 2D run and gun
• Roguelike
• Medals (Achievements)
• 2D turn-based strategy game
• 2D isometric game
• 2D map editor
• 2D mission-based shoot 'em up
• 2D Santa game
• 2D split screen game
• 2D quest game
• SDL 1 tutorials (outdated)
Latest Updates
The Legend of Edgar 1.38
Thu, 1st January 2026
SDL2 Quest game tutorial
Wed, 7th May 2025
SDL2 Versus game tutorial
Wed, 20th March 2024
Download keys for SDL2 tutorials on itch.io
Sat, 16th March 2024
The Legend of Edgar 1.37
Mon, 1st January 2024
Tags
• battle-for-the-solar-system (10)
• blob-wars (10)
• brexit (1)
• code (6)
• edgar (10)
• games (45)
• lasagne-monsters (1)
• making-of (5)
• match3 (1)
• numberblocksonline (1)
• orb (2)
• site (1)
• tanx (4)
• three-guys (3)
• three-guys-apocalypse (3)
• tutorials (18)
• water-closet (4)
Books

Project Starfighter
In his fight back against the ruthless Wade-Ellen Asset Protection Corporation, pilot Chris Bainfield finds himself teaming up with the most unlikely of allies - a sentient starfighter known as Athena.
— Simple 2D quest game —
Part 2: World map generation, part 2
Note: this tutorial assumes knowledge of C, as well as prior tutorials.


Introduction
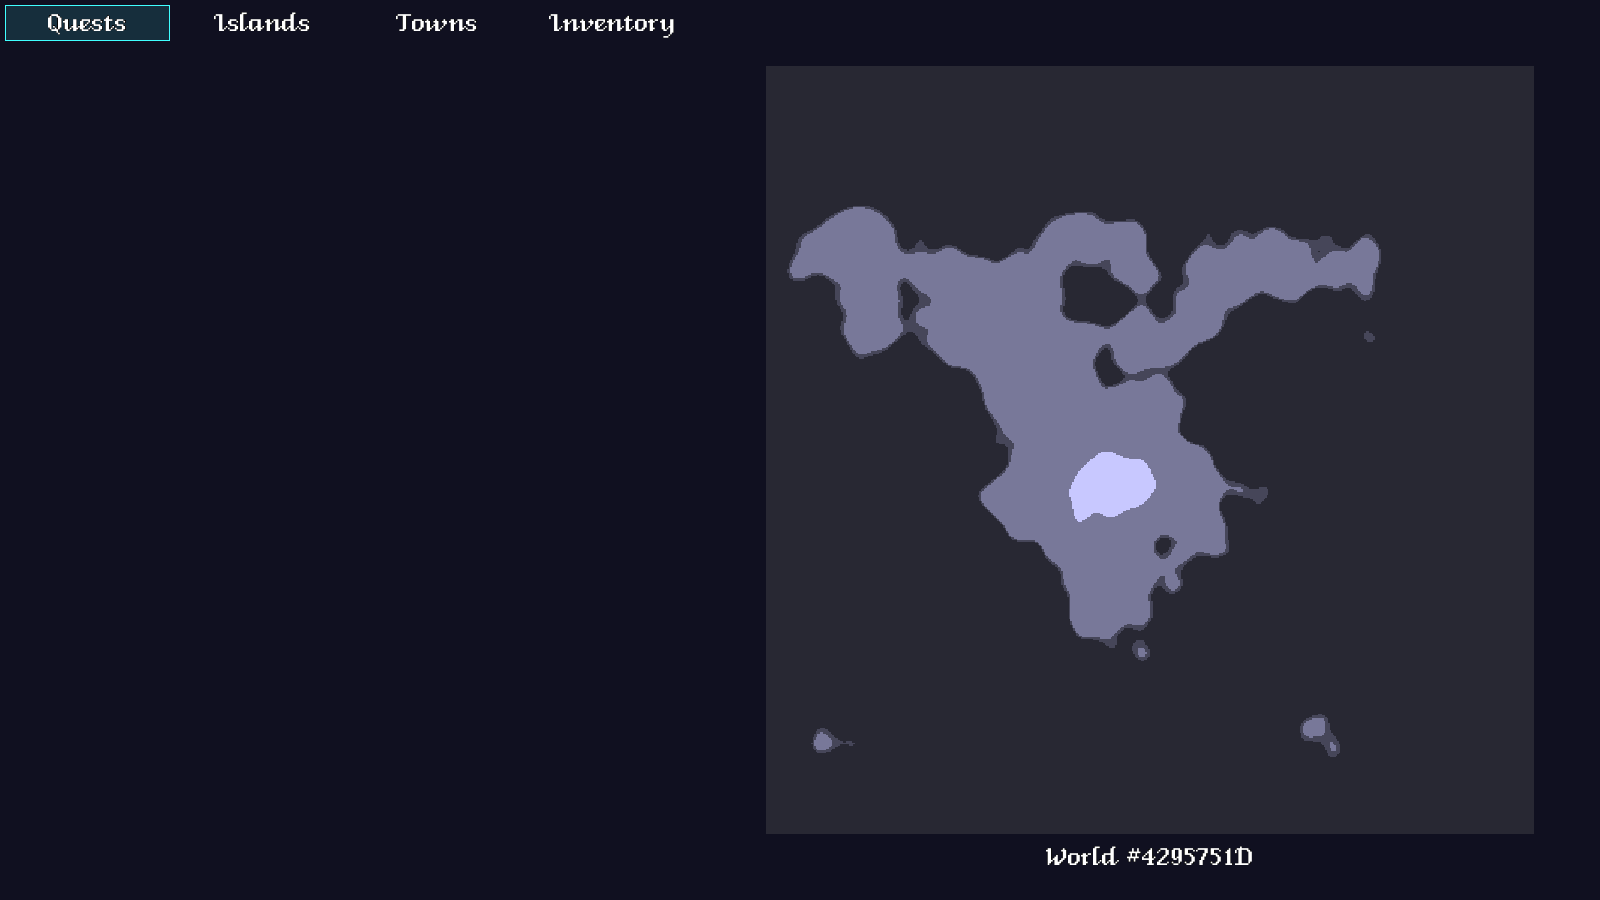
Our first attempt at world generation went very well. However, it's not quite what we wanted - we want islands, with a major continent in the middle of the map. In order to achieve this, we'll need to make some tweaks to the Perlin noise elevation data. This is much easier than it sounds, as we'll shortly see.
Extract the archive, run cmake CMakeLists.txt, followed by make, and then use ./quest02 to run the code. Open the Quest Log (Tab) to view the new world map, which will now look similar to the screenshot above, with a island system in place. You can scroll around the world using the WASD control scheme, as before. When you're finished, close the window to exit.
Inspecting the code
In order to create an archipelago and add more variety to our overworld map, we need only make changes to the generateOverworldWorker function. The expanded function can be seen further below. Before we get into it, we'll discuss the theory behind everything.
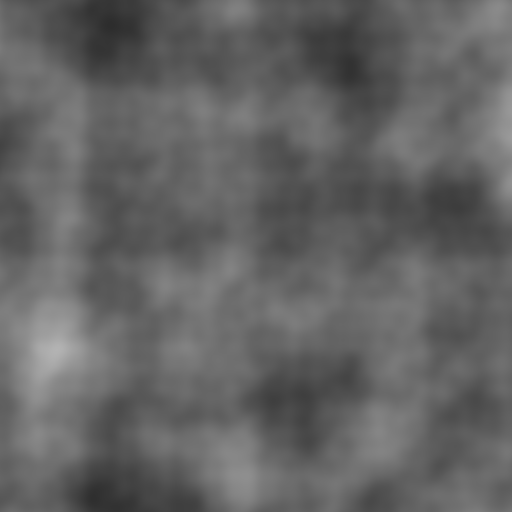
We want to ensure that we don't create landmasses near the borders of our world. One might think the easiest thing to do would be to simply set all the values around the edges to 0, thus making them water, but that results in a hard drop off, which isn't want we want; we want the land to naturally create complete landmasses, with shallows, in the middle of the map. In order to achieve this, what we do is lower the elevation of the map as we move away from the centre. Basically, we'll "fade" the edges, by progressively making the values lower.
Consider the image below:

As you can see, the colours grow darker as they move away from the centre. We'll use this technique to adjust the values of our elevation data, so that they naturally reduce.
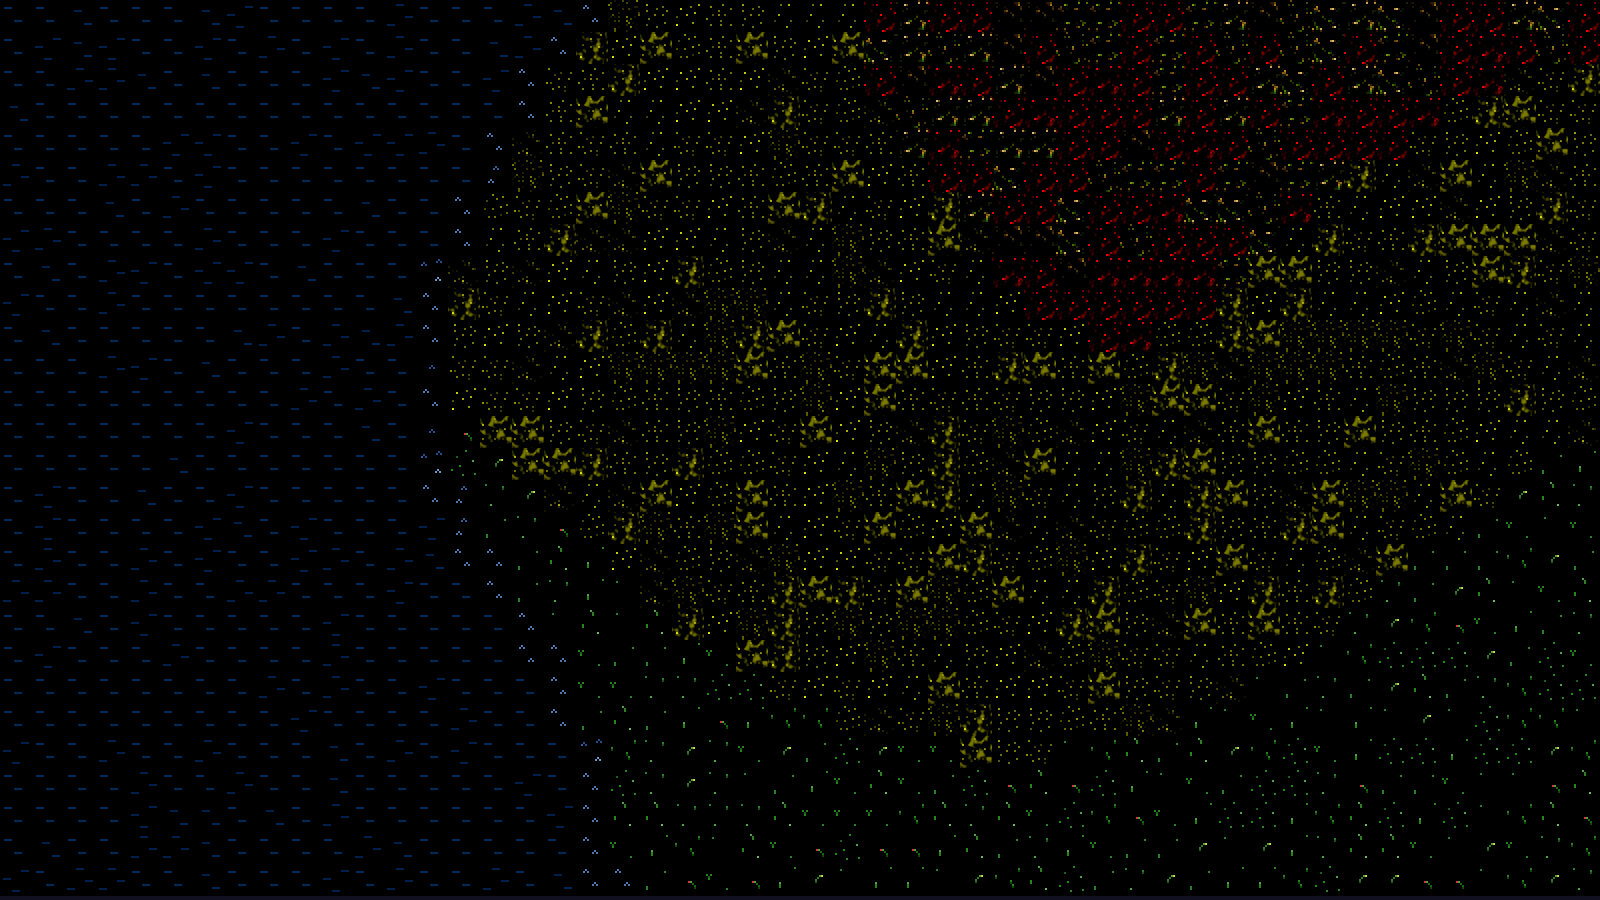
As well as the fade map, we're also producing another data set - a moisture map. This will be used to determine how much moisture exists at a certain point of the map. It is simply another Perlin noise map:
The approach we'll use is to lookup the moisture value over land and mountains, to then determine whether the land is forest or desert, and whether the mountains are snow capped.
With that summarised, let's look at the code. You should find this is pretty simple:
static int generateOverworldWorker(void *p)
{
	double   maxElevation, maxMoisture, e, m, f1, f2;
	int      x, y;
	double **elevation, **moisture;
	long     then;

	then = SDL_GetTicks();

	elevation = generatePerlinNoise(WORLD_WIDTH, WORLD_HEIGHT, rand());
	moisture = generatePerlinNoise(WORLD_WIDTH, WORLD_HEIGHT, rand());

	maxElevation = 0;
	maxMoisture = 0;

	game.overworld.map.width = WORLD_WIDTH;
	game.overworld.map.height = WORLD_HEIGHT;

	game.overworld.map.data = (int **)malloc(WORLD_WIDTH * sizeof(int *));

	for (x = 0; x < WORLD_WIDTH; x++)
	{
		game.overworld.map.data[x] = (int *)malloc(WORLD_HEIGHT * sizeof(int));

		for (y = 0; y < WORLD_HEIGHT; y++)
		{
			maxElevation = MAX(elevation[x][y], maxElevation);
			maxMoisture = MAX(moisture[x][y], maxMoisture);
		}
	}

	// fade edges
	for (x = 0; x < WORLD_WIDTH; x++)
	{
		f1 = fabs(x - WORLD_WIDTH / 2);
		f1 /= WORLD_WIDTH / 2;

		for (y = 0; y < WORLD_HEIGHT; y++)
		{
			f2 = fabs(y - WORLD_HEIGHT / 2);
			f2 /= WORLD_HEIGHT / 2;

			elevation[x][y] *= 1.55 - MAX(f1, f2);
		}
	}

	for (x = 0; x < WORLD_WIDTH; x++)
	{
		for (y = 0; y < WORLD_HEIGHT; y++)
		{
			e = elevation[x][y] / maxElevation;
			m = moisture[x][y] / maxMoisture;

			if (e < 0.6)
			{
				game.map->data[x][y] = MT_WATER;
			}
			else if (e < 0.61)
			{
				game.map->data[x][y] = MT_SHALLOWS;
			}
			else if (e < 0.9)
			{
				if (m < 0.3)
				{
					game.map->data[x][y] = MT_DESERT;
				}
				else if (m < 0.4)
				{
					game.map->data[x][y] = MT_SAVANNAH;
				}
				else if (m < 0.8)
				{
					game.map->data[x][y] = MT_LAND;
				}
				else
				{
					game.map->data[x][y] = MT_FOREST;
				}
			}
			else
			{
				if (m < 0.75)
				{
					game.map->data[x][y] = MT_MOUNTAINS;
				}
				else
				{
					game.map->data[x][y] = MT_SNOW;
				}
			}
		}
	}

	freePerlin(elevation, WORLD_HEIGHT);
	freePerlin(moisture, WORLD_HEIGHT);

	SDL_LogMessage(SDL_LOG_CATEGORY_APPLICATION, SDL_LOG_PRIORITY_INFO, "Overworld generated in %ldms\n", SDL_GetTicks() - then);

	worldGenDone();

	return 0;
}
First, we're generating a second Perlin noise map, and assigning it to `moisture`. And, as with our elevation data, we're determining the maximum moisture value (maxMoisture) during our map data setup step.
With that done, we're performing our "fade" step against the elevation data. Our calculation will only start fading the values halfway out from the centre; we don't want to begin our fade right away, since this will result in far smaller values. We also want to ensure we have one big island on the map. Also note that we're creating a "square" fade, rather than a circular one. A circular one will create a "fish-eye lens" effect, which will look quite unnatural, which we don't want.
With our edges nicely faded and our islands now done, we can turn our attention to the decoration step. This is, again, quite straightforward - at the same time as determining our tile type, we'll also inspect the moisture level at the same point. So, before, we were assigning MT_LAND to a tile between between 0.62 and 0.9. Now, we're also testing the moisture value (as `m`). If it's less than 0.3, for example, we'll assign the tile MT_DESERT. Slightly higher and it will be MT_SAVANNAH. MT_LAND follows this, and for high moisture levels, we'll create a forest (MT_FOREST).
The results look like this:
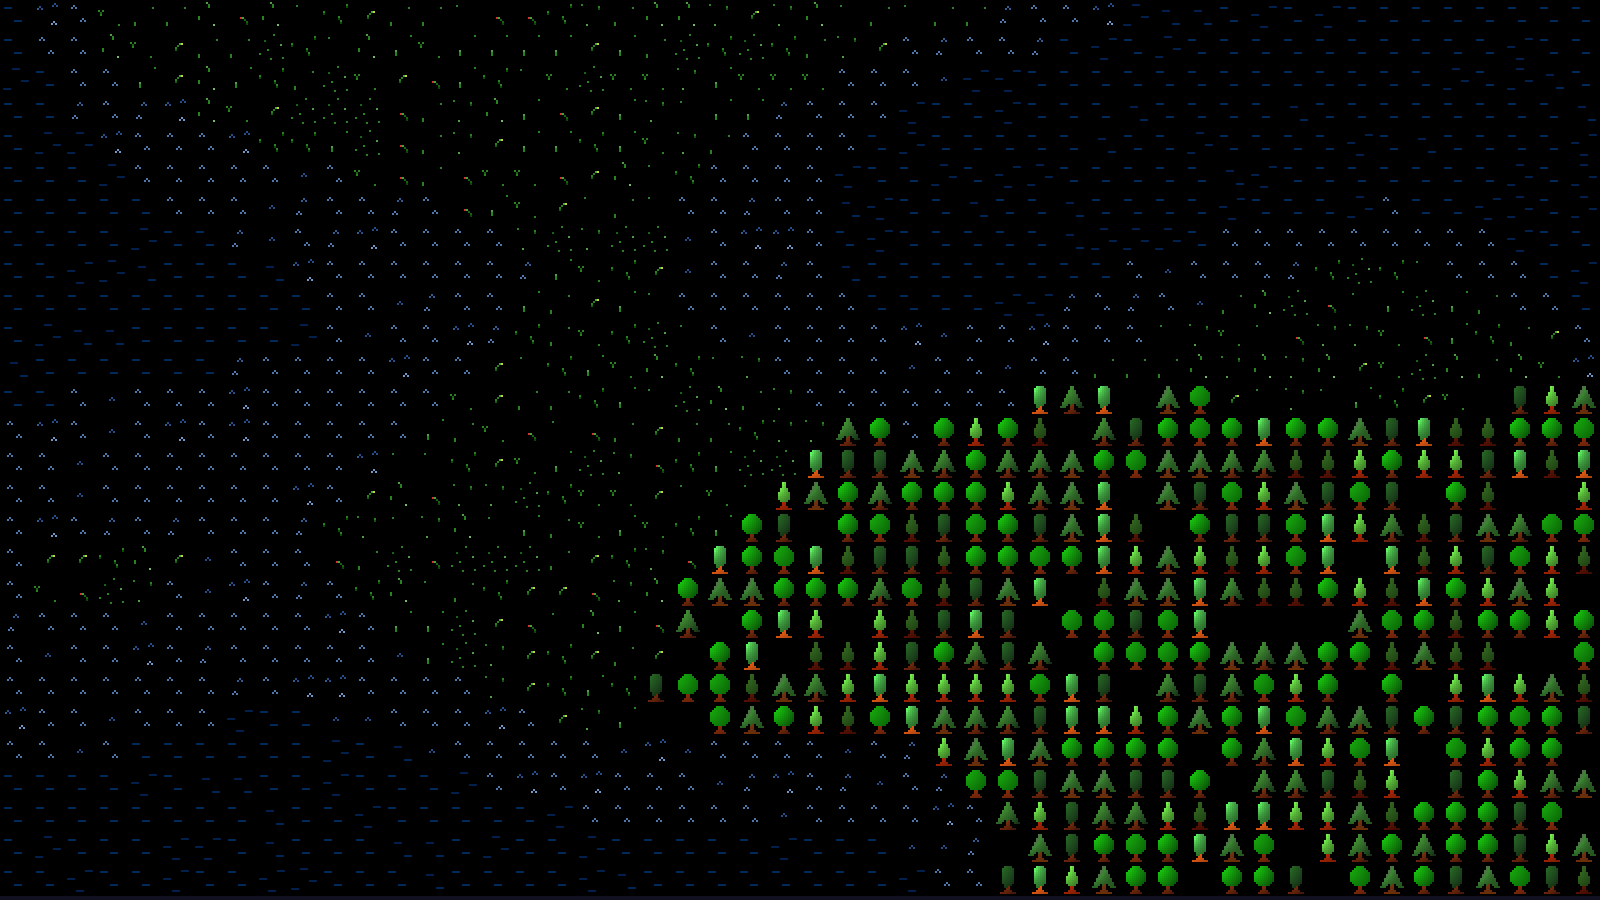
We do a similar thing with our mountains. If our moisture value is greater than 0.75, we'll create a snowy mountain instead of a regular one.
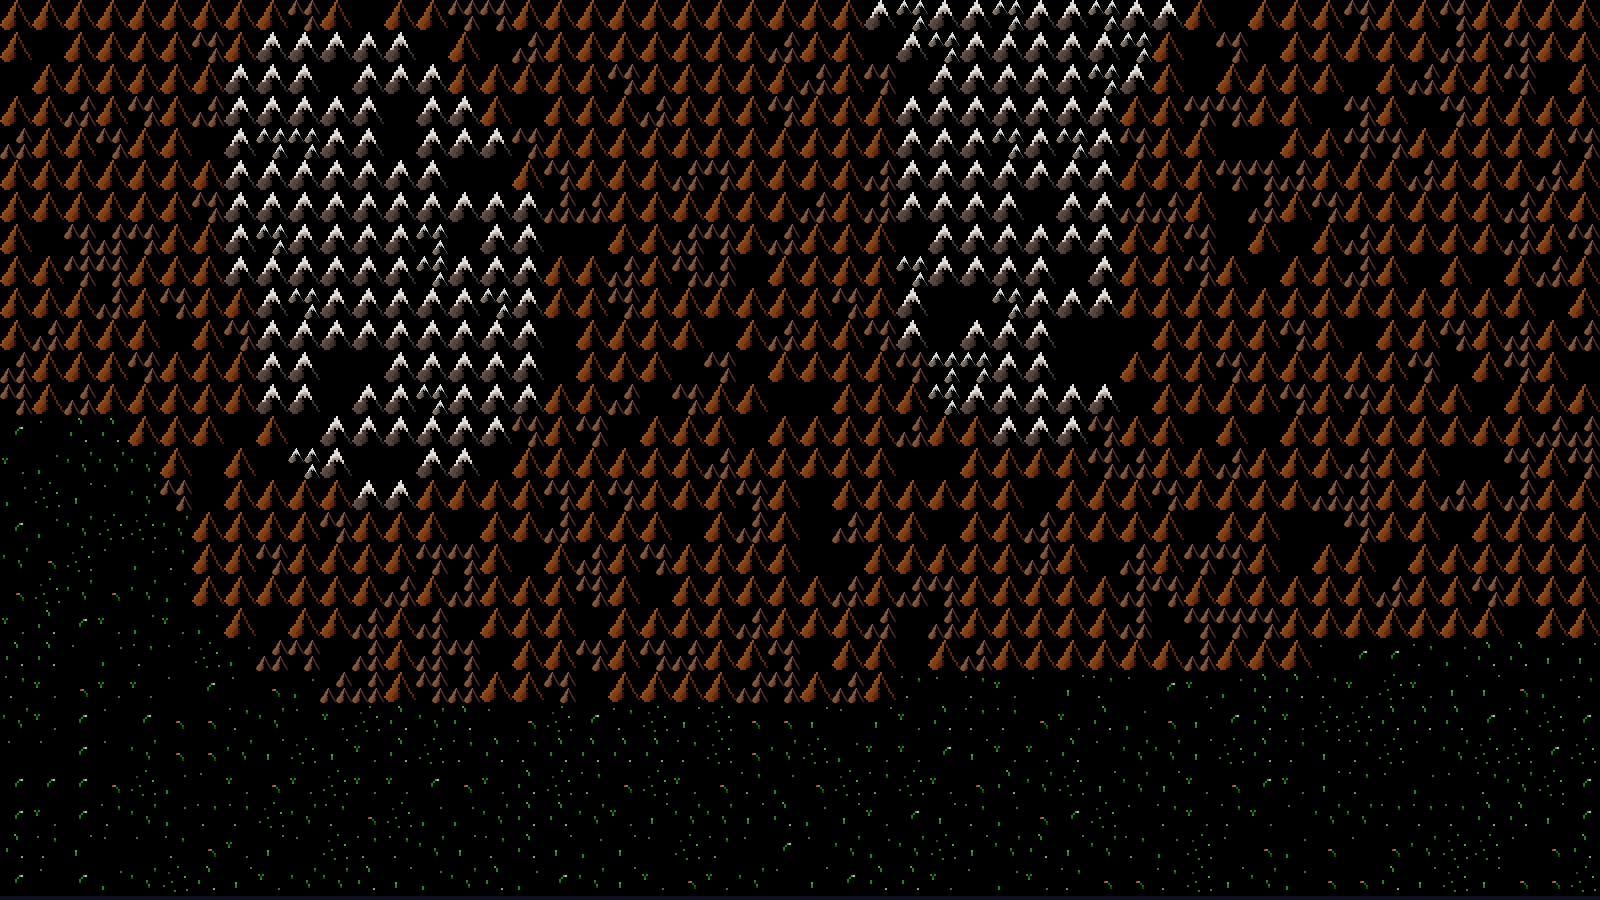
Our forests, like our mountains, will be impassable to the player. Otherwise, these decorative effects don't have much gameplay impact; they do add a lot more variation to the landscape, however, and make things more visually appealing (so long as you have a nice set of graphics to go alongside it..!)
And that's it for this part! Only a few extra lines in our world generation step, and we have a world that is far more pleasing to explore, and more natural-looking.
Something that would be nice is if we were able to name our islands, so that the player can discover them. This will give the player a bit more incentive to go about the map, and land on each island, to add it to their exploration record. So, in the next part, we'll look at how we can individually determine our islands, and also name them.
Purchase
The source code for all parts of this tutorial (including assets) is available for purchase, as part of the SDL2 tutorials bundle:
From itch.io