PC Games
• Orb
• Lasagne Monsters
• Three Guys Apocalypse
• Water Closet
• Blob Wars : Attrition
• The Legend of Edgar
• TBFTSS: The Pandoran War
• Three Guys
• Blob Wars : Blob and Conquer
• Blob Wars : Metal Blob Solid
• Project: Starfighter
• TANX Squadron
Tutorials
• 2D shoot 'em up
• 2D top-down shooter
• 2D platform game
• Sprite atlas tutorial
• Working with TTF fonts
• 2D adventure game
• Widget tutorial
• 2D shoot 'em up sequel
• 2D run and gun
• Roguelike
• Medals (Achievements)
• 2D turn-based strategy game
• 2D isometric game
• 2D map editor
• 2D mission-based shoot 'em up
• 2D Santa game
• 2D split screen game
• 2D quest game
• SDL 1 tutorials (outdated)
Latest Updates
The Legend of Edgar 1.38
Thu, 1st January 2026
SDL2 Quest game tutorial
Wed, 7th May 2025
SDL2 Versus game tutorial
Wed, 20th March 2024
Download keys for SDL2 tutorials on itch.io
Sat, 16th March 2024
The Legend of Edgar 1.37
Mon, 1st January 2024
Tags
• battle-for-the-solar-system (10)
• blob-wars (10)
• brexit (1)
• code (6)
• edgar (10)
• games (45)
• lasagne-monsters (1)
• making-of (5)
• match3 (1)
• numberblocksonline (1)
• orb (2)
• site (1)
• tanx (4)
• three-guys (3)
• three-guys-apocalypse (3)
• tutorials (18)
• water-closet (4)
Books
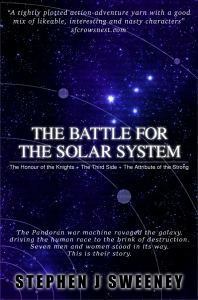
The Battle for the Solar System (Complete)
The Pandoran war machine ravaged the galaxy, driving the human race to the brink of destruction. Seven men and women stood in its way. This is their story.
— Simple 2D quest game —
Part 14: Delivery quest
Note: this tutorial assumes knowledge of C, as well as prior tutorials.


Introduction
In our last part, we put together the framework for generating quests, with our demo quest simply being to wish someone a Happy Birthday. In this part, we're going to make our first "real" quest, which will involve delivering an item to someone. This is, in fact, much like the Happy Birthday quest, except that we will now have an item in our inventory, that will be removed once the quest is complete.
Extract the archive, run cmake CMakeLists.txt, followed by make, and then use ./quest14 to run the code. As before, you can move around with the WASD control scheme. Play the game as normal. Every now again, a Resident will request that you deliver an item to another person. The Quest Log can help you to locate the town where the Resident resides (so long as you've discovered it), in the Inventory section. In the town itself, the Resident will be swaying left and right on the screen, as a small indication that they are the one you need to talk to to complete the quest. Once done, the item will be removed from your inventory. When you're finished, close the window to exit.
Inspecting the code
This part represents the final major piece of our game, as it involves adding in the inventory, and also completing the section on the Quest Log. A new entity type, Item, will be created in this part.
Let's start by looking at the updates to structs.h:
typedef struct
{
	Quest *quest;
} Item;
We've added a new struct called Item, which will represent a quest item. This item can be linked to a `quest`, which will aid us when viewing its data in the Quest Log.
Next, we've updated the Game struct:
typedef struct
{
	// snipped

	Entity     inventoryHead, *inventoryTail;
	int        numInventoryItems;
	double     time;
} Game;
We've added in a linked list to hold our inventory items (inventoryHead, inventoryTail). We also have a field to hold the number of inventory item - numInventoryItems.
Moving on now to quests.c, where we've made some updates to support our new quest type (note that we've removed the demo quest, with the delivery quest replacing it).
First up, we've updated generateQuest:
void generateQuest(Entity *requester)
{
	Quest *q;

	// snipped

	addQuestStep(q, formattedString("INTERACT %d", q->requester->id));
	addQuestStep(q, "START_DELIVERY_QUEST");

	// snipped
}
Now, instead of START_DEMO_QUEST, our second quest step is START_DELIVERY_QUEST.
We've next made some changes to executeQuestSteps, to support the new quest steps we'll be introducing:
static void executeQuestSteps(Quest *q)
{
	int  done;
	char command[MAX_NAME_LENGTH];

	done = 0;

	do
	{
		q->currentStep = q->currentStep->next;

		if (q->currentStep != NULL)
		{
			sscanf(q->currentStep->line, "%s", command);

			if (strcmp(command, "START_DELIVERY_QUEST") == 0)
			{
				doStartDeliveryQuest(q);
			}

			// snipped

			else if (strcmp(command, "REMOVE_INVENTORY_ITEM") == 0)
			{
				doRemoveInventoryItem(q->currentStep->line);
			}

			// snipped
		}
		else
		{
			done = 1;
		}
	} while (!done);
}
We're first handling the new START_DELIVERY_QUEST command, and another new one command called REMOVE_INVENTORY_ITEM. This, as we'll see in a bit, removes an item from the player's inventory.
Before that, we'll first look at doStartDeliveryQuest. This won't look too dissimilar from the demo quest setup:
static void doStartDeliveryQuest(Quest *q)
{
Entity *item;
Entity *recipient;
Entity *town;
recipient = getRandomResident();
town = ((Resident *)recipient->data)->town;
item = initEntity("Item");
((Item *)item->data)->quest = q;
item->touch(item, game.map->player);
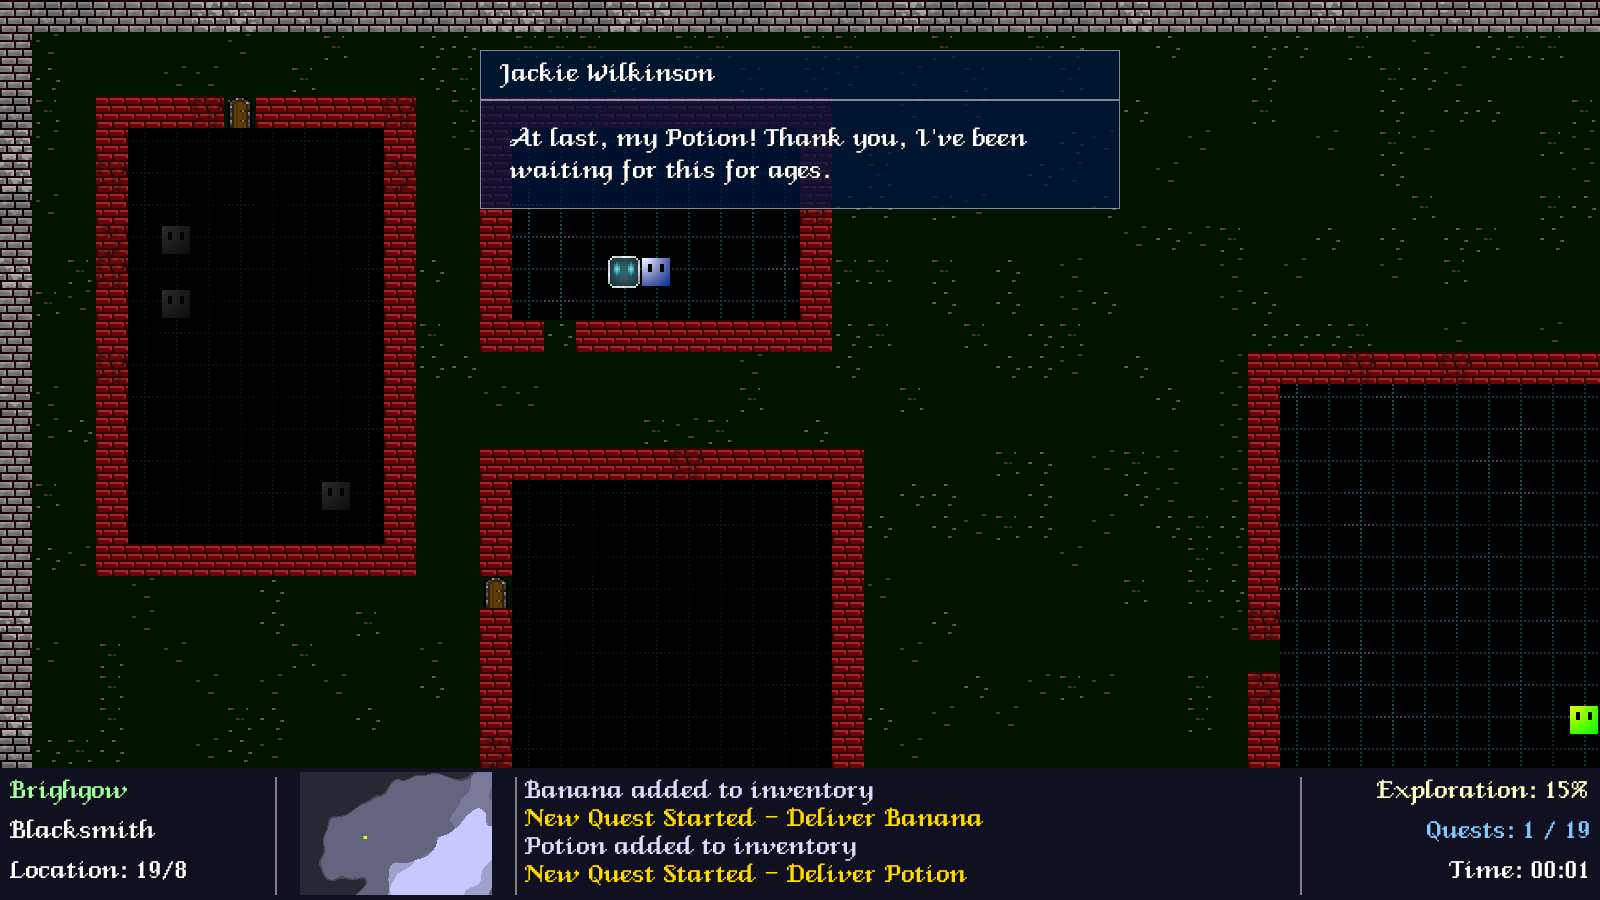
sprintf(q->title, "Deliver %s", item->name);
sprintf(q->description, "Deliver to %s (%s)", recipient->name, town->name);
q->town = town;
addQuestStep(q, formattedString("PULSE_ENTITY %d 1", recipient->id));
addQuestStep(q, formattedString("INTERACT %d", recipient->id));
addQuestStep(q, formattedString("PULSE_ENTITY %d 0", recipient->id));
addQuestStep(q, formattedString("REMOVE_INVENTORY_ITEM %d", item->id));
addQuestStep(q, formattedString("MSG_BOX %s;At last, my %s! Thank you, I've been waiting for this for ages.", recipient->name, item->name));
addQuestStep(q, "COMPLETE_QUEST");
doActivateQuest(q);
addMessageBox(q->requester->name, "Oh, hello there! If you've got a moment, I have a favour to ask.");
addMessageBox(q->requester->name, expiringFormattedString("I've got this %s that needs delivering, but I don't have time to do it now.", item->name));
addMessageBox(q->requester->name, "If you could do it for me, that would be swell.");
}
Much like the demo quest, we're selecting a random resident as the `recipient`, setting the quest's `title` and `description`, and setting up a number of quest steps. One thing of note is that we're also creating an Item (as `item`). This item will form the core of the quest. With the item created, we link it to the quest (`q`), and then immediately invoke its `touch` function, passing over the player at the entity that touched it. This will basically move the item into the player's inventory (from the world where it currently lives). Doing this ensures that the behaviour of picking up an item remains the same, whether we added it manually or found it in the world.
Another thing to notice is the REMOVE_INVENTORY_ITEM command in the quest steps. Notice that we're passing over the `id` of the Item we created. This ensures that we remove the correct item from the player's inventory when this command is executed.
An example of a fully complete delivery script from this part might look like this:
INTERACT 88
START_DELIVERY_QUEST
PULSE_ENTITY 7 1
INTERACT 7
PULSE_ENTITY 7 0
REMOVE_INVENTORY_ITEM 157
MSG_BOX Johnny Lawrence;At last, my Parcel! Thank you, I've been waiting for this for ages.
COMPLETE_QUEST
Translated, line by line, this script would mean:
- Wait for the player to interact with entity #88.
- Setup the delivery quest.
- Make the entity with id 7 start to pulse (they will sway back and forth, to draw our attention to them).
- Wait for the player to interact with entity #7.
- Make the entity with id 7 stop pulsing.
- Remove the item from our inventory with id 157
- Show a message box, with the speaker as "Johnny Lawrence" and the text "At last, my Parcel! Thank you, I've been waiting for this for ages."
- Mark the quest as complete.
If we look at the new doRemoveInventoryItem function (invoked by executeQuestSteps), we can see this in action:
static void doRemoveInventoryItem(char *line)
{
	unsigned int id;

	sscanf(line, "%*s %d", &id);

	removeInventoryItem(id);
}
We simply extract the `id` of the Item from the quest step, and then pass that value to a function called removeInventoryItem. We'll see this in a moment.
That's all the changes we need to make to quests.c. As you can see, since we've put together a strong, fluent framework, adding in new commands and steps is quite simple. We'll be expanding this further with more interesting features in the next two parts. For now, let's turn our attention to inventory.c. This is a new file that holds a number of functions related to inventory management. Our game's inventory is quite simple, being just a linked list, so all this will be easy to understand.
First, we have initInventory:
void initInventory(void)
{
	memset(&game.inventoryHead, 0, sizeof(Entity));
	game.inventoryTail = &game.inventoryHead;

	deadTail = &deadHead;
}
Nothing overcomplicated here. We're setting up Game's inventory linked list, and also setting up a "dead" list (deadHead, deadTail). This is the list into which we'll move items that are removed from our inventory (when items are removed from the inventory, they are destroyed, never transferred).
Next, we have addToInventory:
void addToInventory(Entity *e)
{
	game.inventoryTail->next = e;
	game.inventoryTail = e;

	game.numInventoryItems++;

	e->next = NULL;

	addHudMessage(expiringFormattedString("%s added to inventory", e->name), 220, 220, 255);
}
The entity (`e`) is added to our inventory's linked list, and Game's inventory item counter is incremented. We then add a message to the HUD, to say that the item was added to our inventory.
Finally, we have removeInventoryItem:
void removeInventoryItem(unsigned int id)
{
	Entity *e, *prev;

	prev = &game.inventoryHead;

	for (e = game.inventoryHead.next; e != NULL; e = e->next)
	{
		if (e->id == id)
		{
			addHudMessage(expiringFormattedString("%s removed from inventory", e->name), 220, 220, 255);

			prev->next = e->next;

			if (e == game.inventoryTail)
			{
				game.inventoryTail = prev;
			}

			deadTail->next = e;
			deadTail = e;
			e->next = NULL;

			e = prev;

			game.numInventoryItems--;
		}

		prev = e;
	}
}
This is the function that is called by our quest step script, when the REMOVE_INVENTORY_ITEM command is encountered. Simply put, this function loops through all the items in the inventory, searching for one that matches the `id` passed into the function. When the item is found, we'll display a HUD message to say the item was removed, and then remove the entity from the inventory list, before then adding it to the dead list instead. We then decrement Game's numInventoryItems.
Nothing unexpected (unless you weren't expecting the item to be killed off - again, we have no use for items outside of quests, so removing them from the game is no big deal).
With our quest creation updated and inventory prepared, we should now look at how items themselves work. As expected, this all resides in a file called item.c.
Before we jump into the functions themselves, we should look at one of the static variables in the file:
static char *filenames[] = {"apple", "banana", "card", "coin", "coins", "diamond", "emerald", "letter", "melon", "parcel1", "parcel2", "parcel3", "parcel4", "parcel5", "pill1", "pill2", "pill3", "pill4", "potion1", "potion2", "potion3", "soil", "topaz", "vinyl"};
This variable hold an array of strings, that represent both the name of the item, and the texture filename to use. We'll be manipulating these during our item creation.
Let's look at initItem now:
void initItem(Entity *e)
{
	int   n;
	Item *i;

	i = malloc(sizeof(Item));
	memset(i, 0, sizeof(Item));

	n = sizeof(filenames) / sizeof(char *);

	n = rand() % n;

	setName(e->name, filenames[n]);
	e->type = ET_ITEM;
	e->solid = 0;
	e->texture = getAtlasImage(expiringFormattedString("gfx/entities/%s.png", filenames[n]), 1);
	e->data = i;

	e->touch = touch;
}
For the most part, this is a standard entity setup function, with an Item object (`i`) being set to the entity's `data` field. Of note here is that we're randomly selecting a string from the `filenames` array, and passing that to a function named setName. We're also using the randomly chosen filename in the texture lookup.
We'll come to setName in a moment. First, let's deal with `touch` (you'll remember that we're manually invoking this in our delivery quest setup):
static void touch(Entity *self, Entity *other)
{
	if (other == game.map->player)
	{
		detachEntity(self);

		addToInventory(self);

		doQuestInteraction(self);
	}
}
When the player interacts with an Item, we'll first remove it from the current map (detachEntity), then add it to our inventory (addToInventory), and finally call doQuestInteraction. This call won't do anything in our delivery quest, since no INTERACT commands will be triggered by it, but will come in handy in the future.
Now for setName:
static void setName(char *name, char *filename)
{
	int i, l;

	l = strlen(filename);

	for (i = 0; i < l; i++)
	{
		if (isdigit(filename[i]))
		{
			return;
		}

		name[i] = filename[i];

		if (i == 0)
		{
			name[0] = toupper(name[0]);
		}
	}
}
Simply put, what this function does is copies `filename` into `name`, with some changes. It does this one character at a time, capitalising the first letter, and stopping if it hits a number. So, a `filename` with the text "coin" will become "Coin", while a `filename` with the text "parcel1" will become "Parcel". This not only lets our names look nice in text displays, but also allows us to have multiple parcel graphics, without them being called "Parcel1", "Parcel2", etc. in our inventory and message boxes.
That's all there is to item.c! The last major thing we have to do is update the Quest Log, so that we can actually use the Inventory section. This is going to look very similar to the other sections we recently updated, so we won't spent too long on it.
Over to questLog.c, where we've updated `logic`:
static void logic(void)
{
	// snipped

	switch (show)
	{
		// snipped

		case SHOW_INVENTORY:
			doInventory();
			break;

		default:
			itemNumber = 0;
			itemNumberTotal = 0;
			break;
	}
}
For the name case SHOW_INVENTORY, we're calling doInventory:
static void doInventory(void)
{
	int     i;
	Entity *e;
	Quest  *q;

	i = 0;
	itemNumber = MIN(MAX(itemNumber, 0), game.numInventoryItems - 1);
	itemNumberTotal = game.numInventoryItems;

	highlightedTown = NULL;
	highlightedIsland = NULL;

	for (e = game.inventoryHead.next; e != NULL; e = e->next)
	{
		if (i == itemNumber)
		{
			selectedItem = e;

			q = ((Item *)e->data)->quest;

			if (q->status == QS_IN_PROGRESS)
			{
				if (q->town != NULL && ((Town *)q->town->data)->discovered)
				{
					highlightedTown = q->town;
				}

				if (q->island != NULL && q->island->discovered)
				{
					highlightedIsland = q->island;
				}
			}
		}

		i++;
	}
}
Much like like processing the other sections, we're looping through our items. One thing to note here is that we're testing the Item's linked `quest`. Should the quest have a `town` or `island` linked to it, we'll highlight these on the map (again, only if they've been `discovered`).
Next, we have `draw`:
static void draw(void)
{
	// snipped

	switch (show)
	{
		// snipped

		case SHOW_INVENTORY:
			drawInventory();
			break;

		default:
			break;
	}

	drawScrollBar();
}
For the SHOW_INVENTORY case, we're calling drawInventory:
static void drawInventory(void)
{
	Entity *e;
	int     i, y, start, end;

	i = 0;
	start = MIN(MAX(itemNumber - (NUM_DISPLAY_ITEMS / 2), 0), game.numInventoryItems - NUM_DISPLAY_ITEMS);
	end = start + NUM_DISPLAY_ITEMS - 1;
	y = 75;

	for (e = game.inventoryHead.next; e != NULL; e = e->next)
	{
		if (i >= start && i <= end)
		{
			if (e == selectedItem)
			{
				drawRect(10, y, 650, 80, 64, 255, 255, 32);
				drawOutlineRect(10, y, 650, 80, 64, 255, 255, 255);
			}

			drawText(e->name, 25, y, 255, 255, 255, TEXT_ALIGN_LEFT, 0);
			drawText(((Item *)e->data)->quest->description, 25, y + 30, 200, 200, 200, TEXT_ALIGN_LEFT, 0);

			blitAtlasImage(e->texture, 650 - e->texture->rect.w, y + 32 - (e->texture->rect.h / 2), 0, SDL_FLIP_NONE);

			y += 90;
		}

		i++;
	}
}
As expected, we're looping through all the inventory items, and rendering the ones in view. For each item, we're rendering its `name`, its linked quest's `description`, and also drawing the item's texture on to the right of the text. Yes, very much like our other lists.
This part is more or less done. Before we finish up, let's take a quick look at the detachEntity function, in entities.c:
void detachEntity(Entity *target)
{
	Entity *e, *prev;

	prev = &game.map->entityHead;

	for (e = game.map->entityHead.next; e != NULL; e = e->next)
	{
		if (e == target)
		{
			prev->next = e->next;

			if (e == game.map->entityTail)
			{
				game.map->entityTail = prev;
			}

			e->next = NULL;

			return;
		}

		prev = e;
	}
}
This function merely chops an entity (`target`) out of the current Map's entity list. We loop through all the entities in the list until we find the matching one, then set its parent's (`prev`) `next` pointer to the target's `next` (thereby bypassing it). We then set the target's `next` to NULL, to ensure it's been fully isolated, and exit the function.
Our first real quest is done! We can talk to Residents and be given items to delivery, with the Resident in receipt being very grateful for it. Not only that, but we also have our inventory system working, and our Quest Log is fully complete! We've got two further quest types that we want to add in - Fetch and Dispose. These will be extremely easy, as we're now able to simply build things up in the quest generation system. Once that's all done, we'll finish up the game with randomised quest types, music, sound effects, etc.
Purchase
The source code for all parts of this tutorial (including assets) is available for purchase, as part of the SDL2 tutorials bundle:
From itch.io