PC Games
• Orb
• Lasagne Monsters
• Three Guys Apocalypse
• Water Closet
• Blob Wars : Attrition
• The Legend of Edgar
• TBFTSS: The Pandoran War
• Three Guys
• Blob Wars : Blob and Conquer
• Blob Wars : Metal Blob Solid
• Project: Starfighter
• TANX Squadron
Tutorials
• 2D shoot 'em up
• 2D top-down shooter
• 2D platform game
• Sprite atlas tutorial
• Working with TTF fonts
• 2D adventure game
• Widget tutorial
• 2D shoot 'em up sequel
• 2D run and gun
• Roguelike
• Medals (Achievements)
• 2D turn-based strategy game
• 2D isometric game
• 2D map editor
• 2D mission-based shoot 'em up
• 2D Santa game
• 2D split screen game
• 2D quest game
• SDL 1 tutorials (outdated)
Latest Updates
The Legend of Edgar 1.38
Thu, 1st January 2026
SDL2 Quest game tutorial
Wed, 7th May 2025
SDL2 Versus game tutorial
Wed, 20th March 2024
Download keys for SDL2 tutorials on itch.io
Sat, 16th March 2024
The Legend of Edgar 1.37
Mon, 1st January 2024
Tags
• battle-for-the-solar-system (10)
• blob-wars (10)
• brexit (1)
• code (6)
• edgar (10)
• games (45)
• lasagne-monsters (1)
• making-of (5)
• match3 (1)
• numberblocksonline (1)
• orb (2)
• site (1)
• tanx (4)
• three-guys (3)
• three-guys-apocalypse (3)
• tutorials (18)
• water-closet (4)
Books
The Attribute of the Strong (Battle for the Solar System, #3)
The Pandoran War is nearing its end... and the Senate's Mistake have all but won. Leaving a galaxy in ruin behind them, they set their sights on Sol and prepare to finish their twelve year Mission. All seems lost. But in the final forty-eight hours, while hunting for the elusive Zackaria, the White Knights make a discovery in the former Mitikas Empire that could herald one last chance at victory.
— Simple 2D quest game —
Part 13: Introduction to quests
Note: this tutorial assumes knowledge of C, as well as prior tutorials.


Introduction
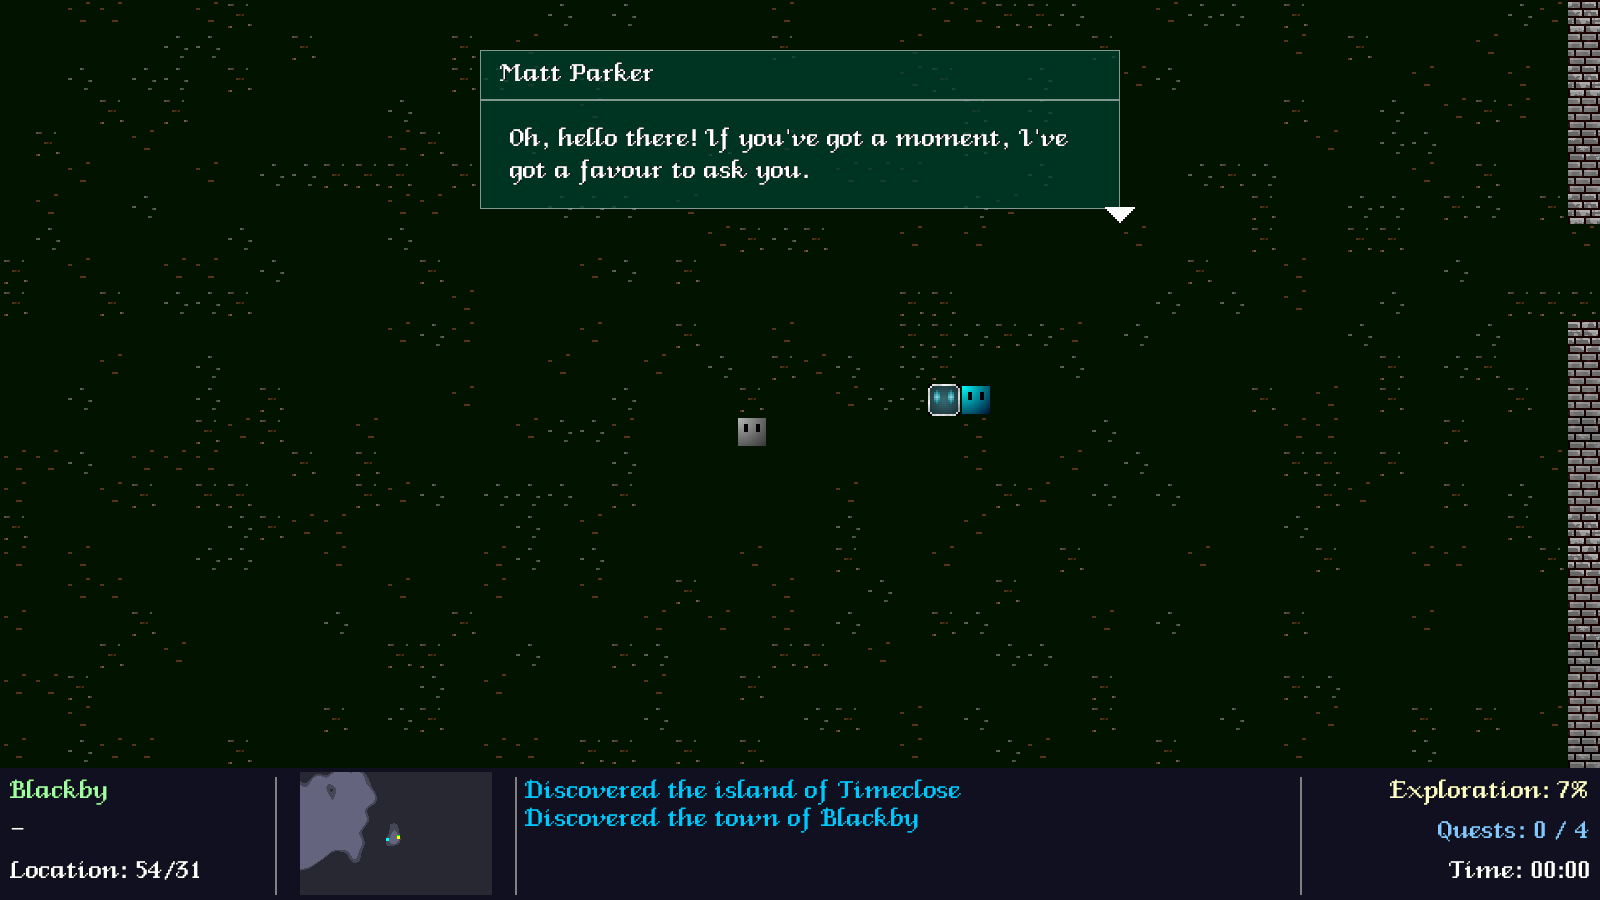
The final missing piece of our game is the ability to undertake quests. In this part, we're going to put together the ground work for supporting them. This will involve setting up a basic quest, that simply involves interacting with one Resident at the request of another (the quest is simply to wish another Resident a happy birthday).
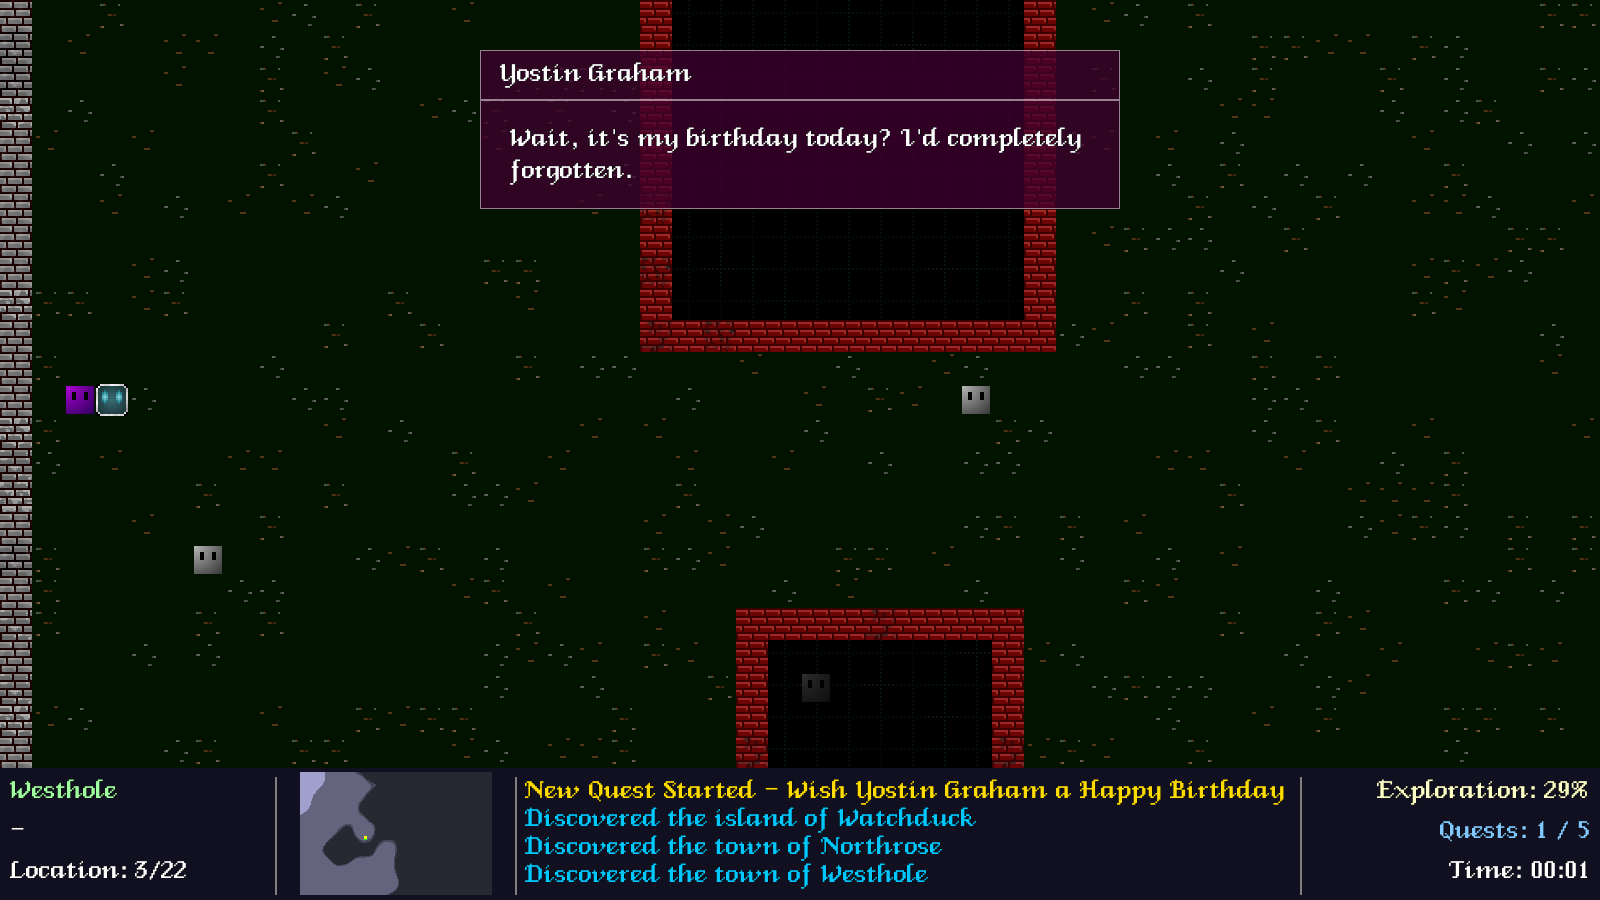
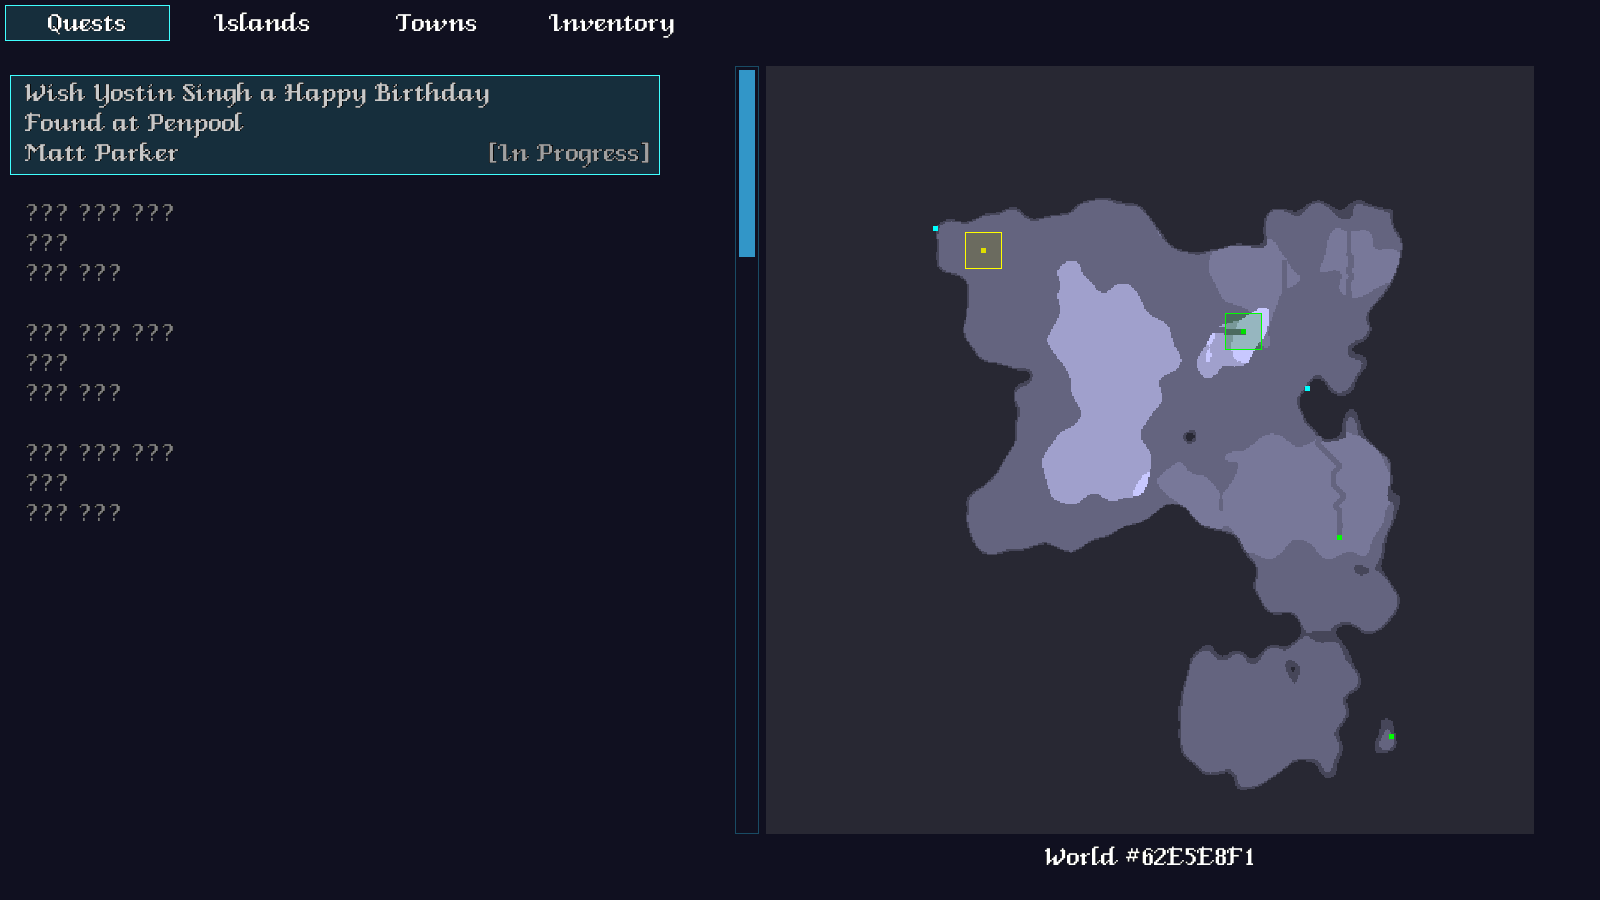
Extract the archive, run cmake CMakeLists.txt, followed by make, and then use ./quest13 to run the code. As before, you can move around with the WASD control scheme. Play the game as normal. Every now again, a Resident will request that you undertake a "quest" to wish another Resident a happy birthday. They will inform you of whom you need to meet, and where. The Quest Log can help you to locate the town where the Resident resides (so long as you've discovered it). In the town itself, the Resident will be swaying left and right on the screen, as a small indication that they are the one you need to talk to to complete the quest. When you're finished, close the window to exit.
Inspecting the code
This part is, again, a little involved, as there is a lot to add in; we have to add in the quests themselves, update the Resident logic, and also update the Quest Log. Before we get into the code, we'll first look at overview of how our quest system will work.
If you've ever played a game like Skyrim or Fallout, you will be aware that the quests there can be seen to be composed of several steps - talk to person, go to location, find object, return to requester. Our quest system will follow a similar design, with a quest object that contains several steps. These steps will be defined as script commands, as we saw in SDL2 Shooter 3.
An example of a fully complete script from this part might look like this:
INTERACT 8
START_DEMO_QUEST
PULSE_ENTITY 15 1
INTERACT 15
PULSE_ENTITY 15 0
MSG_BOX Daniel Larusso;Wait, it's my birthday today? I'd completely forgotten.
COMPLETE_QUEST
Translated, line by line, this script would mean:
- Wait for the player to interact with entity #8.
- Setup the "demo quest".
- Make entity #15 start to pulse (they will sway back and forth, to draw our attention to them).
- Wait for the player to interact with entity #15.
- Make entity #15 stop pulsing.
- Show a message box, with the speaker as "Daniel Larusso" and the text "Wait, it's my birthday today? I'd completely forgotten."
- Mark the quest as complete.
We can have as many script lines as we wish, with as many different commands as we want to support. As you can see already, there is huge scope for massive, complex quests, with plenty of options.
We'll see more as we dive into the code. So, let's get started. First, we've updated structs.h:
struct QuestStep
{
	char      *line;
	QuestStep *next;
};
We've added in QuestStep. This will represent a single command instruction (`line`) in our main quest object. The Quest struct itself follows:
struct Quest
{
	char       title[MAX_DESCRIPTION_LENGTH];
	char       description[MAX_DESCRIPTION_LENGTH];
	Entity    *requester;
	int        status;
	Island    *island;
	Entity    *town;
	QuestStep  stepHead, *stepTail;
	QuestStep *currentStep;
	Quest     *next;
};
Quite a few fields here. Let's go through them one by one. `title` and `description` are the title and description of the quest; `requester` is the Resident who has requested the quest; `status` is the current status of the quest, such as incomplete, in progress, complete; `island` is the target island of the quest, while `town` is the target town of the quest (either of these could be null, depending on our script). stepHead and stepTail is the linked list for our quest steps, while currentStep is a pointer to the current step. This will required for when the script execution is halted due to waiting on an interaction.
A tweak to Resident follows:
typedef struct
{
	Entity   *town;
	Entity   *entity;
	Building *building;
	Quest    *quest;
} Resident;
We've added a pointer to a `quest`. This will be used during our interactions (`touch`), to test if a Resident has a quest for the player to undertake.
Finally, we've updated Game:
typedef struct
{
	// snipped

	Island    *island;
	Quest      questHead, *questTail;
	MessageBox messageBoxHead, *messageBoxTail;

	// snipped
} Game;
We've added in a linked list (questHead, questTail) to support our quests.
Now on to the main event. We've added a file called quests.c, where all the logic for handling our quests will live. There's quite a few functions in here to get through, though none are actually very complicated, at all.
Starting with initQuests:
void initQuests(void)
{
	game.questTail = &game.questHead;

	collectTownsResidents();
}
We're first setting up our quests linked list, then calling a function named collectTownsResidents. We'll see this later, but know that it is responsible for collecting all the towns and residents in our world into an array, so that we can randomly access them.
Next, we have generateQuest:
void generateQuest(Entity *requester)
{
	Quest *q;

	q = malloc(sizeof(Quest));
	memset(q, 0, sizeof(Quest));
	game.questTail->next = q;
	game.questTail = q;

	q->requester = requester;
	q->stepTail = &q->stepHead;

	addQuestStep(q, formattedString("INTERACT %d", q->requester->id));
	addQuestStep(q, "START_DEMO_QUEST");

	q->currentStep = q->stepHead.next;

	((Resident *)requester->data)->quest = q;

	game.totalQuests++;
}
This function generates a new quest, and assigns it to a Resident (`requester`). To begin with, the quest has two steps: INTERACT and START_DEMO_QUEST. This means that our quest will be activated (and randomly setup) when we first interact with the resident in a town. We ensure that the quest's currentStep points at the INTERACT step, and also increment Game's totalQuests.
Next, we have doQuestInteraction:
int doQuestInteraction(Entity *e)
{
	Quest *q;
	char  *command;
	int    rtn;

	rtn = 0;

	command = expiringFormattedString("INTERACT %d", e->id);

	for (q = game.questHead.next; q != NULL; q = q->next)
	{
		if (q->currentStep != NULL && strcmp(q->currentStep->line, command) == 0)
		{
			executeQuestSteps(q);

			rtn = 1;
		}
	}

	return rtn;
}
This function is called whenever a Resident is interacted with (we'll see this later). `e` in this case is the Resident, but it could be any entity. We first create a string containing the expected INTERACT command, with the id of the entity passed into the function (meaning the result might look like INTERACT 18). We then loop through all our quests, to see if the current step matches the expected command. In other words, if a quest is currently blocked on the INTERACT step that matches the command, we will proceed to continue its execution. The matching quest will call executeQuestSteps, and we'll set `rtn` to 1 (to be returned from this function), to indicate that a quest execution occurred.
With that done, let's look at what executeQuestSteps does:
static void executeQuestSteps(Quest *q)
{
	int  done;
	char command[MAX_NAME_LENGTH];

	done = 0;

	do
	{
		q->currentStep = q->currentStep->next;

		if (q->currentStep != NULL)
		{
			sscanf(q->currentStep->line, "%s", command);

			if (strcmp(command, "START_DEMO_QUEST") == 0)
			{
				doStartDemoQuest(q);
			}
			else if (strcmp(command, "MSG_BOX") == 0)
			{
				doAddMessageBox(q->currentStep->line);
			}
			else if (strcmp(command, "PULSE_ENTITY") == 0)
			{
				doPulseEntity(q);
			}
			else if (strcmp(command, "COMPLETE_QUEST") == 0)
			{
				doCompleteQuest(q);
			}
			else if (strcmp(command, "INTERACT") == 0)
			{
				done = 1;
			}
			else
			{
				SDL_LogMessage(SDL_LOG_CATEGORY_APPLICATION, SDL_LOG_PRIORITY_CRITICAL, "Unrecognised command '%s'", command);
				exit(1);
			}
		}
		else
		{
			done = 1;
		}
	} while (!done);
}
Put simply, we're stepping through each quest step, and executing its command. We halt execution if we run out of quest steps or if we hit an INTERACT command. This should be quite clear (and it's also very much like SDL2 Shooter 3), so we'll move on to looking at what each of our commands do:
First up, we have doStartDemoQuest:
static void doStartDemoQuest(Quest *q)
{
	Entity *resident;
	Entity *town;

	resident = getRandomResident();
	town = ((Resident *)resident->data)->town;

	sprintf(q->title, "Wish %s a Happy Birthday", resident->name);
	sprintf(q->description, "Found at %s", town->name);
	q->town = town;

	addQuestStep(q, formattedString("PULSE_ENTITY %d 1", resident->id));
	addQuestStep(q, formattedString("INTERACT %d", resident->id));
	addQuestStep(q, formattedString("PULSE_ENTITY %d 0", resident->id));
	addQuestStep(q, formattedString("MSG_BOX %s;Wait, it's my birthday today? I'd completely forgotten.", resident->name));
	addQuestStep(q, "COMPLETE_QUEST");

	doActivateQuest(q);

	addMessageBox(q->requester->name, "Oh, hello there! If you've got a moment, I've got a favour to ask you.");
	addMessageBox(q->requester->name, expiringFormattedString("It's %s's birthday today. Could you wish them a happy birthday from me, please?", resident->name));
	addMessageBox(q->requester->name, expiringFormattedString("You can find them in %s. Thanks very much!", town->name));
}
Here, we're setting up our demo quest (`q`), which involves wishing another resident a happy birthday. We first make a call to getRandomResident, which will return a random Resident in the world (not just the current town). We then set the `title` and `description` of the quest, and also set the quest's `town` field as the target Resident's `town`. This will mean that when we view the quest information in the quest log, we know which town we need to head to, in order to complete the quest.
Next, we set up a number of the quest steps that will be required for our script, make a call to doActivateQuest (we'll see this next), and finally display some dialog boxes, so that the requester can tell the player all about the task they wish them to undertake. As an adventurer, we can't refuse!
Next up, we have doActivateQuest:
static void doActivateQuest(Quest *q)
{
	q->status = QS_IN_PROGRESS;

	addHudMessage(expiringFormattedString("New Quest Started - %s", q->title), 255, 220, 0);

	reorderQuestList();
}
Simply put, this swaps the Quest's (`q`) status to in progress, adds a message to that effect on the HUD, and makes a call to reorderQuestList. As we'll see in a moment, that function pushes all the in progress quests to the top of the list, with complete, and unknown quests pushed further down.
doCompleteQuest is quite similar:
static void doCompleteQuest(Quest *q)
{
	q->status = QS_COMPLETE;

	game.completedQuests++;

	addHudMessage(expiringFormattedString("%s - Quest compeleted!", q->title), 255, 220, 0);

	reorderQuestList();
}
The Quest's `status` is set to complete, and Game's completeQuests is incremented.
doAddMessageBox comes next:
static void doAddMessageBox(char *line)
{
	char speaker[MAX_NAME_LENGTH];
	char message[MAX_MESSAGE_LENGTH];

	sscanf(line, "%*s %[^;];%[^\n]", speaker, message);

	addMessageBox(speaker, message);
}
Nothing special here - we're tokenizing the command line (semi-colon delimited), and using the values to add a message box.
doPulseEntity is similarly simple:
static void doPulseEntity(Quest *q)
{
	int id, pulse;

	sscanf(q->currentStep->line, "%*s %d %d", &id, &pulse);

	getEntityById(id)->pulse = pulse;
}
Here, we're setting the `pulse` flag of an entity. We look up the entity via getEntityById (this function will search the entire world!), and set `pulse` to the value in the command string. This value will either be 0 or 1, to true or false.
That's all our commands handled. As you can see, they're all very simple, but can be combined any way we like, making for some interesting script behaviour. We'll now look at the remainder of the functions in quests.c, to see what they do. None of these will be especially challenging.
First, addQuestStep:
static void addQuestStep(Quest *q, char *line)
{
	QuestStep *qs;

	qs = malloc(sizeof(QuestStep));
	memset(qs, 0, sizeof(QuestStep));
	q->stepTail->next = qs;
	q->stepTail = qs;

	qs->line = line;
}
This function merely creates a QuestStep, with the command (`line`) passed into the function, and adds it to a Quest (`q`).
Next, we have getRandomResident:
static Entity *getRandomResident(void)
{
	Entity *e;

	while (1)
	{
		e = residents[rand() % numResidents];

		if (((Resident*)e->data)->quest == NULL)
		{
			return e;
		}
	}
}
This function returns a random Resident from our array of residents, that do not already have a quest associated with them; we don't want to be assigning Residents as quest targets if they already have a quest of their own, as this will conflict with our Resident's `touch` logic.
The collectTownsResidents function comes next:
static void collectTownsResidents(void)
{
	Entity *e, *r;
	Town   *t;

	memset(&towns, 0, sizeof(towns));
	memset(&residents, 0, sizeof(residents));

	numTowns = 0;
	numResidents = 0;

	for (e = game.overworld.map.entityHead.next; e != NULL; e = e->next)
	{
		if (e->type == ET_SETTLEMENT)
		{
			t = (Town *)e->data;

			if (numTowns < MAX_TOWNS)
			{
				towns[numTowns++] = e;
			}

			for (r = t->map.entityHead.next; r != NULL; r = r->next)
			{
				if (r->type == ET_RESIDENT && numResidents < MAX_RESIDENTS)
				{
					residents[numResidents++] = r;
				}
			}
		}
	}

	SDL_LogMessage(SDL_LOG_CATEGORY_APPLICATION, SDL_LOG_PRIORITY_INFO, "Towns=%d, Residents=%d", numTowns, numResidents);
}
In other places in the code, we're relying on linked lists and counters to iterate through our residents and towns (see the town list in the Quest Log, for example). While we can get away with it there, in the case of quests, we need to be able to quickly access a random Resident or Town. Therefore, we're collecting all of them into arrays called `towns` and `residents` (with length variables called numTowns and numResidents). We can have a maximum of MAX_TOWNS and MAX_RESIDENTS (defined as 32 and 128, respectively).
Next up we have reorderQuestList:
static void reorderQuestList(void)
{
	Quest *q, **questList, *prev;
	int    i, n;

	for (q = game.questHead.next, n = 0; q != NULL; q = q->next, n++)
	{
	}

	questList = malloc(sizeof(Quest *) * n);

	for (q = game.questHead.next, n = 0; q != NULL; q = q->next, n++)
	{
		questList[n] = q;
	}

	qsort(questList, n, sizeof(Quest *), questComparator);

	prev = &game.questHead;

	for (i = 0; i < n; i++)
	{
		q = questList[i];

		prev->next = q;
		game.questTail = q;
		game.questTail->next = NULL;

		prev = q;
	}

	free(questList);
}
As stated previously, this function will reorder our quest list, so that in progress quests will be at the top of the list, completed quests next, and finally incomplete / unknown quests last. We do this by creating an array to hold all our quests, sort the array, and then set our linked list back up again.
That's all there is for quests.c for now. We should now turn our attention to how the quests are activated and processed. In our game, this is an event driven system, which is triggered right now by interactions with Residents. So, if we head over to resident.c, we can see that we've updated the `touch` function:
static void touch(Entity *self, Entity *other)
{
	Resident *r;

	if (other == game.map->player)
	{
		r = (Resident *)self->data;

		// snipped

		if (!doQuestInteraction(self))
		{
			if (r->quest != NULL)
			{
				switch (r->quest->status)
				{
					case QS_IN_PROGRESS:
						addMessageBox(r->entity->name, "All the details are in your quest log.");
						break;

					case QS_COMPLETE:
						addMessageBox(r->entity->name, "Thanks for doing that for me, buddy.");
						break;

					default:
						break;
				}
			}
			else
			{
				chat(r);
			}
		}
	}
}
Before, whenever we touched a Resident, we'd make a call to the `chat` function. Now, we're testing first if the Resident is associated with a Quest. We don't want our Resident to start yipping on about the weather when we have important tasks to complete! We therefore make a call to doQuestInteraction. If this returns false, it means that we didn't process a quest script. We then check if the resident has a quest associated with them. If so, we'll prompt the player about the quest progress itself (such as telling them they've yet to finsih it, or thanking them for undertaking it). Otherwise, we'll invoke the `chat` function as normal.
What this means is that if a Resident has a quest for the player, they will talk to the player about it, even when it's complete. They won't launch into their normal greetings. If we wanted them to return to their normal level of conversation, we could null their quest pointer in the QS_COMPLETE case.
With that done, we can move over to the Quest Log, where we've made some updates to support our quests. Before, we only have our Islands and Towns sections setup. Now, we're going to extend this functionality to Quests.
Starting with `logic`:
static void logic(void)
{
	// snipped

	switch (show)
	{
		case SHOW_QUESTS:
			doQuests();
			break;

		// snipped

		default:
			itemNumber = 0;
			itemNumberTotal = 0;
			break;
	}
}
Now, if we're on the Quest section, we're calling a new function named doQuests:
static void doQuests(void)
{
	int    i;
	Quest *q;

	i = 0;
	itemNumber = MIN(MAX(itemNumber, 0), game.totalQuests - 1);
	itemNumberTotal = game.totalQuests;

	highlightedIsland = NULL;
	highlightedTown = NULL;

	for (q = game.questHead.next; q != NULL; q = q->next)
	{
		if (i == itemNumber)
		{
			selectedQuest = q;

			if (q->status == QS_IN_PROGRESS)
			{
				if (q->town != NULL && ((Town *)q->town->data)->discovered)
				{
					highlightedTown = q->town;
				}

				if (q->island != NULL && q->island->discovered)
				{
					highlightedIsland = q->island;
				}
			}
		}

		i++;
	}
}
Much like the Islands and Towns section handling, we're determining how many items to display in our list, and which item is currently selected. On top of that, we're checking if the selected quest (selectedQuest) is currently in progress. If so, we're going to check if it has a town assigned to it, and also if the town has been discovered, and setting the quest logs highlightedTown to that. Similarly, we're checking if the quest's island has been discovered, and setting highlightedIsland to it.
This means that as we scroll through our quest list, if the quest has a town or island assigned to it, these will be highlighted on the map. This makes undertaking our quests much easier, as we know where we need to go to fulfil them.
The `draw` function has next been updated:
static void draw(void)
{
	// snipped

	switch (show)
	{
		case SHOW_QUESTS:
			drawQuests();
			break;

		// snipped

		default:
			break;
	}

	drawScrollBar();
}
When in the Quests section, we're calling drawQuests:
static void drawQuests(void)
{
	Quest    *q;
	int       i, y, start, end;
	char     *title, *description, *name, *status;
	SDL_Color c;

	i = 0;
	start = MIN(MAX(itemNumber - (NUM_DISPLAY_QUESTS / 2), 0), game.totalQuests - NUM_DISPLAY_QUESTS);
	end = start + NUM_DISPLAY_QUESTS - 1;
	y = 75;

	for (q = game.questHead.next; q != NULL; q = q->next)
	{
		if (i >= start && i <= end)
		{
			if (q == selectedQuest)
			{
				drawRect(10, y, 650, 100, 64, 255, 255, 32);
				drawOutlineRect(10, y, 650, 100, 64, 255, 255, 255);
			}

			if (q->status == QS_INCOMPLETE)
			{
				title = "??? ??? ???";
				description = "???";
				name = "??? ???";
				status = "";

				c.r = c.g = c.b = 128;
			}
			else
			{
				title = q->title;
				description = q->description;
				name = q->requester->name;

				if (q->status == QS_IN_PROGRESS)
				{
					status = "[In Progress]";

					c.r = 200;
					c.g = 200;
					c.b = 200;
				}
				else
				{
					status = "[Complete]";

					c.r = 128;
					c.g = 255;
					c.b = 128;
				}
			}

			drawText(title, 25, y, c.r, c.g, c.b, TEXT_ALIGN_LEFT, 0);
			drawText(description, 25, y + 30, c.r, c.g, c.b, TEXT_ALIGN_LEFT, 0);
			drawText(name, 25, y + 60, c.r, c.g, c.b, TEXT_ALIGN_LEFT, 0);
			drawText(status, 650, y + 60, 160, 160, 160, TEXT_ALIGN_RIGHT, 0);

			y += 120;
		}

		i++;
	}
}
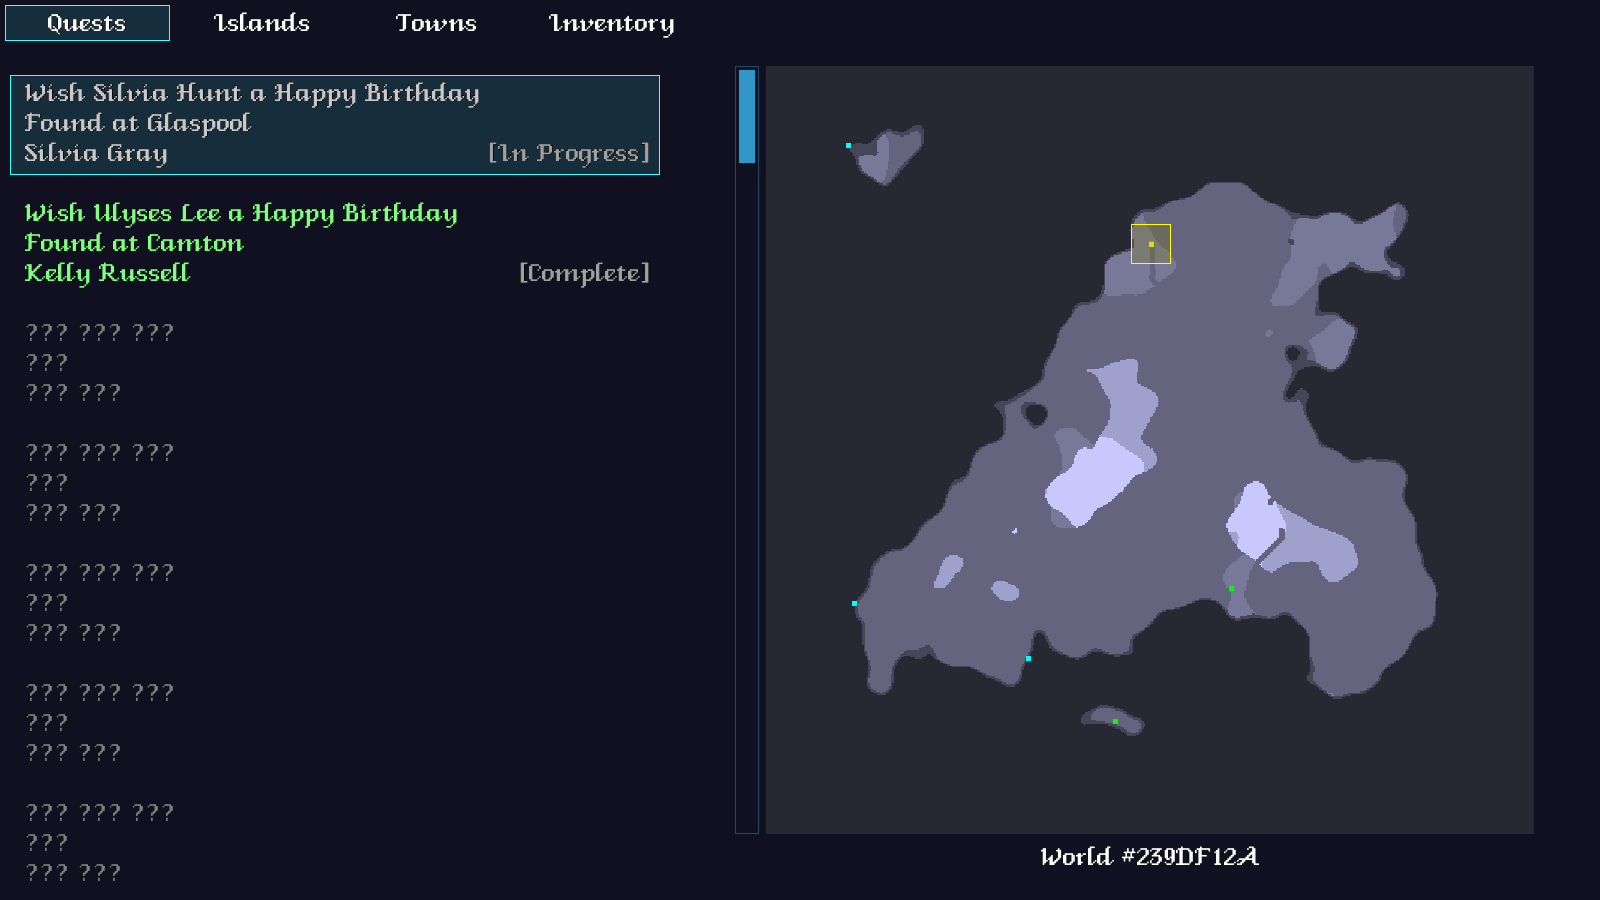
This function is very much like drawTowns and drawIslands, except we're printing a lot more detail about the Quest. If the quest isn't known to us, we're printing a series of question marks. The colour of the text will also change, depending on the quest status (unknown will be grey, incomplete a light grey, and complete a pale green).
With our Quest Log updated, we're more or less done. We just need to look at how we're actually generating the quests. This is done in overworldGen.c, after we've finished creating our Residents, Towns, and other entities.
static int generateOverworldWorker(void *p)
{
	double **elevation, **moisture;
	long     then;

	// snipped

	addQuests();

	// snipped

	return 0;
}
In generateOverworldWorker, we're calling addQuests:
static void addQuests(void)
{
	Entity *e, *r;
	Town   *t;

	initQuests();

	for (e = game.overworld.map.entityHead.next; e != NULL; e = e->next)
	{
		if (e->type == ET_SETTLEMENT)
		{
			t = (Town *)e->data;

			for (r = t->map.entityHead.next; r != NULL; r = r->next)
			{
				if (r->type == ET_RESIDENT && rand() % 10 == 0)
				{
					generateQuest(r);

					SDL_LogMessage(SDL_LOG_CATEGORY_APPLICATION, SDL_LOG_PRIORITY_INFO, "Generated quest for %s (%s)", r->name, e->name);
				}
			}
		}
	}
}
The addQuests function basically loops through all the Residents in our game (via the Towns on the overworld), and will randomly create a quest for them, based on a 1 in 10 chance. If you feel you want more quests, simply reduce 10 to smaller value. Be careful not to drop this value too low (3 should probably be the limit), or you could cause the game to lock up when it comes to searching for Residents that already don't have quests associated with them when setting up the birthday greetings.
Finally, a quick look at getEntityById, in entities.c:
Entity *getEntityById(int id)
{
	Entity *e1, *e2;

	for (e1 = game.overworld.map.entityHead.next; e1 != NULL; e1 = e1->next)
	{
		if (e1->id == id)
		{
			return e1;
		}

		if (e1->type == ET_SETTLEMENT)
		{
			for (e2 = ((Town *)e1->data)->map.entityHead.next; e2 != NULL; e2 = e2->next)
			{
				if (e2->id == id)
				{
					return e2;
				}
			}
		}
	}

	SDL_LogMessage(SDL_LOG_CATEGORY_APPLICATION, SDL_LOG_PRIORITY_CRITICAL, "No such entity with id %d", id);
	exit(1);
}
As stated back when we first introduced entities, each one will have a unique id in the game. In order to find an entity, we need to loop through all the entities in the overworld, as well as the towns, to locate one with a matching `id`. Something we could do here is to create an array of pointers to our entities, for a faster lookup. This is the sort of thing that could also apply to towns, quests, etc. As noted in SDL2 Versus, linked lists and array both have their advantages and disadvantages. In this case, I opted for linked lists as my primary data holder. At your option, you may find you would preferred to use arrays through the game instead (but be aware of fitfalls associated with re-ordering arrays that involve pointers).
Our basic Quest structure is complete! We can generate quests, assign them to residents, and perform all the tasks necessary to complete them. Ultimately, we will implement three different quest types - a delivery quest, a fetch quest (everyone's favourite!), and a dispose quest. Over the next three parts, we'll add these in, and also introduce the inventory, since it will make for a good addition to see what is being carried by the player.
Purchase
The source code for all parts of this tutorial (including assets) is available for purchase, as part of the SDL2 tutorials bundle:
From itch.io