PC Games
• Orb
• Lasagne Monsters
• Three Guys Apocalypse
• Water Closet
• Blob Wars : Attrition
• The Legend of Edgar
• TBFTSS: The Pandoran War
• Three Guys
• Blob Wars : Blob and Conquer
• Blob Wars : Metal Blob Solid
• Project: Starfighter
• TANX Squadron
Tutorials
• 2D shoot 'em up
• 2D top-down shooter
• 2D platform game
• Sprite atlas tutorial
• Working with TTF fonts
• 2D adventure game
• Widget tutorial
• 2D shoot 'em up sequel
• 2D run and gun
• Roguelike
• Medals (Achievements)
• 2D turn-based strategy game
• 2D isometric game
• 2D map editor
• 2D mission-based shoot 'em up
• 2D Santa game
• 2D split screen game
• 2D quest game
• SDL 1 tutorials (outdated)
Latest Updates
The Legend of Edgar 1.38
Thu, 1st January 2026
SDL2 Quest game tutorial
Wed, 7th May 2025
SDL2 Versus game tutorial
Wed, 20th March 2024
Download keys for SDL2 tutorials on itch.io
Sat, 16th March 2024
The Legend of Edgar 1.37
Mon, 1st January 2024
Tags
• battle-for-the-solar-system (10)
• blob-wars (10)
• brexit (1)
• code (6)
• edgar (10)
• games (45)
• lasagne-monsters (1)
• making-of (5)
• match3 (1)
• numberblocksonline (1)
• orb (2)
• site (1)
• tanx (4)
• three-guys (3)
• three-guys-apocalypse (3)
• tutorials (18)
• water-closet (4)
Books

Firmware
HF-Tech's chips have changed the world. Embedded into the heads of over 90% of the world's population, they have cured autism, dementia, provided intelligence boosts, and helped to ease some of the more mundane tasks in life. Daniel Blair, hacker and Workshop member, however is not convinced that everything is as rosy as it seems. But is he looking in all the wrong places..?
— Simple 2D quest game —
Part 12: The quest log
Note: this tutorial assumes knowledge of C, as well as prior tutorials.


Introduction
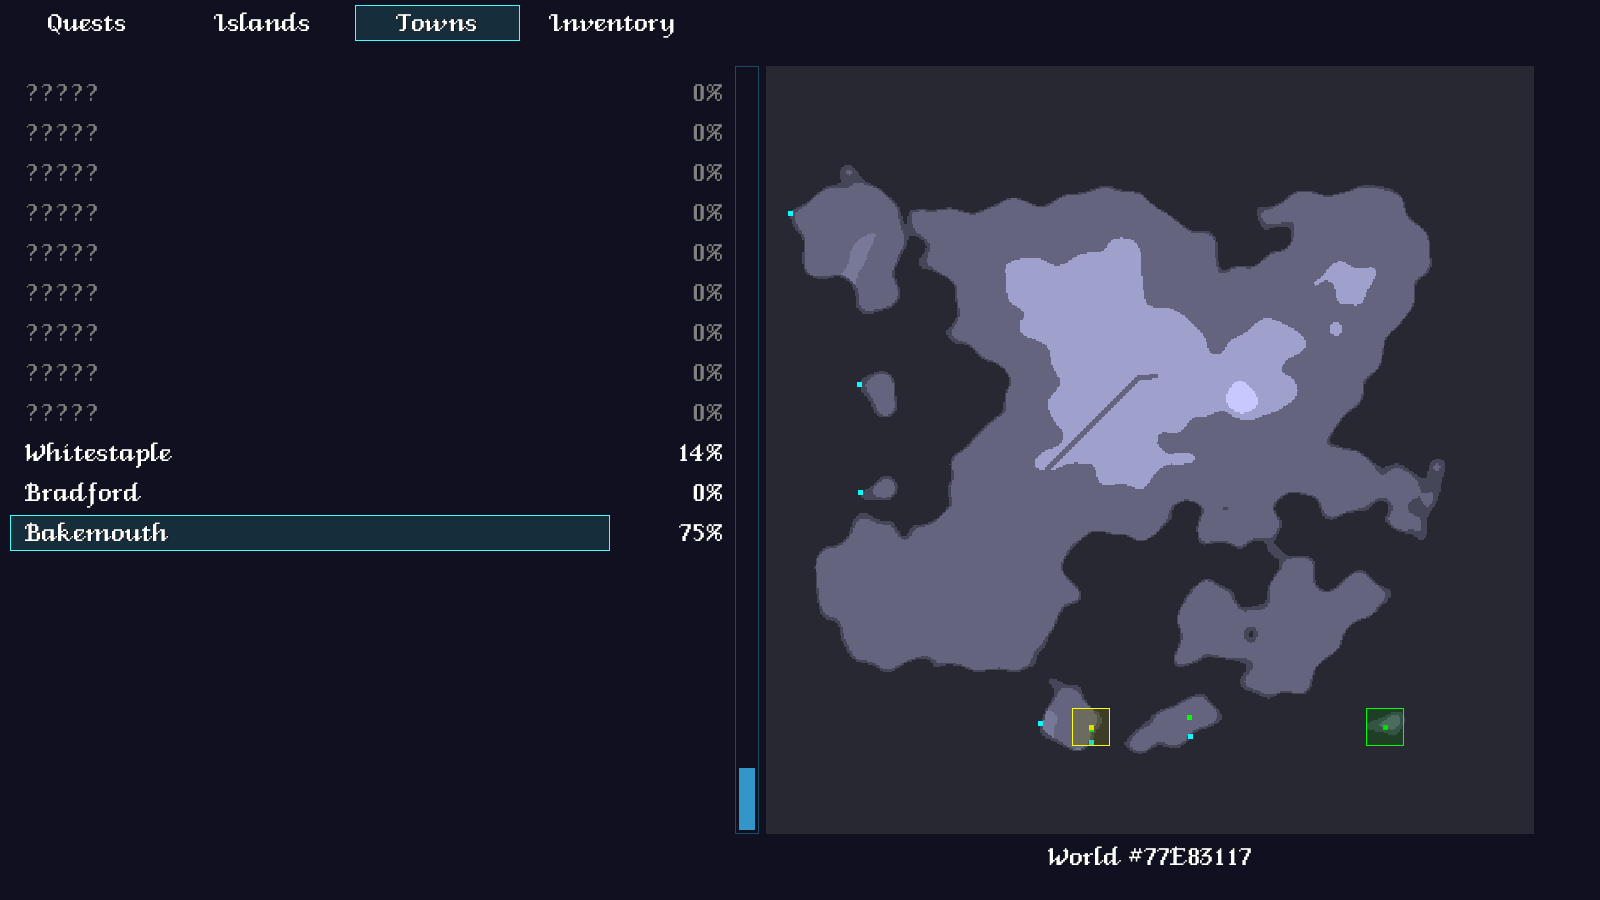
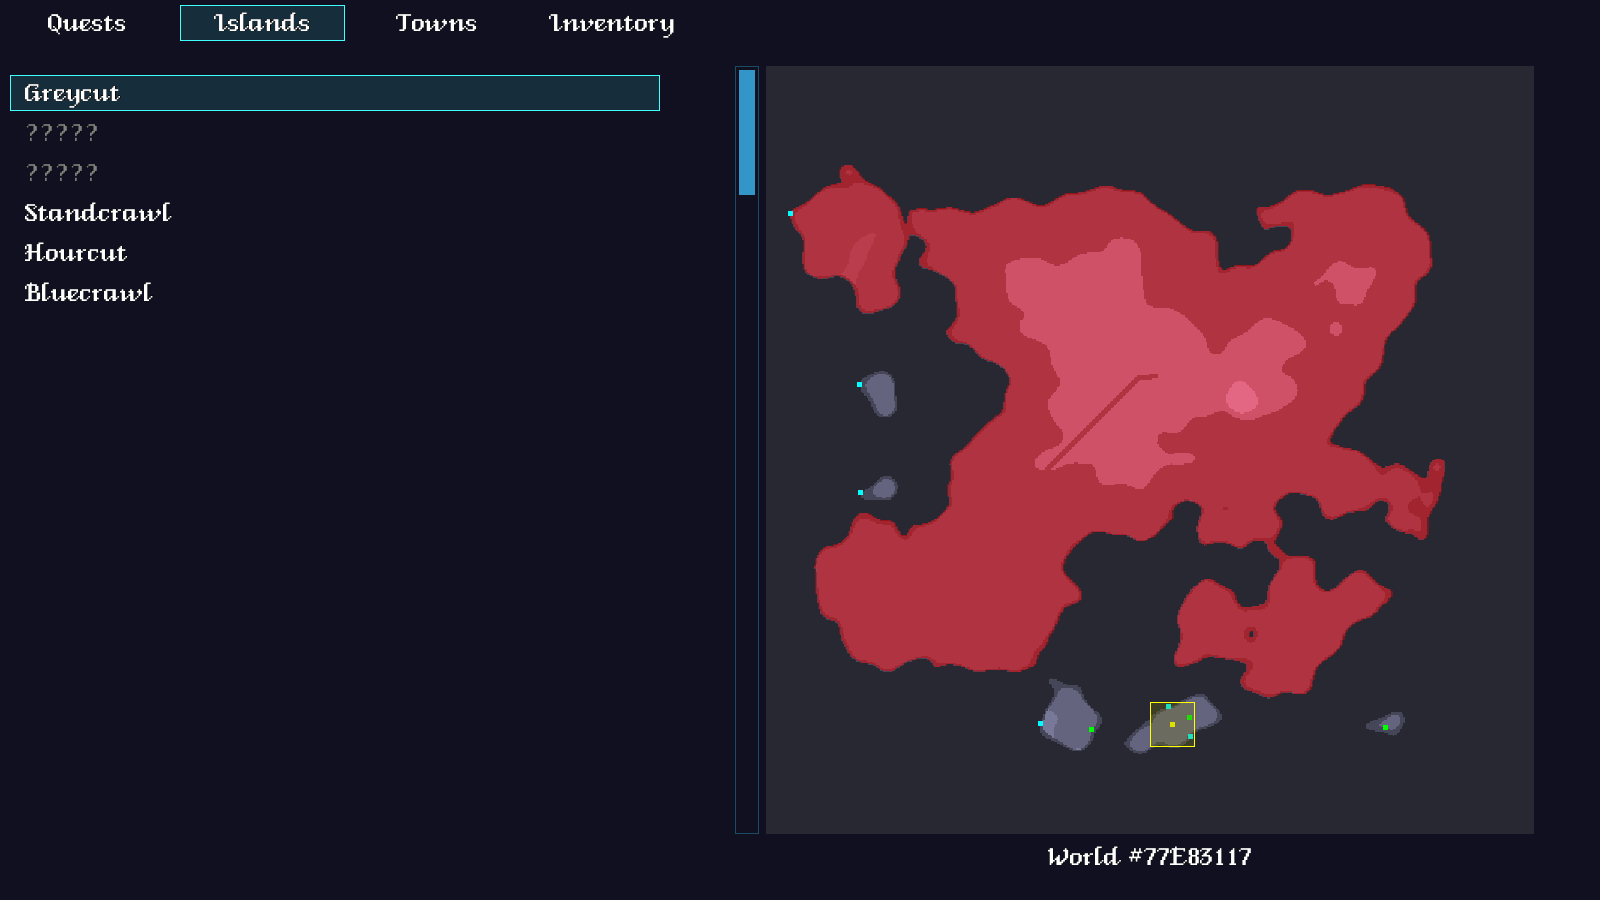
We're able to explore our world fully, and see how our exploration progress is going on the HUD we've added. It would be good if the Quest Log could be made more useful; being able to see which islands we've discovered, how many towns there are yet to find, and how much of each town we've explored would be great. So, in this part we're going to get to work on displaying this information in the Quest Log.
Extract the archive, run cmake CMakeLists.txt, followed by make, and then use ./quest12 to run the code. As before, you can move around with the WASD control scheme. Open the Quest Log by pressing Tab. Use A and D to switch sections (the Quest and Inventory sections will be empty), and W and S to move up and down through the list items. Note how as you explore the world, the islands and towns sections show information about what we've uncovered. When you're finished, close the window to exit.
Inspecting the code
We have four sections on our Quest Log, but we will only be focusing on the Islands and Towns sections in this part. When we come to adding in quests, we will revist the others.
There's quite a few new additions and updates that we'll need in order for the Quest Log to display our islands and towns (though thankfully this won't be nearly as involved as the previous part!).
Everything in this part is done in questLog.c, so no need to go jumping around other files this time (we added everything in the previous part). So, let's start with openQuestLog:
void openQuestLog(void (*rtn)(void))
{
	pulse = 0;

	closeQuestLog = rtn;

	show = SHOW_QUESTS;

	itemNumber = 0;
	itemNumberTotal = 0;

	scrollTimer = 0;

	highlightedTown = NULL;
	highlightedIsland = NULL;

	app.delegate.logic = logic;
	app.delegate.draw = draw;
}
We're initialising a number of new variables in this function. `show` is used to determine the section that we're currently viewing. itemNumber is the currently selected item in the list we're viewing, while itemNumberTotal is the total number of items in the active list. scrollTimer is used to control how fast we move through items when holding down W and S. highlightedTown and highlightedIsland are pointers to the town and island that we currently want to highlight on the map.
Nothing taxing. So, let's move onto the updates to `logic`:
static void logic(void)
{
	pulse += 0.1 * app.deltaTime;

	doControls();

	switch (show)
	{
		case SHOW_ISLANDS:
			doIslands();
			break;

		case SHOW_TOWNS:
			doTowns();
			break;

		default:
			itemNumber = 0;
			itemNumberTotal = 0;
			break;
	}
}
We're now testing the value of `show`, to see how we want to do, depending on which section is currently active. If it's SHOW_ISLANDS, we'll call doIslands. If it's SHOW_TOWNS, we'll call doTowns. Otherwise, we're setting both itemNumber and itemNumberTotal to 0, since the other sections don't do anything, and there are no items in them.
Before we get to doIslands and doTowns, we've also made an update to doControls:
static void doControls(void)
{
	scrollTimer = MAX(scrollTimer - app.deltaTime, 0);

	if (app.keyboard[SDL_SCANCODE_A])
	{
		show = (SHOW_MAX + (show - 1)) % SHOW_MAX;

		itemNumber = 0;
		itemNumberTotal = 0;
		highlightedTown = NULL;
		highlightedIsland = NULL;

		app.keyboard[SDL_SCANCODE_A] = 0;
	}

	if (app.keyboard[SDL_SCANCODE_D])
	{
		show = (show + 1) % SHOW_MAX;

		itemNumber = 0;
		itemNumberTotal = 0;
		highlightedTown = NULL;
		highlightedIsland = NULL;

		app.keyboard[SDL_SCANCODE_D] = 0;
	}

	if (scrollTimer == 0)
	{
		if (app.keyboard[SDL_SCANCODE_W])
		{
			itemNumber--;

			scrollTimer = SCROLL_TIMER;
		}

		if (app.keyboard[SDL_SCANCODE_S])
		{
			itemNumber++;

			scrollTimer = SCROLL_TIMER;
		}
	}

	if (app.keyboard[SDL_SCANCODE_TAB])
	{
		closeQuestLog();

		app.transitionTimer = FPS / 4;

		app.keyboard[SDL_SCANCODE_TAB] = 0;
	}
}
As we can now cycle sections, we've added in checks for our WASD controls. Pressing A or D will decrease or increase the value of `show`, cycling around when we fall below 0 and hitting SHOW_MAX. Any time these keys are pressed, we're resetting itemNumber, itemNumberTotal, highlightedTown, and highlightedIsland. We're also resetting the control key itself, so changing sections requires a key press. We can scroll up and down the list of items any time scrollTimer is 0. When pressing W or S we're decreasing or increasing itemNumber, and also resetting the scrollTimer value, to add a delay to the next move.
Again, quite simple. Next, let's look at how doIslands works:
static void doIslands(void)
{
	int     i;
	Island *is;

	i = 0;
	itemNumber = MIN(MAX(itemNumber, 0), game.overworld.numIslands - 1);
	itemNumberTotal = game.overworld.numIslands;

	highlightedIsland = NULL;

	for (is = game.overworld.islandHead.next; is != NULL; is = is->next)
	{
		if (i == itemNumber)
		{
			selectedIsland = is;

			if (is->discovered)
			{
				highlightedIsland = is;
			}
		}

		i++;
	}
}
This is the function that will be called whenever we're on the Islands section. Here, we're ensuring that itemNumber is within the range of 0 and the number of islands in our world (numIslands), and also setting itemNumberTotal to this value. Next, we're looping through all our islands, setting selectedIsland to the item at the list index (`i`) that matches itemNumber. If the island is `discovered`, we also set it as the highlightedIsland. Our islands are stored as a linked list, hence the search loop. If our islands were stored as an array, we could jump directly to that index.
Next, we have doTowns:
static void doTowns(void)
{
	int     i;
	Entity *e;

	i = 0;
	itemNumber = MIN(MAX(itemNumber, 0), game.overworld.numTowns - 1);
	itemNumberTotal = game.overworld.numTowns;

	highlightedTown = NULL;

	for (e = game.overworld.map.entityHead.next; e != NULL; e = e->next)
	{
		if (e->type == ET_SETTLEMENT)
		{
			if (i == itemNumber)
			{
				selectedTown = e;

				if (((Town *)e->data)->discovered)
				{
					highlightedTown = e;
				}
			}

			i++;
		}
	}
}
This works in a very similar way to doIslands, except we're checking all the towns in the Overworld (by looping over all the enities in the world, and checking their `type` - note that we only incremenet `i` if we encounter a town). The town will become the highlightedTown if it has been `discovered`.
That's all our logic dealt with, so we can move on to the rendering. Starting with `draw`, we've made some tweaks:
static void draw(void)
{
	drawSectionBar();

	drawMap();

	switch (show)
	{
		case SHOW_ISLANDS:
			drawIslands();
			break;

		case SHOW_TOWNS:
			drawTowns();
			break;

		default:
			break;
	}

	drawScrollBar();
}
Once again, we're testing the value of `show` to see what we want to display. We'll call drawIslands or drawTowns, depending on the section we're currently viewing. We'll start with drawIslands:
static void drawIslands(void)
{
	Island   *is;
	int       i, y, start, end;
	SDL_Color c;
	char     *name;

	i = 0;
	start = MIN(MAX(itemNumber - (NUM_DISPLAY_ISLANDS / 2), 0), game.overworld.numIslands - NUM_DISPLAY_ISLANDS);
	end = start + NUM_DISPLAY_ISLANDS - 1;
	y = 75;

	for (is = game.overworld.islandHead.next; is != NULL; is = is->next)
	{
		if (i >= start && i <= end)
		{
			if (is == selectedIsland)
			{
				drawRect(10, y, 650, 36, 64, 255, 255, 32);
				drawOutlineRect(10, y, 650, 36, 64, 255, 255, 255);
			}

			if (!is->discovered)
			{
				name = "?????";

				c.r = c.g = c.b = 128;
			}
			else
			{
				name = is->name;

				c.r = c.g = c.b = 255;
			}

			drawText(name, 25, y, c.r, c.g, c.b, TEXT_ALIGN_LEFT, 0);

			y += 40;
		}

		i++;
	}
}
When it comes to drawing our islands (and towns) we'll want to display a certain number of items (NUM_DISPLAY_ISLANDS and NUM_DISPLAY_TOWNS). The items selected will be some of those that come before our current item and some that come after. We'll calculate this, and place the results into two variables called `start` and `end`. Next, we'll loop through all our islands, and display the name of those that are relevant to the current view (i.e., their place in the list falls between `start` and `end`, inclusive). In short, this means that as we scroll up and down our list, we'll be able to see which items come before and after the current, much like you'd select in other list UIs.
If the current island is the one we have selected (selectedIsland), we'll highlight it with a coloured background. If it's yet to be `discovered`, instead of its name we'll print a series of question marks (and also make the text color, governed by `c`, grey). Otherwise, we'll draw the name of the island as expected.
All this results in a list that we can scroll up and down, and will show which islands are known to us.
Next, we have drawTowns:
static void drawTowns(void)
{
	Entity   *e;
	Town     *t;
	int       i, y, start, end;
	SDL_Color c;
	char     *name;

	i = 0;
	start = MIN(MAX(itemNumber - (NUM_DISPLAY_TOWNS / 2), 0), game.overworld.numTowns - NUM_DISPLAY_TOWNS);
	end = start + NUM_DISPLAY_TOWNS - 1;
	y = 75;

	for (e = game.overworld.map.entityHead.next; e != NULL; e = e->next)
	{
		if (e->type == ET_SETTLEMENT)
		{
			t = (Town *)e->data;

			if (i >= start && i <= end)
			{
				if (e == selectedTown)
				{
					drawRect(10, y, 600, 36, 64, 255, 255, 32);
					drawOutlineRect(10, y, 600, 36, 64, 255, 255, 255);
				}

				if (!t->discovered)
				{
					name = "?????";

					c.r = c.g = c.b = 128;
				}
				else
				{
					name = e->name;

					c.r = c.g = c.b = 255;
				}

				drawText(name, 25, y, c.r, c.g, c.b, TEXT_ALIGN_LEFT, 0);

				drawText(expiringFormattedString("%d%%", (int)((1.0 * t->numBuildingsVisited / t->numBuildings) * 100)), 725, y, c.r, c.g, c.b, TEXT_ALIGN_RIGHT, 0);

				y += 40;
			}

			i++;
		}
	}
}
As you can see, this works much in the same way as the islands, except that we're now displaying the names of the towns. Here, we'll also display a series of question marks if the town has yet to be `discovered`, and highlight the currently selected item in the list. However, something else we're doing is displaying a percentage to the right of the town name. This will show how many buildings have been visited in that town, so we know whether we've entered all of them, or if we need to return there to max out our exploration total. A nice feature to have, I'm sure you'll agree. It would be annoying to not know which towns have been fully explored yet.
Next we have the changes to drawMap:
static void drawMap(void)
{
	SDL_Rect dest;

	// snipped

	highlightIsland(&dest);

	drawEnts(&dest);

	highlightEntity(game.overworld.map.player, 255, 255, 0, &dest);

	if (highlightedTown != NULL)
	{
		highlightEntity(highlightedTown, 0, 255, 0, &dest);
	}

	// snipped
}
We're doing two new things here - we're making a call to highlightedIsland, and we're also testing if highlightedTown is not null, and calling highlightEntity if so. This means that if we have a town selected in our town listing (highlightedTown will be set in doTowns), we'll mark it on the map with a pulsing rectangle, in the same way we do with the player.
Finally, let's look at highlightIsland:
static void highlightIsland(SDL_Rect *dest)
{
	SDL_Rect src;
	int      i;
	RLE     *rle;
	double   alpha;

	if (highlightedIsland != NULL)
	{
		src.w = 3;

		alpha = ((1 + sin(-pulse)) * 0.5) * 32;

		for (i = 0; i < (highlightedIsland->bounds.x2 - highlightedIsland->bounds.x1); i++)
		{
			for (rle = &highlightedIsland->rle[i]; rle != NULL; rle = rle->next)
			{
				src.x = (highlightedIsland->bounds.x1 + i) * MAP_SCALE;
				src.x += dest->x;

				src.y = rle->start * MAP_SCALE;
				src.y += dest->y;

				src.h = (rle->end - rle->start) * MAP_SCALE;

				drawRect(src.x, src.y, src.w, src.h, highlightedIsland->color.r, highlightedIsland->color.g, highlightedIsland->color.b, 64 + alpha);
			}
		}
	}
}
If you're thinking this code looks familiar, it's because it was first added in Part 3 (and removed shortly thereafter). This code is largely the same as what existed back then, only that we're manipulating the colour of the island according to the value of `pulse`. Our RLE rectangles will have their alpha adjusted, so that they subtly flash their colour, rather than appearing solid. This will help to identify smaller island, with a gentle change of colour.
We're done! Our Quest Log now shows us information about the towns and islands we've visited and have yet to discover. This enables us to know exactly how much we've yet to find, and where to find it, which is another great quality of life win. It's also going to be come in very handy when we implement quests, as we will be able to see where we need to go while undertaking them.
It's finally time we made a start on the quests. In the next part, we'll take a look at what needs to go into supporting a quest system in our game, and what other changes will be needed to the Quest Log, in order to make it all work.
Purchase
The source code for all parts of this tutorial (including assets) is available for purchase, as part of the SDL2 tutorials bundle:
From itch.io