PC Games
• Orb
• Lasagne Monsters
• Three Guys Apocalypse
• Water Closet
• Blob Wars : Attrition
• The Legend of Edgar
• TBFTSS: The Pandoran War
• Three Guys
• Blob Wars : Blob and Conquer
• Blob Wars : Metal Blob Solid
• Project: Starfighter
• TANX Squadron
Tutorials
• 2D shoot 'em up
• 2D top-down shooter
• 2D platform game
• Sprite atlas tutorial
• Working with TTF fonts
• 2D adventure game
• Widget tutorial
• 2D shoot 'em up sequel
• 2D run and gun
• Roguelike
• Medals (Achievements)
• 2D turn-based strategy game
• 2D isometric game
• 2D map editor
• 2D mission-based shoot 'em up
• 2D Santa game
• 2D split screen game
• 2D quest game
• SDL 1 tutorials (outdated)
Latest Updates
The Legend of Edgar 1.38
Thu, 1st January 2026
SDL2 Quest game tutorial
Wed, 7th May 2025
SDL2 Versus game tutorial
Wed, 20th March 2024
Download keys for SDL2 tutorials on itch.io
Sat, 16th March 2024
The Legend of Edgar 1.37
Mon, 1st January 2024
Tags
• battle-for-the-solar-system (10)
• blob-wars (10)
• brexit (1)
• code (6)
• edgar (10)
• games (45)
• lasagne-monsters (1)
• making-of (5)
• match3 (1)
• numberblocksonline (1)
• orb (2)
• site (1)
• tanx (4)
• three-guys (3)
• three-guys-apocalypse (3)
• tutorials (18)
• water-closet (4)
Books
The Third Side (Battle for the Solar System, #2)
The White Knights have had their wings clipped. Shot down and stranded on a planet in independent space, the five pilots find themselves sitting directly in the path of the Pandoran war machine as it prepares to advance The Mission. But if they can somehow survive and find a way home, they might just discover something far more worrisome than that which destroyed an empire.
— Simple 2D quest game —
Part 11: Discovery and exploration
Note: this tutorial assumes knowledge of C, as well as prior tutorials.


Introduction
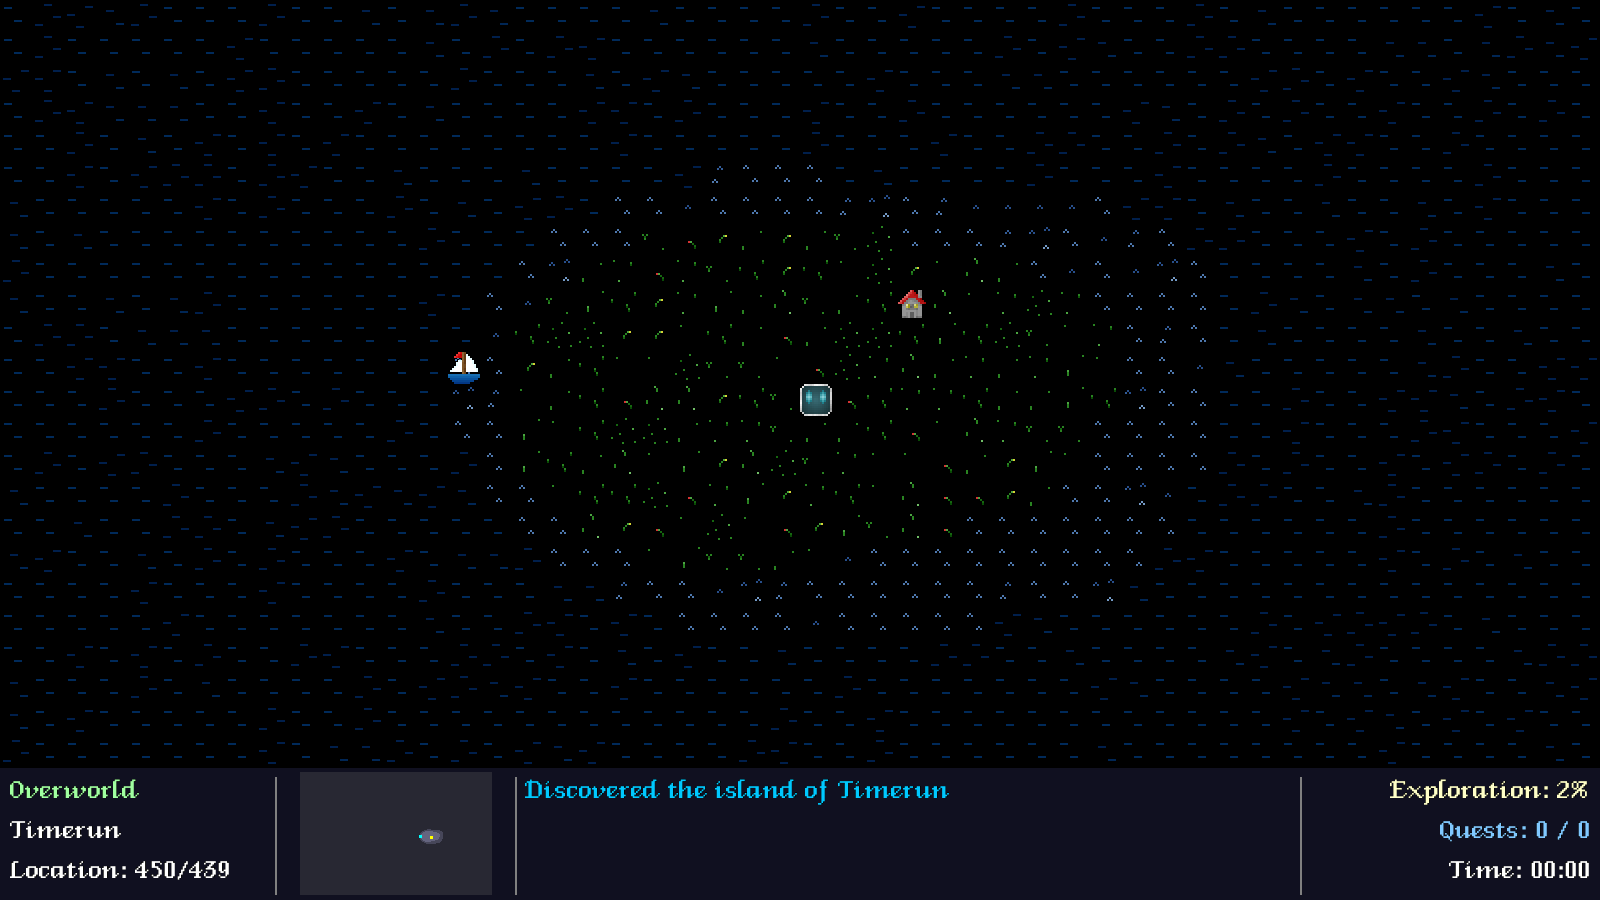
We're now able to fully explore the world we've built, including all the towns. It would be good if we were able to track this progress somehow, to see how much we've discovered. Being able to locate our position in the world would also be very useful. So, in this part we're going to add all that in. Note that this will be quite a long part, as there are lots of bits and pieces we have to add.
Extract the archive, run cmake CMakeLists.txt, followed by make, and then use ./quest11 to run the code. As before, you can move around with the WASD control scheme. Explore the world as before. Note how when you first step foot on islands or enter towns that the HUD displays a message to that effect. Also note the the total exploration percentage on the right will rise. Opening the Quest Log (Tab) will now display your current location, as a pulsing yellow square. When you're finished, close the window to exit.
Inspecting the code
As stated before, there is quite a lot to get through, so we won't linger. We'll also not go into too much details on each section.
To begin with, we've updated defs.h:
#define HUD_HEIGHT (32 * 4)

#define MAP_RENDER_WIDTH  (SCREEN_WIDTH / MAP_TILE_SIZE)
#define MAP_RENDER_HEIGHT ((SCREEN_HEIGHT - HUD_HEIGHT) / MAP_TILE_SIZE)
As our HUD now consumes a portion of the screen, we want to reduce our map render height, to prevent overdraw. We'll therefore subtract the hud's height from the screen height.
Next, over to structs.h, where we've made some updates and additions. First, we've updated Island:
struct Island
{
	char        name[MAX_NAME_LENGTH];
	int         size;
	BoundingBox bounds;
	SDL_Color   color;
	SDL_Point   lowPoint;
	RLE		*rle;
	int         discovered;
	Island     *next;
};
We've added the `discovered` flag, to track whether we've discovered this island.
Next, we have HudMessage:
struct HudMessage
{
	char        text[MAX_MESSAGE_LENGTH];
	SDL_Color   color;
	double      timer;
	HudMessage *next;
};
This acts quite a lot like HUD messages in our tutorials, holding the message itself (`text`), the `color`, and also a `timer` variable, that will be used for "typing" the message text to the screen.
We've also updated Overworld:
typedef struct
{
	long         seed;
	Map          map;
	Island       islandHead, *islandTail;
	SDL_Texture *miniMapTexture;
	int          numIslands;
	int          numTowns;
} Overworld;
We're now tracking the number of island and towns in our world. This will come into play in the next part.
An update to Building follows:
struct Building
{
	char        name[MAX_NAME_LENGTH];
	int         type;
	int         visited;
	BoundingBox bounds;
	Building   *next;
};
As with our islands, we're tracking whether a building has been "discovered", with the help of such a `visited` flag.
Town is next:
typedef struct
{
	char      name[MAX_NAME_LENGTH];
	Entity   *entity;
	Map       map;
	SDL_Point entrance;
	Building  buildingHead;
	int       discovered;
	int       numBuildings, numBuildingsVisited;
} Town;
We're tracking whether the town itself has been `discovered`, and also the number of buildings within the town (numBuildings), and those that have been visited (numBuildingsVisited - again, this will come into play in the next).
Finally, we've updated Game:
typedef struct
{
	Overworld  overworld;
	Entity    *town;
	Building  *building;
	Map       *map;
	Island    *island;
	MessageBox messageBoxHead, *messageBoxTail;
	int        exploration, totalExploration;
	int        completedQuests, totalQuests;
	double     time;
} Game;
We're storing our current `exploration` value, the total exploration (totalExploration) possible, and the number of completed and total quests (completedQuests, totalQuests) (for later).
With our structs updated, we can move on to hud.c, where all the logic and rendering for our HUD is found. This will look quite familiar to those who have followed past tutorials, so we should be able to get through this all quite swiftly.
First up is initHud:
void initHud(void)
{
	memset(&hudMessageHead, 0, sizeof(HudMessage));
	hudMessageTail = &hudMessageHead;
}
A standard init function, to setup our messages linked list.
Over next to doHud:
void doHud(void)
{
	HudMessage *hudMessage;
	long        l;
	static int  numHudMessages;

	numHudMessages = 0;

	if (game.messageBoxHead.next == NULL)
	{
		hudMessage = hudMessageHead.next;

		while (hudMessage != NULL)
		{
			numHudMessages++;

			l = strlen(hudMessage->text) + 1;

			hudMessage->timer = MIN(hudMessage->timer + 0.4 * app.deltaTime, l);

			if (hudMessage->timer == l)
			{
				hudMessage = hudMessage->next;
			}
			else
			{
				hudMessage = NULL;
			}
		}
	}

	while (numHudMessages > MAX_HUD_MESSAGES)
	{
		hudMessage = hudMessageHead.next;

		hudMessageHead.next = hudMessage->next;

		free(hudMessage);

		numHudMessages--;
	}
}
The sole purpose of this function is to process the messages. For each message in the list, we'll increase its `timer`. If the `timer` value is equal to the length of the message `text` itself, we'll move onto the next message, and proceed to increment its `timer`. Otherwise, we'll stop processing. The idea here is to fully complete the `timer` of each message before processing the next. This is what drives our typewriter effect, so that the previous message must finish typing before the next can start.
At the end of the function, we're testing if we have more messages in the list than the maximum allowed (MAX_HUD_MESSAGES). If so, we're removing the first message in the list, until we're down to the allowed maximum.
Pretty simple. Next, we have addHudMessage:
void addHudMessage(char *text, int r, int g, int b)
{
	HudMessage *hudMessage;

	hudMessage = malloc(sizeof(HudMessage));
	memset(hudMessage, 0, sizeof(HudMessage));
	hudMessageTail->next = hudMessage;
	hudMessageTail = hudMessage;

	STRCPY(hudMessage->text, text);
	hudMessage->color.r = r;
	hudMessage->color.g = g;
	hudMessage->color.b = b;
}
Not a lot to say here. This function creates a new HudMessage for the given `text` and colours (`r`, `g`, `b`), and adds it to the Hud's linked list.
Our logic step is more or less done, so we can look at the rendering phase, where things are a bit more interesting. This all happens in drawHud:
void drawHud(void)
{
	drawSeparators();

	drawLocationInfo();

	drawMiniMap();

	drawMessages();

	drawProgressInfo();
}
As you can see, we're delegating to other functions, which we'll go through one by one. We'll skip over drawSeparators, as this simply renders the lines between the sections.
So, over to drawLocationInfo:
static void drawLocationInfo(void)
{
	char *text;
	int   y;

	y = (SCREEN_HEIGHT - HUD_HEIGHT);

	if (game.town == NULL)
	{
		drawText("Overworld", 10, y, 160, 255, 160, TEXT_ALIGN_LEFT, 0);

		y += LINE_SPACING;

		if (game.island == NULL)
		{
			text = "Ocean";
		}
		else
		{
			text = expiringFormattedString("%s", game.island->name);
		}

		drawText(text, 10, y, 255, 255, 255, TEXT_ALIGN_LEFT, 0);
	}
	else
	{
		drawText(game.town->name, 10, y, 160, 255, 160, TEXT_ALIGN_LEFT, 0);

		y += LINE_SPACING;

		if (game.building == NULL)
		{
			text = "-";
		}
		else
		{
			text = game.building->name;
		}

		drawText(text, 10, y, 255, 255, 255, TEXT_ALIGN_LEFT, 0);
	}

	y += LINE_SPACING;
	text = expiringFormattedString("Location: %d/%d", game.map->player->x, game.map->player->y);
	drawText(text, 10, y, 255, 255, 255, TEXT_ALIGN_LEFT, 0);
}
What will be displayed in the location section of the HUD is determined by our present location. If we're not a town (so, we're in the overworld), our main location will be Overworld. Next, we'll either display the name of the island, if we're standing on one, otherwise we'll display "Ocean". As we'll see later on, as the player moves about we check whether they are on an island, with help of the RLE data.
If we're in a town, we'll display first the name of the town, and then the name of the building, should we happen to be in one. Otherwise, we'll simply render a dash. Finally, in both circumstances, we'll display the x and y location of the player on the current map (mainly to use up the extra line in the location info slot..!).
Next up, we have drawMiniMap, where things get rather interesting:
static void drawMiniMap(void)
{
	SDL_Rect  src;
	SDL_Rect  dest;
	int       x, y;
	Entity   *e;
	SDL_Color c;

	src.x = MIN(MAX(game.overworld.map.player->x - (HUD_HEIGHT / 2), 0), WORLD_WIDTH - (HUD_HEIGHT * 1.5));
	src.y = MIN(MAX(game.overworld.map.player->y - (HUD_HEIGHT / 2), 0), WORLD_HEIGHT - HUD_HEIGHT + 8);
	src.w = HUD_HEIGHT * 1.5;
	src.h = HUD_HEIGHT - 5;

	dest.x = 300;
	dest.y = (SCREEN_HEIGHT - HUD_HEIGHT);
	dest.w = src.w;
	dest.h = src.h;

	SDL_RenderCopy(app.renderer, game.overworld.miniMapTexture, &src, &dest);

	for (e = game.overworld.map.entityHead.next; e != NULL; e = e->next)
	{
		setEntityBlipColour(e, &c);

		if (c.r != 0 || c.g != 0 || c.b != 0)
		{
			x = e->x;
			x -= src.x;
			x += dest.x;

			y = e->y;
			y -= src.y;
			y += dest.y;

			if (x >= dest.x && y >= dest.y && x < dest.x + dest.w && y < dest.y + HUD_HEIGHT - 8)
			{
				drawRect(x, y, 3, 3, c.r, c.g, c.b, 255);
			}
		}
	}
}
This function is responsible for drawing the mini map that we see on the HUD. It displays the local area, highlighting some of the entities nearby. Simply put, what this function does is copies a rectangular area from the overworld's miniMapTexture (that was created way back in part 1, and is displayed on the Quest Log). The area copied (`src`) is centered around the player, and limited to the bounds of the map, in the same way our scrolling is. The width and height of both the source and destination (`dest`) rects is the same. We copy image data using SDL_RenderCopy.
With our map section rendered to the screen, we then move on to rendering all the entities on the world map. Note that we're always using the overworld entities, regardless of whether we are currently in a town (the mini map does not show the map of the town). For each entity, we're calling setEntityBlipColour, to define the colour of the blip (we'll come to setEntityBlipColour at the end). If the blip's colour is not pure black, we'll draw the entity as a 3x3 square on the map, with its position adjusted accordingly (those out of range will be skipped).
With our mini map all done, we can next look at drawMessages:
static void drawMessages(void)
{
	int         y;
	HudMessage *hudMessage;
	char        text[MAX_MESSAGE_LENGTH];

	y = SCREEN_HEIGHT - HUD_HEIGHT;

	for (hudMessage = hudMessageHead.next; hudMessage != NULL; hudMessage = hudMessage->next)
	{
		if (hudMessage->timer > 0)
		{
			memset(text, 0, sizeof(text));

			STRNCPY(text, hudMessage->text, (int)hudMessage->timer);

			if (strlen(text) < strlen(hudMessage->text))
			{
				strcat(text, "_");
			}

			drawText(text, 525, y, hudMessage->color.r, hudMessage->color.g, hudMessage->color.b, TEXT_ALIGN_LEFT, 0);

			y += 28;
		}
	}
}
This function simply displays the hud messages, rendering them one per line. A message will only be displayed if its `timer` value is greater than 0. Due to the way our logic works, a HudMessage's `timer` value will always be 0 if the previous message's `timer` is less than the length of its `text`. So, in other words, a message must be fully printed out before the next one will start to display. We add an underscore to the end of the message while it is being typed out, for effect.
drawProgressInfo is the final function we'll look at in hud.c, and it's rather simple to understand:
static void drawProgressInfo(void)
{
	int y, hours, mins, explorationPercent;

	explorationPercent = ((1.0 * game.exploration) / game.totalExploration) * 100;

	mins = (game.time / FPS) / 60;
	hours = mins / 60;

	mins %= 60;

	y = (SCREEN_HEIGHT - HUD_HEIGHT);
	drawText(expiringFormattedString("Exploration: %d%%", explorationPercent), SCREEN_WIDTH - 10, y, 255, 255, 200, TEXT_ALIGN_RIGHT, 0);

	y += LINE_SPACING;
	drawText(expiringFormattedString("Quests: %d / %d", game.completedQuests, game.totalQuests), SCREEN_WIDTH - 10, y, 128, 200, 255, TEXT_ALIGN_RIGHT, 0);

	y += LINE_SPACING;
	drawText(expiringFormattedString("Time: %02d:%02d", hours, mins), SCREEN_WIDTH - 10, y, 255, 255, 255, TEXT_ALIGN_RIGHT, 0);
}
We're displaying our exploration progress as a percentage (worked out from Game's exploration and totalExploration values), the number of quests we've completed and the total currently available (which will both be 0 right now), and finally the time we've spent playing the game, in hours and minutes. Nothing difficult to get our heads around.

That's our HUD finished, which can now display some useful information. Next, let's look at the changes we've made to the Quest Log. These will be some minor changes for now, with a much larger set of changes coming in the next part. For now, we're going to focus on making the map a lot more helpful.
So, over to questLog.c, where we've updated drawMap:
static void drawMap(void)
{
	SDL_Rect dest;

	// snipped

	drawEnts(&dest);

	highlightEntity(game.overworld.map.player, 255, 255, 0, &dest);

	drawText(expiringFormattedString("World #%X", game.overworld.seed), dest.x + (dest.w / 2), dest.y + dest.h + 5, 255, 255, 255, TEXT_ALIGN_CENTER, 0);
}
We're calling two new functions here - drawEnts and highlightEntity. We'll look first at drawEnts:
static void drawEnts(SDL_Rect *dest)
{
	Entity   *e;
	SDL_Rect  src;
	SDL_Color c;

	for (e = game.overworld.map.entityHead.next; e != NULL; e = e->next)
	{
		setEntityBlipColour(e, &c);

		if (c.r != 0 || c.g != 0 || c.b != 0)
		{
			src.w = 5;
			src.h = 5;
			src.x = (dest->x + (e->x * MAP_SCALE)) - (src.w / 2);
			src.y = (dest->y + (e->y * MAP_SCALE)) - (src.h / 2);

			drawRect(src.x, src.y, src.w, src.h, c.r, c.g, c.b, 255);
		}
	}
}
drawEnts (short for draw entities) will look very familiar, since it is much the same as the code we had for rendering the entities on the mini map, on the HUD. Like then, we're calling setEntityBlipColour, and drawing anything that's not black. Note that we don't need to restrict the entities to those that will be in range, since we're able to see the full map this time.
Moving over to highlightEntity:
static void highlightEntity(Entity *e, int r, int g, int b, SDL_Rect *dest)
{
	SDL_Rect src;
	double   s;

	s = ((1 + sin(pulse)) * 0.5) * 15;

	src.w = 35 + s;
	src.h = 35 + s;
	src.x = (dest->x + (e->x * MAP_SCALE)) - (src.w / 2);
	src.y = (dest->y + (e->y * MAP_SCALE)) - (src.h / 2);

	drawRect(src.x, src.y, src.w, src.h, r / 2, g / 2, b / 2, 64);
	drawOutlineRect(src.x, src.y, src.w, src.h, r, g, b, 255);
}
Simply put, this function will render a pulsing rectangle at the given entity's location, in the map. The pulsing is controlled by the `pulse` variable, processed in the `logic` function of questLog.c. The colour can be specified (`r`, `g`, `b`), as in future we will want to have different colours when highlighting different entities. Right now, the only entity that we're highlighting is the player, that will have a yellow square around their location.
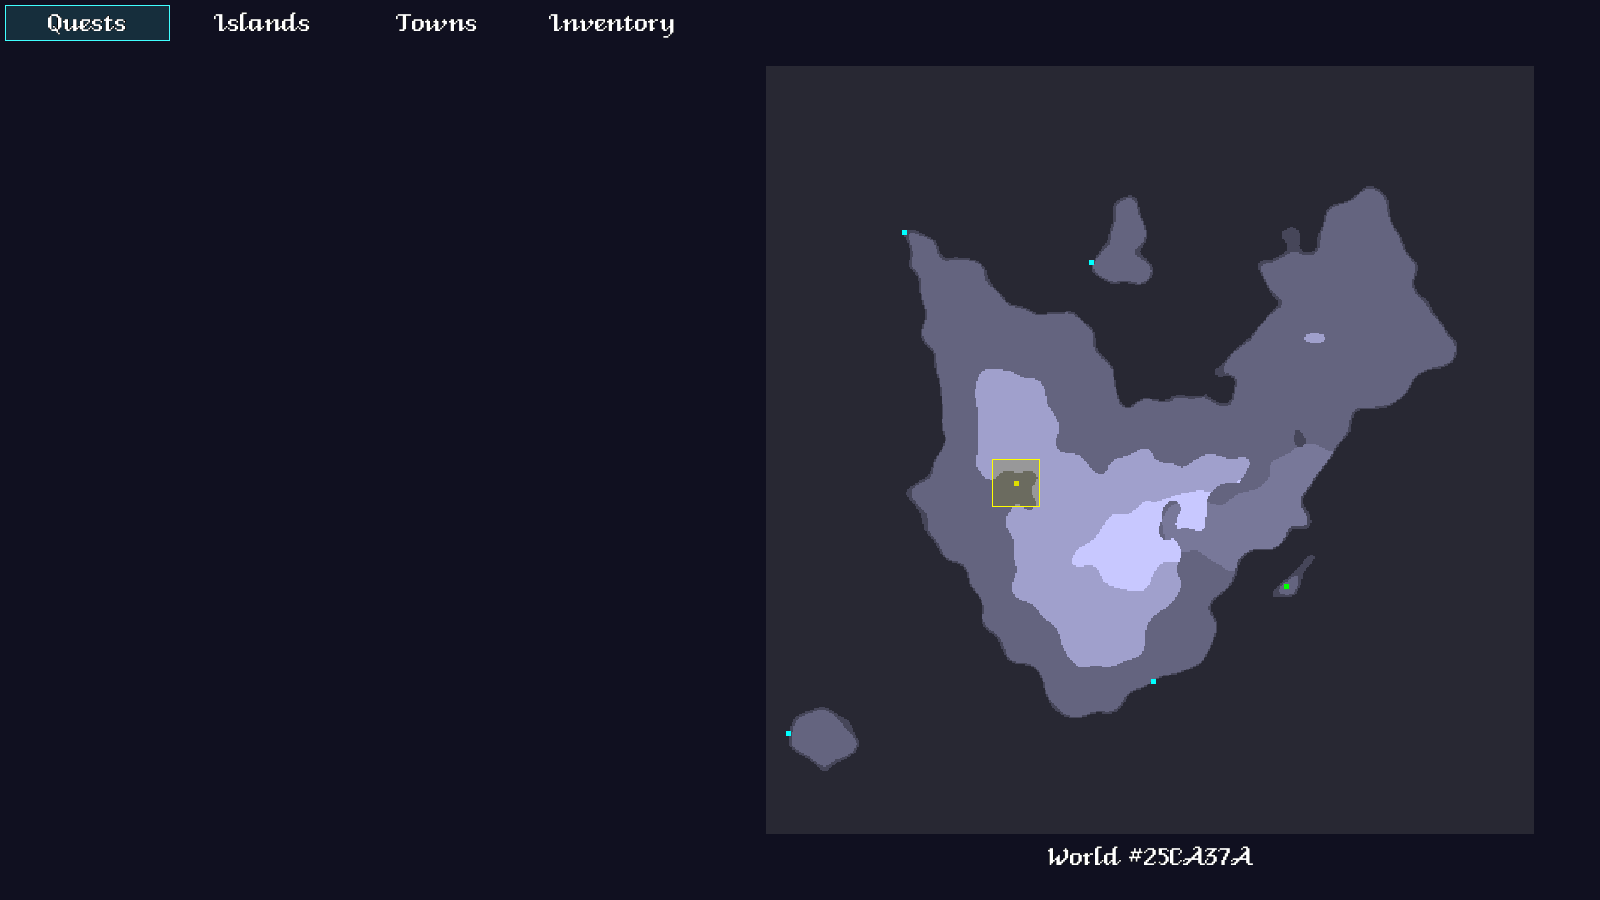
That's our quality of life updates done. We now have a HUD to will display messages and show us a mini map, as well as log our current exploration progress. We can also locate ourselves on the main Quest Log, which will greatly assist our overall journey. Boats and towns (once discovered) will also be marked on it.
Now, we can look at how our actual exploration and discovery is handled. When stepping foot on an island or entering a town for the first time, we're greeted with a HUD message that tells us such. We'll look now at how this is done. So, over to player.c, where we've made some tweaks.
First up, we've made changes to moveOverworld:
static void moveOverworld(int dx, int dy)
{
	int     t, x, y;
	Entity *e;

	// snipped

	if (game.map->player->type == ET_ADVENTURER)
	{
		if (t >= MT_SHALLOWS && t <= MT_LAND)
		{
			game.map->player->x = x;
			game.map->player->y = y;

			discoverIslands(x, y);
		}
	}
	else if (game.map->player->type == ET_BOAT)
	{
		game.island = NULL;

		// snipped
	}
}
Now, when controlling the adventurer entity (the robot), when walking on land we'll make a call to a new function called discoverIslands. If we're currently controlling the boat, then we'll set Game's `island` to null. This is what causes the HUD to display "Ocean" when we're not on a island (we could also have tested in the HUD if we're in the boat before showing this text).
The discoverIslands follows:
static void discoverIslands(int x, int y)
{
	game.island = getIslandAt(x, y);

	if (!game.island->discovered)
	{
		game.island->discovered = 1;

		game.exploration++;

		addHudMessage(expiringFormattedString("Discovered the island of %s", game.island->name), 0, 200, 255);
	}
}
This is a simple function that looks up the island at the given location (`x`, `y`). Note that this function is expected to find an island, and will never return NULL. We then check if the island's `discovered` flag is set. If not, we'll mark the island as having been `discovered`, increase Game's `exploration` count, and also display a message on the HUD, informing the player of the island they have found.
That's all we need to do for the overworld. The town movement is just as simple, as we'll see in moveTown:
static void moveTown(int dx, int dy)
{
	int   n, x, y;
	Town *t;

	// snipped

	if (n < TT_WALL)
	{
		game.map->player->x = x;
		game.map->player->y = y;

		visitBuildings(x, y);
	}
}
When walking normally in town, we're now making a call to a new function called visitBuildings:
static void visitBuildings(int x, int y)
{
	Building    *b;
	BoundingBox *bb;
	Town        *t;

	game.building = NULL;

	t = (Town *)game.town->data;

	for (b = t->buildingHead.next; b != NULL; b = b->next)
	{
		bb = &b->bounds;

		if (x >= bb->x1 && y >= bb->y1 && x <= bb->x2 && y <= bb->y2)
		{
			game.building = b;

			if (!b->visited)
			{
				b->visited = 1;

				game.exploration++;

				t->numBuildingsVisited++;
			}
		}
	}
}
Here, we're simply looping through all of the current town's buildings, and testing to see whether the player is currently within any of their bounds (`x` and `y`). If so, we're setting Game's `building` to it (`b`). We're also testing if the building has been `visited` yet. If not, we're marking it as such, and also bumping Game's `exploration` and the Town's `numBuildingsVisited` stats. Note that we're first setting Game's building to NULL, so that be default we're not inside one.
That's all there is to player.c. We're nearly done; we have just a few misc changes to look at. To begin with, we should investigate the changes we've made to town.c and overworld.c. These are very straightforward changes, that we won't spend much time on.
First of all, we've updated `logic` for both:
static void logic(void)
{
	// snipped

	doCamera();

	doHud();
}
We're now calling doHud.
The changes to `draw` follows:
static void draw(void)
{
	drawMap(tiles);

	drawEntities();

	drawHud();
}
We're calling drawHud in both cases, to render the HUD.
More exploration stats are handled in the enterTown function in town.c:
void enterTown(Entity *e)
{
	Town *t;

	// snipped

	if (!t->discovered)
	{
		t->discovered = 1;

		game.exploration++;

		decorate();

		// snipped
	}

	// snipped
}
When first entering a town, we're bumping Game's `exploration` count.
We've also made an addition to the `draw` function, where we're calling a new function named drawBuildings:
static void drawBuildings(void)
{
	Building *b;
	Town     *t;
	int       x, y, mx, my;

	t = (Town *)game.town->data;

	for (b = t->buildingHead.next; b != NULL; b = b->next)
	{
		if (!b->visited)
		{
			for (x = b->bounds.x1 + 1; x <= b->bounds.x2 - 1; x++)
			{
				for (y = b->bounds.y1 + 1; y <= b->bounds.y2 - 1; y++)
				{
					mx = x - game.map->camera.x;
					my = y - game.map->camera.y;

					if (mx >= 0 && my >= 0 && mx < MAP_RENDER_WIDTH && my < MAP_RENDER_HEIGHT)
					{
						drawRect(mx * MAP_TILE_SIZE, my * MAP_TILE_SIZE, MAP_TILE_SIZE, MAP_TILE_SIZE, 0, 0, 0, 192);
					}
				}
			}
		}
	}
}
For all the buildings in the current town, those that haven't been `visited` yet will have their interiors darkened. This is just a little extra on top of removing the doors from buildings, giving the player a better indication of whether they have been inside.
Now over to overworld.c, where we can take a look at the getIslandAt function that is used by player.c:
Island *getIslandAt(int x, int y)
{
	Island *is;
	RLE    *rle;

	for (is = game.overworld.islandHead.next; is != NULL; is = is->next)
	{
		if (x >= is->bounds.x1 && y >= is->bounds.y1 && x <= is->bounds.x2 && y <= is->bounds.y2)
		{
			for (rle = &is->rle[x - is->bounds.x1]; rle != NULL; rle = rle->next)
			{
				if (y >= rle->start && y <= rle->end)
				{
					return is;
				}
			}
		}
	}

	SDL_LogMessage(SDL_LOG_CATEGORY_APPLICATION, SDL_LOG_PRIORITY_CRITICAL, "No island exists at %d,%d", x, y);

	exit(1);
}
This is where our RLE data really comes in handy. Way back in Part 3, we created this data when setting up our islands. Here, we can see how it is properly used.
For each island in the overworld, we're first testing if the player is inside its bounding box (`bounds`). This is a fast fail test, to let us quickly move on to another island if we're nowhere near it. Next, we're looping through all the RLE data at the island's relative location to the player (note that we're subtracting the island's bounds' `x1` value from the input `x`, to get the correct part of the RLE index). We're then testing if the input `y` value falls between any of the RLE's `start` and `end` points (inclusive). If so, we're standing on the island.
As you can probably tell, this is very fast, since it only has to perform a few checks whenever the player moves.
Note how we're bailing if an island doesn't exist, by calling `exit`. This shouldn't be possible in our code, since the player cannot walk anywhere that's not on an island (and when sailing, this check is not performed). Later, this same code will be used for quests, so it will be very important that it never selects a location that isn't on an island. This might seem heavy handed, but this code should never fail to find an island in our game; we'll never use it when selecting a random location on the world map, for example.
As we prepare to wrap things up, let's look at where else we're calculating our exploration data. First, to islands.c, where we've tweaked collectIslands:
static void collectIslands(void)
{
	int     x, y, id;
	Island *is;
	double  r, g, b;

	id = 0;

	for (x = 0; x < WORLD_WIDTH; x++)
	{
		for (y = 0; y < WORLD_HEIGHT; y++)
		{
			if (data[x][y] == LAND_VALUE)
			{
				is = createIsland(x, y, id);

				if (is != NULL)
				{
					// snipped

					game.overworld.numIslands++;

					game.totalExploration++;

					// snipped
				}
				else
				{
					// snipped
				}
			}
		}
	}
}
We're incrementing both the Overworld's numIslands and Game's totalExploration, to aid with our island discovery.
Over in townGen.c, we've updated generateTown:
void generateTown(Entity *e)
{
	Town *t;
	long  then;

	// snipped

	game.overworld.numTowns++;

	game.totalExploration++;

	SDL_LogMessage(SDL_LOG_CATEGORY_APPLICATION, SDL_LOG_PRIORITY_INFO, "Created town '%s' (%ldms)", e->name, SDL_GetTicks() - then);
}
Both Overworld's numTowns and Game's totalExploration get bumped, so that towns are factored into our exploration.
Entering buildings also counts to our total, as we can see in addBuildings:
static void addBuildings(Town *t)
{
	int          n, i, x, y;
	Building    *b, *prev;
	BoundingBox *bb;

	n = MIN_TOWN_BUILDINGS + rand() % (MAX_TOWN_BUILDINGS - MIN_TOWN_BUILDINGS);

	game.totalExploration += n;

	// snipped
}
Game's totalExploration is increased by the total number of buildings (`n`) we generate for this town.
Finally, let's have a look at setEntityBlipColour in entities.c:
void setEntityBlipColour(Entity *e, SDL_Color *c)
{
	c->r = c->g = c->b = 0;

	if (!e->hidden)
	{
		switch (e->type)
		{
			case ET_ADVENTURER:
				c->r = 255;
				c->g = 255;
				c->b = 0;
				break;

			case ET_BOAT:
				c->r = 0;
				c->g = 255;
				c->b = 255;
				break;

			case ET_SETTLEMENT:
				if (((Town *)e->data)->discovered)
				{
					c->r = 0;
					c->g = 255;
					c->b = 0;
				}
				break;

			default:
				break;
		}
	}
}
By default, we're setting the color (`c`) to pure black, which will be ignored by the maps when they process the entities. Next, we check if the entity is not `hidden` (as the player will be when entering a boat), and then check its `type`, updating the color as required. Note that Towns will not be shown on the map until they are `discovered`. We're always going to allow the player to find boats, and these will show up as light blue on both maps.
And we're done! Phew! If you made it through all of that, give yourself a pat on the back! There was a lot to it, and due to the nature of the exploration, things are somewhat scattered. Still, you should now have a good idea of how we want to handle the exploration and stats in our game - every island, town, and building will contribute to the total exploration, encouraging the player to find everything, to hit that 100% mark.
What's next? Well, it won't have escaped your attention that the Quest Log has a number of tabs - Quests, Islands, Towns, Inventory. These could do with populating, so we can understand how they work. So, in the next part we'll do just that, and explain how each one operates, and helps with our journey.
Purchase
The source code for all parts of this tutorial (including assets) is available for purchase, as part of the SDL2 tutorials bundle:
From itch.io