PC Games
• Orb
• Lasagne Monsters
• Three Guys Apocalypse
• Water Closet
• Blob Wars : Attrition
• The Legend of Edgar
• TBFTSS: The Pandoran War
• Three Guys
• Blob Wars : Blob and Conquer
• Blob Wars : Metal Blob Solid
• Project: Starfighter
• TANX Squadron
Tutorials
• 2D shoot 'em up
• 2D top-down shooter
• 2D platform game
• Sprite atlas tutorial
• Working with TTF fonts
• 2D adventure game
• Widget tutorial
• 2D shoot 'em up sequel
• 2D run and gun
• Roguelike
• Medals (Achievements)
• 2D turn-based strategy game
• 2D isometric game
• 2D map editor
• 2D mission-based shoot 'em up
• 2D Santa game
• 2D split screen game
• 2D quest game
• SDL 1 tutorials (outdated)
Latest Updates
The Legend of Edgar 1.38
Thu, 1st January 2026
SDL2 Quest game tutorial
Wed, 7th May 2025
SDL2 Versus game tutorial
Wed, 20th March 2024
Download keys for SDL2 tutorials on itch.io
Sat, 16th March 2024
The Legend of Edgar 1.37
Mon, 1st January 2024
Tags
• battle-for-the-solar-system (10)
• blob-wars (10)
• brexit (1)
• code (6)
• edgar (10)
• games (45)
• lasagne-monsters (1)
• making-of (5)
• match3 (1)
• numberblocksonline (1)
• orb (2)
• site (1)
• tanx (4)
• three-guys (3)
• three-guys-apocalypse (3)
• tutorials (18)
• water-closet (4)
Books

Alysha
When her village is attacked and her friends and family are taken away to be sold as slaves, Alysha Tanner sets out on a quest across the world to track them down and return them home. Along the way, she is aided by the most unlikely of allies - the world's last remaining dragon.
— An old-school isometric game —
Part 2: Selecting tiles
Note: this tutorial assumes knowledge of C, as well as prior tutorials.


Introduction
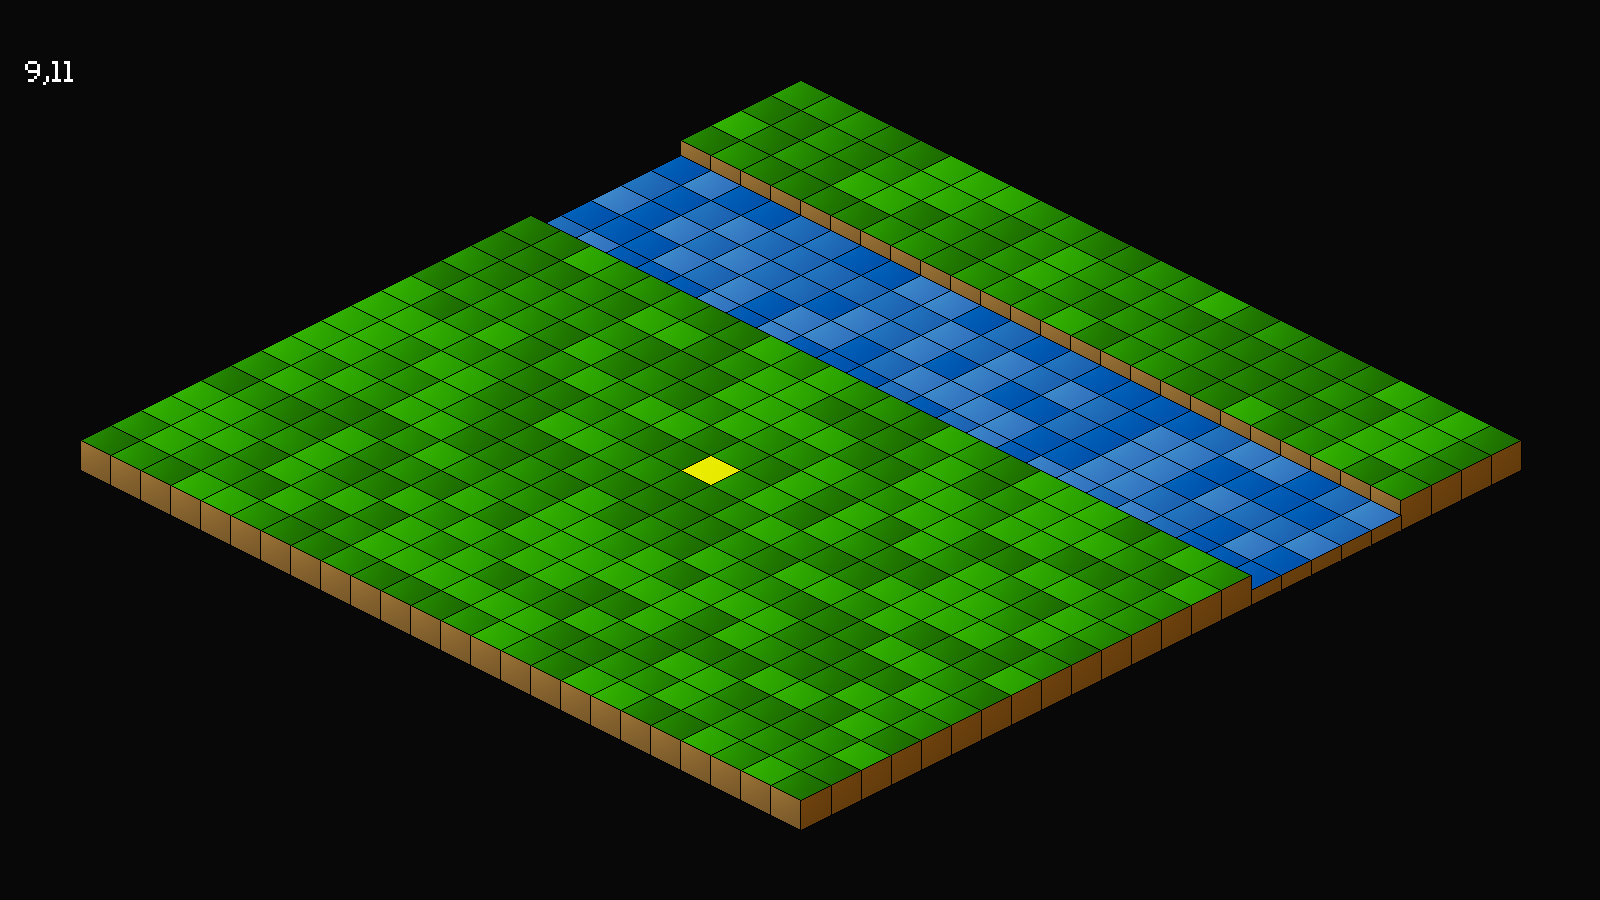
Now that we can render our map, the next step is to be able to select tiles, using the mouse. In our game, we'll be selecting tiles for the main character to move to. Picking tiles is fairly straightforward and really just requires some reverse calculations from our isometric projection.
Extract the archive, run cmake CMakeLists.txt, followed by make, and then use ./isometric02 to run the code. You will see a window open like the one above. Move the mouse cursor around the map to highlight tiles. The tile's x and z values are shown in the top-left. Note that we can only highlight ground tiles (the green ones); moving the cursor over a water tile (blue ones) won't highlight it (but the indexes will still update on screen). Once you're finished, close the window to exit.
Inspecting the code
Selecting tiles isn't too hard, thankfully, so this is a short part. In fact, things will be getting easier from here on out, compared to part 1.
Let's look at structs.h first, where we've updated the World struct:
typedef struct {
	MapTile map[MAP_SIZE][MAP_SIZE];
	struct {
		int x;
		int z;
	} cursor;
} World;
We've added in an anonymous struct called `cursor`, that will hold our selected `x and `z` values.
Nothing else to do here, so let's move onto world.c, where we've made a few changes. Starting with `logic`:
static void logic(void)
{
	doISOObjects();

	doCursor();
}
We're now calling a function named doCursor, that we can see below:
static void doCursor(void)
{
	double sx, sy;

	sx = app.mouse.x - (TILE_WIDTH / 2);
	sy = app.mouse.y - (TILE_HEIGHT / 2);

	sx -= MAP_RENDER_OFFSET_X;
	sy -= MAP_RENDER_OFFSET_Y;

	world.cursor.x = round(((sx / TILE_WIDTH) - (sy / TILE_HEIGHT)));
	world.cursor.z = round(((sx / TILE_WIDTH) + (sy / TILE_HEIGHT)));
}
This function is responsible for converting our mouse's `x` and `y` coordinates into a tile index. Basically, a reverse toISO.
First off, we want to substract half our tile's width and height from our mouse's `x` and `y` values, so that we're handling the tile from the middle, and assigning the results to `sx` and `sy`. Next, we need to substract our map rendering offsets. If we don't do this, our tile selection will be off by about half a screen in both directions. With this, we have a screen coordinate that aligns with the middle of a tile.
Finally, we're dividing `sx` and `sy` by TILE_WIDTH and TILE_HEIGHT, and doing some addition and subtraction, and assigning the final results to World's cursor's `x` and `z`. Notice how we're using doubles for `sx` and `sy`, and rounding the result. Integer maths will fail us here, due to us needing to round half up to correctly match our tile. We want, for example, a value of 1.67 to be rounded up to 2. A value of 1.42 would remain as 1. One can see this in action by removing the round function call. Notice how when this is removed the tile selection is off by about half a tile.
There are plenty of other ways to figure out screen coordinates to isometric coordinates, this being just one of them.
We now have our selected tile index stored, so we can render it. Before we leave world.c, just note we've also updated the `draw` function:
static void draw(void)
{
	clearISOObjects();

	drawMap();

	drawISOObjects();

	drawHud();
}
We're calling a function named drawHud, that we'll see towards the end of this part. For now, let's head over to map.c, where we've made a couple of updates.
To begin with, we've tweaked drawMap:
void drawMap(void)
{
	int x, z, n;

	for (x = 0 ; x < MAP_RENDER_SIZE ; x++)
	{
		for (z = 0 ; z < MAP_RENDER_SIZE ; z++)
		{
			n = world.map[x][z].tile;

			if (n >= 0)
			{
				if (n >= 10 && n < 20 && x == world.cursor.x && z == world.cursor.z)
				{
					addISOObject(x, z, 0, 0, selectedTileTexture);
				}
				else
				{
					addISOObject(x, z, 0, 0, tiles[n]);
				}
			}
		}
	}
}
Now, after testing if `n` is greater than 0, we're testing if it falls between 10 and 19, and also if `x` and `z` are equal to World's cursor's `x` and `z`. This will mean that the current rendered tile is our selected tile. If so, we're calling addISOObject, but passing over a new texture called selectedTileTexture. Our test for `n` being between 10 and 19 means that this will only affect ground tiles. If the cursor is over a water tile, we'll render the water tile as normal. Note that this piece of logic is temporary for our game; we'll be stripping it out in a later part and replacing it with something that adheres more to the structure we'll be introducing.
We've also updated loadTiles:
static void loadTiles(void)
{
	int i;
	char filename[MAX_FILENAME_LENGTH];

	for (i = 0 ; i < MAX_TILES ; i++)
	{
		sprintf(filename, "gfx/tiles/%d.png", i);

		tiles[i] = getAtlasImage(filename, 0);
	}

	selectedTileTexture = getAtlasImage("gfx/tiles/exit.png", 1);
}
We've added a single line, to load selectedTileTexture (notice how we're making use of an image called exit.png, that we'll be using properly in a later part).
Nice and simple. Before we finish up, let's look at hud.c. This is a new file that will ultimately be used to display useful information to the player.
First up is drawHud:
void drawHud(void)
{
	drawInfo();
}
We're simply calling a function named drawInfo:
static void drawInfo(void)
{
	char text[64];

	sprintf(text, "%d,%d", world.cursor.x, world.cursor.z);
	drawText(text, 25, 50, 255, 255, 255, TEXT_ALIGN_LEFT, 0);
}
drawInfo itself a simple function - we're formatting a string called `text`, to include World's cursor's `x` and `z` values, and then passing those to our drawText function (defined in text.c).
And that's it! We can now select tiles by moving the mouse cursor over them. We've now made it to two major milestones in our game, giving our a solid foundation to work with in future parts. In the next part, we're going to introduce entities, to show how we can handle layered rendering.
Purchase
The source code for all parts of this tutorial (including assets) is available for purchase:
From itch.io
It is also available as part of the SDL2 tutorial bundle: