PC Games
• Orb
• Lasagne Monsters
• Three Guys Apocalypse
• Water Closet
• Blob Wars : Attrition
• The Legend of Edgar
• TBFTSS: The Pandoran War
• Three Guys
• Blob Wars : Blob and Conquer
• Blob Wars : Metal Blob Solid
• Project: Starfighter
• TANX Squadron
Tutorials
• 2D shoot 'em up
• 2D top-down shooter
• 2D platform game
• Sprite atlas tutorial
• Working with TTF fonts
• 2D adventure game
• Widget tutorial
• 2D shoot 'em up sequel
• 2D run and gun
• Roguelike
• Medals (Achievements)
• 2D turn-based strategy game
• 2D isometric game
• 2D map editor
• 2D mission-based shoot 'em up
• 2D Santa game
• 2D split screen game
• 2D quest game
• SDL 1 tutorials (outdated)
Latest Updates
The Legend of Edgar 1.38
Thu, 1st January 2026
SDL2 Quest game tutorial
Wed, 7th May 2025
SDL2 Versus game tutorial
Wed, 20th March 2024
Download keys for SDL2 tutorials on itch.io
Sat, 16th March 2024
The Legend of Edgar 1.37
Mon, 1st January 2024
Tags
• battle-for-the-solar-system (10)
• blob-wars (10)
• brexit (1)
• code (6)
• edgar (10)
• games (45)
• lasagne-monsters (1)
• making-of (5)
• match3 (1)
• numberblocksonline (1)
• orb (2)
• site (1)
• tanx (4)
• three-guys (3)
• three-guys-apocalypse (3)
• tutorials (18)
• water-closet (4)
Books

H1NZ
Arriving on the back of a meteorite, an alien pathogen has spread rapidly around the world, infecting all living humans and animals, and killing off all insect life. Only a handful are immune, and these survivors cling desperately to life, searching for food, fresh water, and a means of escape, find rescue, and discover a way to rebuild.
— Sprite Atlas Tutorial —
Part 2: Creating the atlas texture
Note: this tutorial assumes knowledge of C, as well as prior tutorials.


Introduction
In the previous tutorial, we looked into preparing the files we want to use in our atlas by recursively listing files in a directory. In this step, we'll actually use the information gathered to produce our atlas. This is where the real meat of the tool comes into play. Extract the archive, run cmake CMakeLists.txt, followed by make, and then ./gen02 to create the atlas. It will produce a file called atlas.png. If you open this, you will see an image like the one above.
The tool works by taking an empty image (or rather, rectangle) and subdividing it as it places images, essentially creating two children of the root. The parent itself is marked as being in use. When the next image processed, it will look for an empty node into which it can fit, walking down the chain of nodes, before subdividing. The process continues in this way until all the images have been processed. Don't worry if you don't get the concept. All will become clear as we step through the code.
Inspecting the code
First up, we've added a new struct to structs.h:
struct Node {
	int x;
	int y;
	int w;
	int h;
	int used;

	struct Node *child;
};
This struct will be used to hold the data about a node and its children (showing how it was subdivided). We'll see a lot more of this guy in a bit. As before, we'll move onto main. main is now a somewhat long function, so we'll look at it in stages.
root = malloc(sizeof(Node));

root->x = 0;
root->y = 0;
root->w = atlasSize;
root->h = atlasSize;
root->used = 0;
One of the first things we want to do is create a root node, and make it the same size as the atlas itself. The x and y coordinates are set to 0,0, while the w and h (width and height) are set to the atlas's size. We also tell the root node that it is not currently being used. This root node is the one we will start with when placing images.
Next, we want to create an SDL surface:
atlas = SDL_CreateRGBSurface(0, atlasSize, atlasSize, 32, 0x000000ff, 0x0000ff00, 0x00ff0000, 0xff000000);
As with the root node, we create a surface of the same size as the atlas itself. This is the surface upon which all our images will be placed when we make the atlas.
Now for the main for-loop. There's quite a bit to it.
for (i = 0 ; i < numImages ; i++)
{
	rotated = 0;

	w = images[i].surface->w;
	h = images[i].surface->h;

	n = findNode(root, w, h);

	if (n == NULL)
	{
		rotated = 1;

		n = findNode(root, h, w);
	}

	if (n != NULL)
	{
		if (rotated)
		{
			n->h = w;
			n->w = h;
			rotations++;
		}

		dest.x = n->x;
		dest.y = n->y;
		dest.w = n->w;
		dest.h = n->h;

		if (!rotated)
		{
			SDL_BlitSurface(images[i].surface, NULL, atlas, &dest);
		}
		else
		{
			blitRotated(images[i].surface, atlas, dest.x, dest.y);
		}

		printf("[%04d / %04d] %s\n", i + 1, numImages, images[i].filename);
	}
	else
	{
		printf("[ERROR] Couldn't add '%s'\n", images[i].filename);

		fails++;
	}

	SDL_FreeSurface(images[i].surface);
	free(images[i].filename);
}
In summary, the loop is going through each of the images that we have been loaded and locating a node on the atlas in which to place it, via the findNode function. If the first attempt to locate a node fails, the node search will be called again, but this time with the w and h swapped. In effect, this is rotating the image to see if it can fit that way instead. Upon successfully finding a node, the image will be blitted into the node space (being rotated if need be). The progress will be logged, and failures output. Finally, the loaded image and the allocated filename are freed. Overall, it's quite straightforward. However, the findNode function is extremely important to the success of the atlas creation, so we should look into how it works.
static Node *findNode(Node *root, int w, int h)
{
	if (root->used)
	{
		Node *n = NULL;

		if ((n = findNode(&root->child[0], w, h)) != NULL || (n = findNode(&root->child[1], w, h)) != NULL)
		{
			return n;
		}
	}
	else if (w <= root->w && h <= root->h)
	{
		splitNode(root, w, h);

		return root;
	}

	return NULL;
}
We check the input node (root) and check to see if it's being used (meaning that an image is already occupying the space). If so, we descend into the children, checking the first and second to see if they are in use. If the first child is unused, it will be returned, otherwise the result of the second will be returned (which may be null). Pay close attention here: the check with the children calls findNode again, as this is a recursive function!
Now comes the fun bit. If we find a node that is unused, and the node is big enough to accommodate the image we wish to insert (by testing the input w and h against the node's width and height to see if both are smaller or equal), we will use it. Using the node involves splitting it. We're doing this in the splitNode function, as below:
static void splitNode(Node *node, int w, int h)
{
	node->used = 1;

	node->child = malloc(sizeof(Node) * 2);

	memset(node->child, 0, sizeof(Node) * 2);

	node->child[0].x = node->x + w + padding;
	node->child[0].y = node->y;
	node->child[0].w = node->w - w - padding;
	node->child[0].h = h;

	node->child[1].x = node->x;
	node->child[1].y = node->y + h + padding;
	node->child[1].w = node->w;
	node->child[1].h = node->h - h - padding;
}
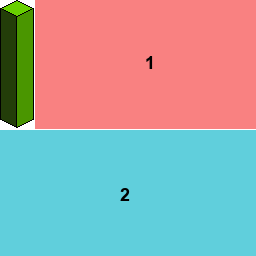
The first thing the function does is mark the candidate root as being in use. It then creates two child nodes, with the input node as their parent. The first node is told to occupy the space to the right of the space the incoming image will occupy, based on the width and height (w + h) inputs. The second child will be told to occupy the space below these two. As this can be hard to visualize just by looking at the code, consider the image below:
When the next image is inserted, and assuming we have determined that node #1 will be the node we will use, the splitting will be carried on that node, resulting in the following:
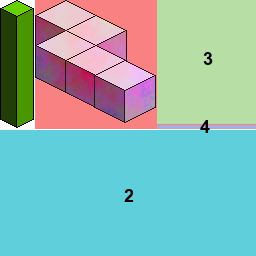
Node #1 now has two child nodes, #3 and #4. Notice how thin node #4 is. Only very small images could fit in there. But the atlas gen program would figure that out for us, making optimal use of all the space available. Something to keep in mind: the first child is ALWAYS to the right of the image and the first node to be checked. This is why we sort the images by their height, so we can build our atlas from left-to-right, then top to bottom.
This process will happen for each image, effectively breaking the root node down into many different cells, into which images can be placed. One thing to keep note of it the padding variable. This adds extra space between the images, on the right-side and the bottom. The reason for this is to avoid texture bleed. When images are placed adjacent to each other, texture bleed can result when applying. This means that part of one image (usually no more than a pixel's worth) will also be used. This mostly happens when using decimals (due to rounding issues), rather than integers as we're doing here, but it's still worth padding the padding to avoid the issue.
With our node selected, it comes time to blit the image to the main atlas. If the image was rotated, we want to swap the w and h variables and call the special blitRotated function:
static void blitRotated(SDL_Surface *src, SDL_Surface *dest, int destX, int destY)
{
	int x, y, p, dx, dy;

	dy = 0;

	for (x = 0 ; x < src->w ; x++)
	{
		dx = src->h - 1;

		for (y = 0 ; y < src->h ; y++)
		{
			p = getPixel(src, x, y);

			putPixel(destX + dx, destY + dy, p, dest);

			dx--;
		}

		dy++;
	}
}
This function simply copies the pixels from the source to the destination, copying them in an ordered way to have them output rotated clockwise. As you can see, it's quite a simple function, so we won't say any more on it. Rotating is actually quite rare, so for most other images we will use the standard SDL_BlitSurface function.
Finally, with all of that done, we can save the atlas. SDL provides a handy function for doing this, taking just the surface and the filename as parameters:
IMG_SavePNG(atlas, "atlas.png");
We're saving the atlas as a PNG to preserve the transparency and ensure it is stored in a loseless format. The last function we'll touch on is that which handles the command liness arguments:
static void handleCommandLine(int argc, char *argv[])
{
	int i;

	/* defaults */
	atlasSize = 256;
	rootDir = "gfx";
	padding = 1;

	for (i = 0 ; i < argc ; i++)
	{
		if (strcmp(argv[i], "-size") == 0)
		{
			atlasSize = atoi(argv[i + 1]);
		}
		else if (strcmp(argv[i], "-dir") == 0)
		{
			rootDir = argv[i + 1];
		}
		else if (strcmp(argv[i], "-padding") == 0)
		{
			padding = atoi(argv[i + 1]);
		}
	}
}
We can specify the size of the atlas by using the -size argument, followed by a number (ideally, this should be a power of two). Specify the directory to scan by using -dir, followed the by the path, and adjust the padding by using the -padding argument. For example, the following will create an atlas of 1024x1024, using images found in a directory called sprites (relative to the binary), and with a padding of 5 pixels between images:
./gen -size 1024 -dir sprites -padding 5
Be aware that there is no error checking performed on these inputs, so be sensible with the arguments supplied.
We now only have one step remaining in the creation of our sprite atlas, and that's to store the coordinate data of each of the images that we've added to our atlas. This is obviously vital if we're going to be able to make use of the atlas, otherwise we will have no way to retreiving our sprites. We'll look at this in the next tutorial.
Purchase
The source code for all parts of this tutorial (including assets) is available for purchase:
From itch.io
It is also available as part of the SDL2 tutorial bundle: