PC Games
• Orb
• Lasagne Monsters
• Three Guys Apocalypse
• Water Closet
• Blob Wars : Attrition
• The Legend of Edgar
• TBFTSS: The Pandoran War
• Three Guys
• Blob Wars : Blob and Conquer
• Blob Wars : Metal Blob Solid
• Project: Starfighter
• TANX Squadron
Tutorials
• 2D shoot 'em up
• 2D top-down shooter
• 2D platform game
• Sprite atlas tutorial
• Working with TTF fonts
• 2D adventure game
• Widget tutorial
• 2D shoot 'em up sequel
• 2D run and gun
• Roguelike
• Medals (Achievements)
• 2D turn-based strategy game
• 2D isometric game
• 2D map editor
• 2D mission-based shoot 'em up
• 2D Santa game
• 2D split screen game
• 2D quest game
• SDL 1 tutorials (outdated)
Latest Updates
The Legend of Edgar 1.38
Thu, 1st January 2026
SDL2 Quest game tutorial
Wed, 7th May 2025
SDL2 Versus game tutorial
Wed, 20th March 2024
Download keys for SDL2 tutorials on itch.io
Sat, 16th March 2024
The Legend of Edgar 1.37
Mon, 1st January 2024
Tags
• battle-for-the-solar-system (10)
• blob-wars (10)
• brexit (1)
• code (6)
• edgar (10)
• games (45)
• lasagne-monsters (1)
• making-of (5)
• match3 (1)
• numberblocksonline (1)
• orb (2)
• site (1)
• tanx (4)
• three-guys (3)
• three-guys-apocalypse (3)
• tutorials (18)
• water-closet (4)
Books
The Battle for the Solar System (Complete)
The Pandoran war machine ravaged the galaxy, driving the human race to the brink of destruction. Seven men and women stood in its way. This is their story.
— Simple 2D adventure game —
Part 5: Inventory management
Note: this tutorial assumes knowledge of C, as well as prior tutorials.


Introduction
We can now interact with other entities, picking up gold and having the value added to our current stash. The next thing we want to do is allow for items to be carried in an inventory. In this tutorial, we'll see how that can be done. When designing this system, we've decided that our prisoner can only carry two items at once. There is therefore some inventory management to be done, to allow for items to be dropped.
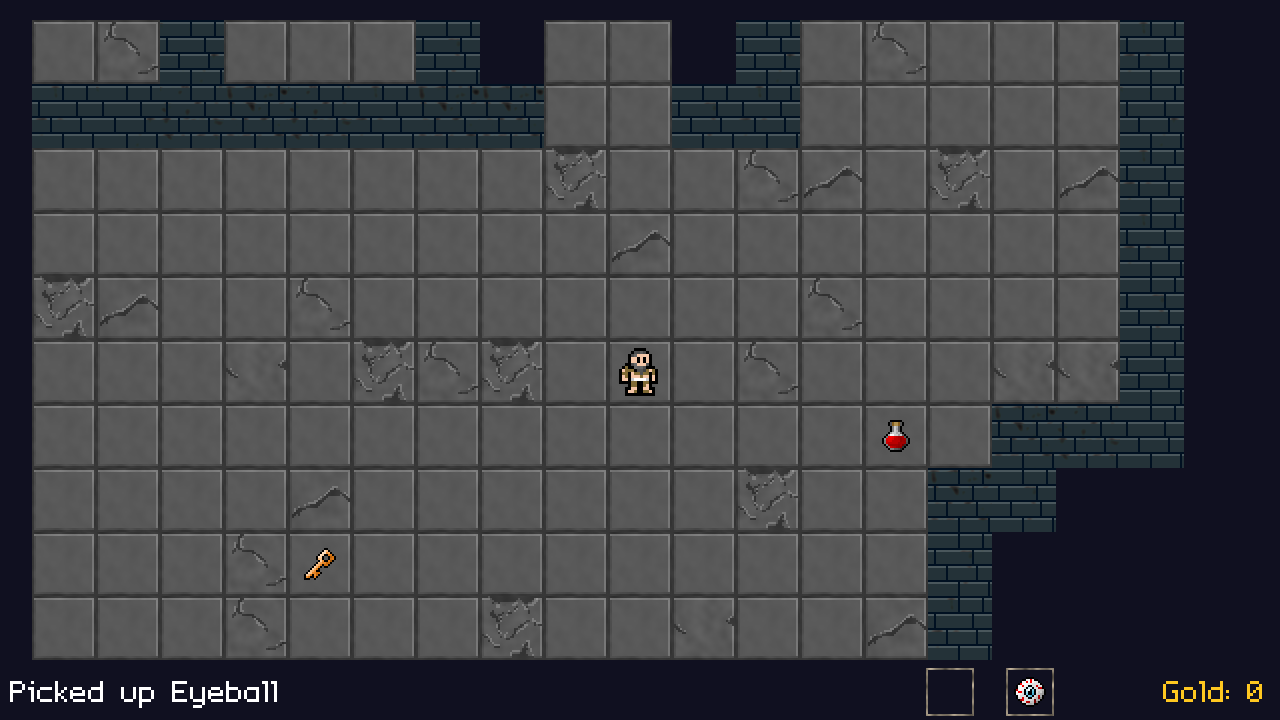
Extract the archive, run cmake CMakeLists.txt, followed by make, and then use ./adventure05 to run the code. You will see a window open like the one above, showing the prisoner on a tiled background. Use WASD to move around. Walk into the any of the items to pick them up. While carrying items, you can be Tab to open the inventory view. The W, S, Up, and Down keys will choose the currently selected item. Press Return to drop the item where you're standing, or press Escape or Tab again to exit the inventory. Only one item can occupy a space at a time. Close the window to exit.
Inspecting the code
There have been quite a few code changes here, not least of all introducing the whole inventory system in inventory.c. As always, we'll start with defs.h and structs.h before we go any further. defs.h has introduced a new define, to declare how many inventory slots we have:
#define NUM_INVENTORY_SLOTS 2
Just the two, as we've decided that our prisoner, dressed in little other than rags, only has two hands in which to hold the items he comes across (money goes into that magical video game purse, that allows one to drag about millions in currency, without so much as a care). Next, we need to update structs.h to define the inventory itself. It is rather simple:
typedef struct {
	int gold;
	Entity *inventorySlots[NUM_INVENTORY_SLOTS];
} Prisoner;
The inventory itself is part of the Prisoner struct, and is little more than an array of entity pointers. This means that when we collect an item, we have a reference to it, so that we know its name, texture, and all the rest.
With those setup, let's look at inventory.c itself, which is where all the inventory management will come into play. We'll start with initInventory:
void initInventory(void)
{
	slotArrow = getAtlasImage("gfx/hud/inventoryArrow.png", 1);
}
This function merely grabs an AtlasImage to use and drawing the inventory. We're doing it here, so that we only grab the image once, as there's no point looking it up once we've already got it. Next, we come to initInventoryView, which is invoked when we press Tab to open the inventory view:
void initInventoryView(void)
{
	Entity *e;

	selectedSlot = 0;

	slotArrowPulse = 0;

	canDrop = 1;

	for (e = dungeon.entityHead.next ; e != NULL ; e = e->next)
	{
		if (e != player && e->x == player->x && e->y == player->y)
		{
			canDrop = 0;
		}
	}

	app.delegate.logic = logic;
	app.delegate.draw = draw;
}
We're resetting some variables here, such as the inventory slot that is currently selected, and a variable called slotArrowPulse, which will be used to control the animation of the slot indicator arrow. We then declare that we're allowed to drop an item in this position, setting a variable called canDrop to 1. Next, we loop through all the entities in the dungeon, testing if there is anything other than the player occupying the same square (such as an item we've previously dropped or cannot pick up). If so, we set canDrop to 0, overriding our previous assertion. We then also set our logic and draw delegates to the static functions within this file.
Our logic function is where we handle all the player controls and the arrow animation:
static void logic(void)
{
	slotArrowPulse += (0.15 * app.deltaTime);

	if (app.keyboard[SDL_SCANCODE_W] || app.keyboard[SDL_SCANCODE_UP])
	{
		app.keyboard[SDL_SCANCODE_W] = app.keyboard[SDL_SCANCODE_UP] = 0;

		cycleSlot(-1);
	}

	if (app.keyboard[SDL_SCANCODE_S] || app.keyboard[SDL_SCANCODE_DOWN])
	{
		app.keyboard[SDL_SCANCODE_S] = app.keyboard[SDL_SCANCODE_DOWN] = 0;

		cycleSlot(1);
	}

	if (app.keyboard[SDL_SCANCODE_RETURN])
	{
		app.keyboard[SDL_SCANCODE_RETURN] = 0;

		if (canDrop)
		{
			dropSelectedItem();

			initDungeonView();
		}
	}

	if (app.keyboard[SDL_SCANCODE_TAB] || app.keyboard[SDL_SCANCODE_ESCAPE])
	{
		app.keyboard[SDL_SCANCODE_TAB] = app.keyboard[SDL_SCANCODE_ESCAPE] = 0;

		initDungeonView();
	}
}
We're incrementing our slotArrowPulse variable by a small amount each frame, to control the arrow animation. We'll see this in action in our draw function later. We then want to test our player controls. If we press W or Up (keyboard arrow), we want to change the currently selected slot. We do this by calling a function called cycleSlot and passing in -1 to say we want to move to the previous slot. Likewise, we test S and Down to see if either of those are pressed and, if so, call cycleSlot, passing over 1, which would mean moving to the next highest slot. In all cases, once a control has been processed we want to reset the values to 0 to stop them from being read again the next frame. If we didn't do this, it would be very hard to control the UI!
We then test if Return has been pressed. If so, we're going to try and drop the selected item. We test the value of canDrop to see if it's 1 (true) and call dropSelectedItem followed by initDungeonView, to exit the inventory. Nothing will happen if we cannot drop the item.
The last thing we want to do is test if Tab or Escape have been pressed, hinting that we want to exit the inventory view. If so, we'll just call initDungeonView to leave.
Our cycleSlot function comes next. It's simple function that merely changes the value of selectedSlot:
static void cycleSlot(int dir)
{
	selectedSlot += dir;

	slotArrowPulse = 0;

	if (selectedSlot < 0)
	{
		selectedSlot = NUM_INVENTORY_SLOTS - 1;
	}

	if (selectedSlot >= NUM_INVENTORY_SLOTS)
	{
		selectedSlot = 0;
	}
}
We'll add the value of dir to selectedSlot (which will either be -1 or 1 according to our earlier calls), and reset the arrow animation to 0. We do this to make it easier to view what has happened, since the arrow will immediately return next to the item slot, rather than away from it. With those done, we need to test the new value of selectedSlot. We need to wrap the value around if it's less than 0 or greater than or equal to NUM_INVENTORY_SLOTS. Since that value will be pointing at an array index, we have to ensure it doesn't go out of bounds. We could clamp the value, but typically players like these sorts of thing to wrap to the top and bottom if you're at either end of a list.
Doing all this just for two inventory slots might seem a bit much, but it gives scope to increase the number of slots in future, if one desired. In our case, we could just increase the value of NUM_INVENTORY_SLOTS to grant more carrying capacity, and the cycleSlot function would happily handle it. There would be athestic changes needed to the UI, however.
We now come to the dropSelectedItem function, and one can immediately see how using an array of entity pointers is helping us here:
static void dropSelectedItem(void)
{
	Prisoner *p;
	Entity *e;

	p = (Prisoner*) player->data;

	if (p->inventorySlots[selectedSlot] != NULL)
	{
		e = p->inventorySlots[selectedSlot];

		e->x = player->x;
		e->y = player->y;

		addEntityToDungeon(e);

		p->inventorySlots[selectedSlot] = NULL;
	}
}
We first extract the Prisoner object from the player's data variable, then check to see if we have an item in the selectedSlot of our inventorySlots. If so, we grab the entity into a temporary variable (for no other purpose than to increase readability), and assign its x and y values to those of the player. In effect, it is now in the same location as the player. Next, we need to return it to the dungeon, doing so by calling addEntityToDungeon and passing the entity data over (we'll see more on this later). With all that done, we NULL the current inventory slot to say nothing is carried there any more.
That's our logic steps all taken care of, now we can look at the rendering. Starting with the main draw function:
static void draw(void)
{
	drawMap();

	drawEntities();

	drawRect(0, 0, SCREEN_WIDTH, SCREEN_HEIGHT, 0, 0, 0, 128);

	drawInventorySlots();

	if (canDrop)
	{
		drawText("[ENTER] Drop item", SCREEN_WIDTH / 2, SCREEN_HEIGHT - 100, 255, 255, 255, TEXT_ALIGN_CENTER, 0);
	}
	else
	{
		drawText("Can't drop anything here", SCREEN_WIDTH / 2, SCREEN_HEIGHT - 100, 190, 190, 190, TEXT_ALIGN_CENTER, 0);
	}
}
As we're now pointing our app.delegate.draw at the draw function contained in this file, the draw function in dungeon.c won't be called any more. That means that the map and entity rendering won't be happening. So, we need to do them here, with calls to drawMap and drawEntities. If we didn't do this, then when we press Tab, we'd get a black background. Having drawn the map and entities, we then draw a black rectangle across the entire screen, with an alpha value of 128. This will effectively dim the screen by 50%, means the map and entities will be darker than what we draw next.
With that done, we make a call to drawInventorySlots, which we'll see in a bit, and then some help text. What help text we display depends on the value of canDrop. If we canDrop is 1 (meaning we can) we render some text instructing the player to press Enter to drop the current item. If canDrop is 0, we inform them that they can't drop anything here.
Coming next to drawInventorySlots, we can see that it basically loops through our inventory slots and draw things accordingly:
static void drawInventorySlots(void)
{
	int i, x, y;
	Prisoner *p;

	p = (Prisoner*) player->data;

	for (i = 0 ; i < NUM_INVENTORY_SLOTS ; i++)
	{
		x = (SCREEN_WIDTH / 2) - 100;
		y = 250 + (i * 128);

		drawRect(x - 64, y - 48, 350, 96, 0, 0, 0, 255);

		drawOutlineRect(x - 64, y - 48, 350, 96, 255, 255, 255, 255);

		if (p->inventorySlots[i] != NULL)
		{
			blitAtlasImageScaled(p->inventorySlots[i]->texture, x, y, 64, 64, 1);

			drawText(p->inventorySlots[i]->name, x + 64, y - 22, 255, 255, 255, TEXT_ALIGN_LEFT, 0);
		}
		else
		{
			drawText("(empty)", x + 64, y - 22, 160, 160, 160, TEXT_ALIGN_LEFT, 0);
		}

		if (i == selectedSlot)
		{
			blitAtlasImage(slotArrow, (x - 100) + (sin(slotArrowPulse) * 16), y, 1, SDL_FLIP_NONE);
		}
	}
}
For each of our slots, we draw an black box with an outline. If there's an item in the slot (the entity pointer isn't NULL), we blit the entity with a called to blitAtlasImageScaled. This will render the object larger than usual, at 64 x 64 pixels. We then render the name of the item next to it. There are some assumptions here made about the size of the entities and the position of the text, but our calculations will work just fine in this instance. If there's no item in the slot, we draw some text that simply says "(empty)". Before completing the loop, we test to see if the slot is the currently selected one (selectedSlot). If so, we want to draw our slotArrow image on the left-hand side. We're making use of slotArrowPulse here, passing it into math.h's sin function. This will results in an out value between -1 and 1, depending on the value of slotArrowPulse. Since we're constantly incrementing slotArrowPusle in our logic step, the value will constantly move between -1 and 1. We then multiply this by 16, resulting in the arrow shifting -16 and 16 on the x axis, making it pulse.
The final function to look at in inventory.c is one that handles adding entities to the player's inventory:
int addToInventory(Entity *e)
{
	Prisoner *p;
	int i;

	p = (Prisoner*) player->data;

	for (i = 0 ; i < NUM_INVENTORY_SLOTS ; i++)
	{
		if (p->inventorySlots[i] == NULL)
		{
			p->inventorySlots[i] = e;

			removeEntityFromDungeon(e);

			return 1;
		}
	}

	return 0;
}
This function is rather simple. We loop through all our inventory slots for the Prisoner, looking for one that is NULL. Finding one, we assign the given entity (e) to it, and then remove the entity from the dungeon, with a call to removeEntityFromDungeon. This step is important, so that the entity doesn't remain in the dungeon to be interacted with. We'll see how it works in a little bit. Having successfully added the item to our inventory, we return 1 (true). Otherwise, if we check all our inventory slots and discover none are available, we return 0 (false).
That's everything for inventory.c. We can now look at the changes made to the other compilation units, starting with entities.c. We've added a few function here that are used by the inventory system. Starting with addEntityToDungeon:
void addEntityToDungeon(Entity *e)
{
	e->next = NULL;

	dungeon.entityTail->next = e;
	dungeon.entityTail = e;
}
Pretty obvious what's happening here - we're passing in an Entity and then adding it to the dungeon's entity tail, and setting the entity tail to be the passed in entity. We're also ensuring that the entity's next is NULL, in order to prevent us from entering into a loop when traversing the list. The other function that we added is removeEntityFromDungeon. This resembles the doEntities function in a way:
void removeEntityFromDungeon(Entity *remove)
{
	Entity *e, *prev;

	prev = &dungeon.entityHead;

	for (e = dungeon.entityHead.next ; e != NULL ; e = e->next)
	{
		if (e == remove)
		{
			if (e == dungeon.entityTail)
			{
				dungeon.entityTail = prev;
			}

			prev->next = e->next;

			remove->next = NULL;
		}

		prev = e;
	}
}
We're looping through all the entities in the dungeon, looking for the one that we want to remove. When we find it, we remove it from the list, and then set the removed entity's next to NULL, again to ensure that it is no longer pointing to anything in the rest of the dungeon.
It's time to add some new entities to interact with. In this tutorial, we've got an eyeball, a rusty key, and a red potion. All three of these will be classed as items that can be picked up. As such, the only thing that changes between them is their name and their texture. We can therefore have a single function to define them:
void initItem(char *name, int x, int y, char *texture)
{
	Entity *e;

	e = spawnEntity();
	STRCPY(e->name, name);
	e->x = x;
	e->y = y;
	e->texture = getAtlasImage(texture, 1);

	e->touch = touch;
}
initItem take all the relevant details of the item, its name, coordinates, and texture, and creates an entity from them. It also sets up the common touch function:
static void touch(Entity *self, Entity *other)
{
	char message[64];

	if (other == player)
	{
		if (addToInventory(self))
		{
			memset(message, 0, sizeof(message));

			sprintf(message, "Picked up %s", self->name);

			setInfoMessage(message);
		}
		else
		{
			setInfoMessage("Can't carry anything else.");
		}
	}
}
While the touch function for the gold coins always removes the gold by setting it to ALIVE_DEAD, this function tests if the touching entity is the player and then attempts to add itself to the player's inventory, by calling addToInventory. If the call succeeds, we create a message using sprintf to say we've picked up the item, passing the item's name into the function. We then call setInfoMessage to display the message to the player. If the item can't be picked up (because the player's inventory is full), we call setInfoMessage with a message saying so. Pretty easy, right?
Adding these items to the dungeon is just as the same as we have done before with the gold and the chest. We simply call the initItem function and pass all to relevant details over. We'll do this in initDungeon, in dungeon.c:
void initDungeon(void)
{
	initMap();

	initEntities();

	initPlayer();

	initHud();

	initItem("Rusty key", 18, 17, "gfx/entities/rustyKey.png");

	initItem("Eyeball", 23, 14, "gfx/entities/eyeball.png");

	initItem("Red Potion", 27, 15, "gfx/entities/redPotion.png");

	dungeon.renderOffset.x = (SCREEN_WIDTH - (MAP_RENDER_WIDTH * TILE_SIZE)) / 2;
	dungeon.renderOffset.y = 20;

	app.delegate.logic = &logic;
	app.delegate.draw = &draw;
}
Here, we're now calling initItem for all three of the items we wish to add, placing them at set locations. While we're in dungeon.c, we should look at unitDungeonView, as called by inventory.c. There's not much to it:
void initDungeonView(void)
{
	app.delegate.logic = &logic;
	app.delegate.draw = &draw;
}
The function merely restores the logic and draw delegates to those of the dungeon, so it can handle the logic and render things as expected.
We're done with the bulk of the changes now, so we can spend some time looking at the misc. changes before wrapping up this part of the tutorial. Starting with player.c, we've added a test to doPlayer, to see if the Tab key was pressed:
void doPlayer(void)
{
	moveDelay = MAX(0, moveDelay - app.deltaTime);

	if (moveDelay == 0)
	{
		if (app.keyboard[SDL_SCANCODE_A])
		{
			movePlayer(-1, 0);

			player->facing = FACING_LEFT;
		}

		if (app.keyboard[SDL_SCANCODE_D])
		{
			movePlayer(1, 0);

			player->facing = FACING_RIGHT;
		}

		if (app.keyboard[SDL_SCANCODE_W])
		{
			movePlayer(0, -1);
		}

		if (app.keyboard[SDL_SCANCODE_S])
		{
			movePlayer(0, 1);
		}

		if (app.keyboard[SDL_SCANCODE_TAB])
		{
			app.keyboard[SDL_SCANCODE_TAB] = 0;

			initInventoryView();
		}
	}
}
If Tab is pressed, we want to call initInventoryView to open the inventory display (and zero tab, so that it doesn't immediately exit again). In hud.c, we're loading a new AtlasImage, to act as the frame around our held inventory items:
void initHud(void)
{
	memset(infoMessage, 0, sizeof(infoMessage));

	inventorySlotFame = getAtlasImage("gfx/hud/inventorySlotFrame.png", 1);

	infoMessageTimer = 0;
}
The frame is then being used in the new drawInventory function:
static void drawInventory(void)
{
	int i, x;
	Prisoner *p;

	p = (Prisoner*) player->data;

	for (i = 0 ; i < NUM_INVENTORY_SLOTS ; i++)
	{
		x = (SCREEN_WIDTH - 250) - (i * 80);

		blitAtlasImage(inventorySlotFame, x, SCREEN_HEIGHT - 28, 1, SDL_FLIP_NONE);

		if (p->inventorySlots[i] != NULL)
		{
			blitAtlasImage(p->inventorySlots[i]->texture, x, SCREEN_HEIGHT - 28, 1, SDL_FLIP_NONE);
		}
	}
}
In this function, we're basically drawing a frame for each possible inventory slot (up to NUM_INVENTORY_SLOTS), from right to left, and then drawing the item in that slot, if one is available.
Before we finish up, we'll take a quick look at two new functions we've added to draw.c. Each one is used for drawing rectangles, using SDL's in-built function. First up, drawRect:
void drawRect(int x, int y, int w, int h, int r, int g, int b, int a)
{
	SDL_Rect rect;
	rect.x = x;
	rect.y = y;
	rect.w = w;
	rect.h = h;

	SDL_SetRenderDrawBlendMode(app.renderer, a < 255 ? SDL_BLENDMODE_BLEND : SDL_BLENDMODE_NONE);
	SDL_SetRenderDrawColor(app.renderer, r, g, b, a);
	SDL_RenderFillRect(app.renderer, &rect);
}
The function takes a position (x and y) and dimensions (w and h) of the rectangle we wish to draw, and also the RGBA values of the rectangle. We start by setting up an SDL_Rect, using the position and dimensions. We then set up the rendering options by first calling SDL_SetRenderDrawBlendMode and either setting the mode to SDL_BLENDMODE_BLEND or SDL_BLENDMODE_NONE, depending on the value of alpha. If alpha is 255, meaning it's completely opaque, we set the blend mode to SDL_BLENDMODE_NONE. Otherwise, we tell the renderer we want to blend the colours. Next, we call SDL_SetRenderDrawColor, passing over the RGBA values we've specified. Finally, we call SDL_RenderFillRect, passing over the SDL_Rect we set up, so that the rectangle is actually drawn.
The drawOutlineRect funciton is largely the same, except we're calling SDL_RenderDrawRect instead of SDL_RenderFillRect:
void drawOutlineRect(int x, int y, int w, int h, int r, int g, int b, int a)
{
	SDL_Rect rect;
	rect.x = x;
	rect.y = y;
	rect.w = w;
	rect.h = h;

	SDL_SetRenderDrawBlendMode(app.renderer, a < 255 ? SDL_BLENDMODE_BLEND : SDL_BLENDMODE_NONE);
	SDL_SetRenderDrawColor(app.renderer, r, g, b, a);
	SDL_RenderDrawRect(app.renderer, &rect);
}
That's our inventory management phase done. There was a quite a lot to it, as you can see. But it provides a great new gameplay element, allowing us to move items around the dungeon. Next, we'll look at how this inventory management can be used when interacting with other entities.
Purchase
The source code for all parts of this tutorial (including assets) is available for purchase:
From itch.io
It is also available as part of the SDL2 tutorial bundle: